🧢 Beautiful ✨ Detailed πŸ’ Adorable

Turtles Amigurumi Pattern

Turtles Amigurumi Pattern
4.1β˜… Rating
5-7 Hours Time Needed
1.6K Made This
βœ‚οΈ

Intermediate Level

Ideal for those with basic crochet experience, featuring slightly more advanced stitches and techniques to expand your skills.

⏱️

Weekend Treat

Takes 5-7 hours, making it an enjoyable project to finish over a couple of days.

πŸ₯

Charming Critter

Delightful animal designs with sweet details that capture the essence of your favorite woodland and farmyard friends.

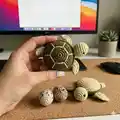
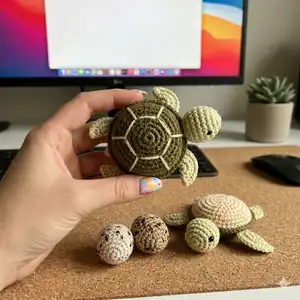
About This Turtles Amigurumi Pattern

This pattern teaches you how to crochet tiny turtle toys using spiral amigurumi technique and YarnArt Jeans yarn. You will make the carapace in two contrasting details, plus head, paws and tail, then assemble and embroider the shell. It’s perfect for small gifts, decorations or keychain charms.

Turtles Amigurumi Pattern crochet pattern - detailed view of completed project

Clear, photo-supported steps show how to stuff and sew pieces together for a neat finish. The pattern includes full round-by-round instructions and abbreviations for easy following.

Why You'll Love This Turtles Amigurumi Pattern

I absolutely love this pattern because it captures the sweet personality of turtles in a tiny, makeable form. I enjoy the combination of small, precise pieces and the relaxing repetition of rounds while you shape each part. The two-layer carapace technique provides a lovely texture and a satisfying embroidery step that really makes the shell pop. I find these make perfect little gifts and display pieces β€” they are quick to make and always bring smiles.

Turtles Amigurumi Pattern step 1 - construction progress Turtles Amigurumi Pattern step 2 - assembly progress Turtles Amigurumi Pattern step 3 - details and accessories Turtles Amigurumi Pattern step 4 - final assembly and finishing

Switch Things Up

I love how easy it is to customize these turtles: change the shell and body colors to create different species or seasonal versions.

I often make pastel colorways for baby gifts and bright contrasting shells for playful decorations.

If you want a chunkier turtle, choose a bulkier cotton yarn and a larger hook; the overall shape will remain the same but bigger and cuddlier.

To make a tiny keychain version, use fingering weight yarn and a 1.5 mm hook, then add a small split ring before finishing the top rounds.

I sometimes substitute safety eyes with embroidered eyes for baby-safe toys and a softer look.

Embroider different shell patterns β€” hexagons, spirals, or dots β€” to create unique personalities for each turtle.

Try adding a tiny scarf or a miniature shell applique in a contrasting color to make seasonal or themed turtles.

I recommend experimenting with textured stitches on the carapace detail to create an embossed look for a more realistic shell.

Use variegated yarn for the carapace to get natural shading without changing colors manually β€” it adds instant interest.

For a gift set, make an egg and a turtle in matching colors and package them together for a charming presentation.

Common Mistakes & How to Fix Them

βœ— Skipping the step to work in a spiral without SL ST or CH will create visible seams; follow the instruction to work continuously in spiral to keep the surface smooth. βœ— Not stuffing the carapace before closing will make assembly difficult and the shell may collapse; stuff the carapace with syntepu h (polyester stuffing) firmly but not overfilled. βœ— Forgetting to mark the start of rounds causes miscounts during increases; use a stitch marker to mark the first stitch of each round and move it as you go. βœ— Sewing parts without pinning first can result in uneven placement; pin or baste parts in position to check symmetry before permanently stitching them in place.

Turtles Amigurumi Pattern

Create charming tiny turtles with this easy-to-follow crochet amigurumi pattern. You will crochet small shells, heads, paws and tails, then assemble and embroider the carapace for a delightful finish. The pattern uses YarnArt Jeans cotton-blend yarn and simple shaping techniques to make adorable, gift-ready turtles. Clear round-by-round instructions and helpful assembly photos guide you through every step.

Intermediate 5-7 Hours

Materials Needed for Turtles Amigurumi Pattern

β€” Main Fabric

  • 01
    YarnArt Jeans (50 g / 150 m, 1.76 oz / 174 yds), 55% cotton / 45% pac, Fine 2 - Basic Color 01 (white) - 1 or more skeins (50g each)
  • 02
    YarnArt Jeans (50 g / 150 m, 1.76 oz / 174 yds), 55% cotton / 45% pac, Fine 2 - Basic Color 11 (light green) - 1 skein (50g)
  • 03
    YarnArt Jeans (50 g / 150 m, 1.76 oz / 174 yds), 55% cotton / 45% pac, Fine 2 - Basic Color 82 (dark green) - 1 skein (50g)

β€” Tools Required

  • 01
    Crochet hook No. 2.25 mm (C) - Soft Touch (or equivalent)
  • 02
    Crochet hook No. 1.5 mm (Gamma) - for finer details (optional)
  • 03
    Scissors
  • 04
    Stitch markers
  • 05
    Tapestry/yarn needle for sewing and weaving ends
  • 06
    2 Buttons for eyes (or safety eyes alternative)
  • 07
    Small beads (optional)
  • 08
    Polyester stuffing (syntepu h)
  • 09
    Pins for assembly

Progress Tracker

0% Complete

β€” Introductory Lesson :

Info :

THE TOY IS MADE IN SPIRAL, WITHOUT ANY SL ST OR CH

β€” Carapace (1 detail) (Basic color 82) :

Round 1 :

1 R: 8 SC IN MC (8)

Round 2 :

2 R: 8 INC (16)

Round 3 :

3 R: (1 SC, INC)*8 (24)

Round 4 :

4 R: 1 SC, INC, (2 SC, INC)*7, 1 SC (32)

Round 5 :

5 R: (3 SC, INC)*8 (40)

Round 6 - 8 :

6 R - 8 R: 40 SC (40)

β€” Carapace (2 detail) (Basic color 11) :

Round 1 :

1 R: BLO: 8 SC IN MC (8)

Round 2 :

2 R: BLO: 8 INC (16)

Round 3 :

3 R: BLO: (1 SC, INC)*8 (24)

Round 4 :

4 R: BLO: 1 SC, INC, (2 SC, INC)*7, 1 SC (32)

Round 5 :

5 R: BLO: (3 SC, INC)*8 (40)

Round 6 :

6 R: BLO: 40 SC (40)

Info :

NOW YOU SHOULD CROCHET 2 DETAILS AROUND (DETAIL 1 + DETAIL 2). !!! HERE YOU NEED TO FILL THE CARAPACE WITH SYNTEPUH

β€” Head (Basic color 11) :

Round 1 :

1 R: 6 SC IN MC (6)

Round 2 :

2 R: 6 INC (12)

Round 3 :

3 R: (1 SC, INC)*6 (18)

Round 4 - 7 :

4 R - 7 R: 18 SC (18)

Round 8 :

8 R: (1 SC, DEC)*6 (12)

Round 9 :

9 R: 6 DEC (6)

Info :

FASTEN OFF LEAVING A TAIL ABOUT 15 CM LONG AND CUT THE YARN. USING A TAPESTRY NEEDLE, WEAVE THE YARN TAIL THROUGH THE FRONT LOOP OF EACH STITCH AND PULL TIGHT TO CLOSE.

Info :

WEAVE IN THE END.

β€” Paws (4 pieces) (Basic color 11) :

Round 1 :

1 R: 8 SC IN MC (8)

Round 2 :

2 R: 8 INC (16)

Info :

FOLD THE PIECE IN HALVES AND WORK SC

β€” Tail (Basic color 11) :

Round 1 :

1 R: 5 CH (5)

Round 2 :

2 R: 1 SC IN THE SECOND CH FROM HOOK, 3 SC (4)

β€” Assembly and Embroidery :

Item Name (P1) :

SEW THE PAWS TO THE CARAPACE

Item Name (P2) :

SEW THE HEAD TO THE CARAPACE. SEW YOUR EYES TO YOUR HEAD

Infos :

EMBROIDER THE CARAPACE LINES WITH A CONTRASTING YARN TO CREATE THE SHELL PATTERN. PIN PIECES BEFORE SEWING TO CHECK PLACEMENT.

β€” Egg (1 detail) (Color 01) :

Round 1 :

1 R: 8 SC IN MC (8)

Round 2 :

2 R: 8 INC (16)

Round 3 :

3 R: (1 SC, INC)*8 (24)

Round 4 :

4 R: 1 SC, INC, (2 SC, INC)*7, 1 SC (32)

Round 5 :

5 R: 32 SC (32)

Round 6 :

6 R: (3 SC, INC)*8 (40)

Round 7 :

7 R: 2 SC, INC, (4 SC, INC)*7, 2 SC (48)

Round 8 - 14 :

8 R - 14 R: 48 SC (48)

Round 15 :

15 R: (4 SC, DEC)*8 (40)

Round 16 - 17 :

16 R - 17 R: 40 SC (40)

Info :

FASTEN AND CUT THE THREAD, LEAVE A LONG YARN TAIL.

β€” Egg (2 detail) (Color 01) :

Round 1 :

1 R: 8 SC IN MC (8)

Round 2 :

2 R: 8 INC (16)

Round 3 :

3 R: 16 SC (16)

Round 4 :

4 R: (1 SC, INC)*8 (24)

Round 5 - 6 :

5 R - 6 R: 24 SC (24)

Round 7 :

7 R: 1 SC, INC, (2 SC, INC)*7, 1 SC (32)

Round 8 - 9 :

8 R - 9 R: 32 SC (32)

Round 10 :

10 R: (3 SC, INC)*8 (40)

Round 11 - 12 :

11 R - 12 R: 40 SC (40)

Round 13 :

13 R: 7 CH ...

Round 13 (cont) :

...1 SC IN THE EIGHTH CH FROM HOOK...

Round X :

...39 SC (39)

Info :

FASTEN AND CUT THE THREAD, LEAVE A LONG YARN TAIL. SEW DETAIL 1 AND DETAIL 2.

β€” Button (Color 01) :

Round 1 :

1 R: 8 SC IN MC (8)

Assembly Instructions

  • Sew the paws to the carapace by positioning them evenly around the edge and stitching securely with a yarn needle and matching yarn.
  • Sew the head to the carapace at the front opening, aligning the neck to the shell and securing with small whipstitches so it sits centered and stable.
  • Attach eyes to the head (sew on buttons or insert safety eyes) and embroider nostrils or mouth if desired before final sewing.
  • Stuff the carapace with polyester stuffing (syntepu h) before closing the opening and sewing the two carapace details together to maintain shell shape.
  • Embroider shell lines on the carapace using contrasting yarn after all pieces are sewn; stitch through both layers to secure the embroidery and hide ends.

Important Notes

  • πŸ’‘Work in continuous spiral rounds without joining with slip stitch or chains to avoid visible seams and keep a smooth surface.
  • πŸ’‘Use stitch markers to mark the first stitch of each round and move the marker up as you crochet to maintain accurate stitch counts.
  • πŸ’‘Stuff parts gradually and evenly to avoid lumps; fill the carapace before closing and adjust stuffing during assembly for the best shape.
  • πŸ’‘Pin pieces in place and check symmetry before sewing; use a long yarn tail to baste pieces and test placement before final stitching.

These tiny turtles are small treasures made with a lot of love and simple materials. They are quick to make, great for gifts, and perfect for practicing amigurumi shaping and embroidery. Make a family of turtles in different colors and enjoy the cheerful results. 🧢🐒

You ask,

we answer.

FAQs

What size will the finished piece be?

The finished turtle measures approximately 6-8 cm across depending on your tension and yarn, when using the recommended YarnArt Jeans and 2.25 mm hook.

Can I use different yarn weights for this pattern?

Yes, you can use different yarn weights but the final size will change; choose an appropriate hook for your yarn and adjust stuffing and assembly accordingly.

Do I need prior crochet experience for this pattern?

This pattern is rated intermediate; basic knowledge of single crochet, increases, decreases and working in the round is recommended for best results.

How long does this project typically take to complete?

Most crocheters finish a single turtle in about 5-7 hours, depending on experience and the amount of detail or embroidery you choose to add.