🧢 Beautiful ✨ Detailed πŸ’ Adorable

Dino Noodle Amigurumi Pattern

Dino Noodle Amigurumi Pattern
4.8β˜… Rating
5-7 Hours Time Needed
3.7K Made This
βœ‚οΈ

Intermediate Level

Ideal for those with basic crochet experience, featuring slightly more advanced stitches and techniques to expand your skills.

⏱️

Weekend Treat

Takes 5-7 hours, making it an enjoyable project to finish over a couple of days.

🧸

Cute Companion

An adorable friend to cherish, handcrafted with love to bring comfort and joy for years to come.

About This Dino Noodle Amigurumi Pattern

This pattern creates a charming little dinosaur amigurumi holding a bowl of spaghetti with lots of playful details. You will crochet multiple small parts including head, body, limbs, tail, spikes and a separate bowl with noodles. The instructions include round-by-round counts, color changes, and joining guidance so you can assemble with confidence.

Dino Noodle Amigurumi Pattern crochet pattern - detailed view of completed project

Includes clear abbreviations, materials list and step-by-step rounds for each piece. Perfect for makers who enjoy small toys with character and finishing details.

Why You'll Love This Dino Noodle Amigurumi Pattern

I absolutely love this pattern because it combines classic amigurumi shaping with a whimsical accessory that brings the character to life. I enjoy how the little details β€” like the layered lower lip and tiny spikes down the back β€” give so much personality with simple stitches. I also love that the bowl of spaghetti adds a playful scene and a chance to practice different construction techniques. Making one of these always brightens my day and I hope you enjoy creating yours as much as I do.

Dino Noodle Amigurumi Pattern step 1 - construction progress Dino Noodle Amigurumi Pattern step 2 - assembly progress Dino Noodle Amigurumi Pattern step 3 - details and accessories Dino Noodle Amigurumi Pattern step 4 - final assembly and finishing

Switch Things Up

I love customizing the color palette; try soft pastels for a nursery-friendly friend or bold contrasting colors for a playful look.

I sometimes make the dinosaur bigger or smaller by changing yarn weight and hook size β€” bulky yarn with a bigger hook makes a chunky plush, while finer yarn makes mini keychain versions.

I like adding embroidered facial expressions to change the personality, such as a big smile, sleepy eyes, or surprised eyebrows β€” these small changes are impactful.

Swap the bowl color and noodle color to create different food themes, like green pesto noodles or pink frosting for a dessert-themed companion.

I also experiment by adding tiny clothes or accessories, like a scarf or a little hat, sewn on after assembly for seasonal variations.

For more durable play versions, I reinforce sewn joints with extra stitches and shorter thread tails so parts stay secure during handling.

To make a standing version, I alter leg placement and add internal stability with tightly stuffed bases or a small piece of cardboard inside the bowl for balance.

I enjoy mixing textures β€” try a fluffy yarn for the noodle pieces or a cotton yarn for the bowl to change drape and feel.

I sometimes add safety eyes or embroider eyes depending on the intended recipient; embroidered eyes are great for baby-safe toys.

I recommend experimenting with placement of the spikes and tail length to create unique silhouettes β€” small adjustments create lots of variety.

Common Mistakes & How to Fix Them

βœ— Skipping stitch markers during round increases will cause miscounted stitches; use a stitch marker at the beginning of each round to ensure accurate increases and decreases. βœ— Understuffing the head or body makes flattening and misshaping likely; stuff gradually and firmly, adding fiberfill as you shape to maintain smooth curves. βœ— Pulling your tension inconsistently results in uneven stitch size and troublesome seams; maintain a consistent tension and check gauge visually as you work. βœ— Rushing the joining of parts may create crooked limbs; pin parts into position and check placement before sewing to ensure symmetry and the correct pose.

Dino Noodle Amigurumi Pattern

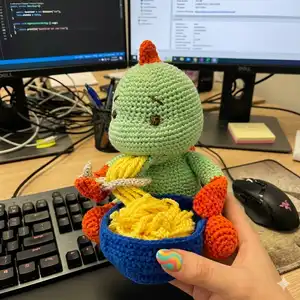
Make a lovable dinosaur enjoying a bowl of spaghetti with this detailed amigurumi pattern. You will crochet the head, body, tail, arms, legs, dinosaur back spikes, a bowl and spaghetti pieces with clear step-by-step rounds and photos for reference. Perfect for gifting or decorating, this pattern highlights playful details like layered lips and a textured bowl of noodles to personalize.

Intermediate 5-7 Hours

Materials Needed for Dino Noodle Amigurumi Pattern

β€” Main Fabric

  • 01
    Yarn - main color Green (MAIN COLOR)
  • 02
    Color A - Blue (BOWL)
  • 03
    Color B - Orange (DETAILS: spikes, hands, feet)
  • 04
    Color C - Yellow (SPAGHETTI)
  • 05
    Use yarn appropriate for a 2.5 mm hook or a hook size that fits your chosen yarn

β€” Tools Required

  • 01
    Crochet hook size 2.5 mm or a size that fits your yarn
  • 02
    Scissors
  • 03
    Polyester stuffing
  • 04
    Tapestry needle for sewing and weaving ends
  • 05
    Stitch marker
  • 06
    Pins for assembly
  • 07
    Awl or similar tool to straighten layered pieces

Progress Tracker

0% Complete

β€” Head & Body :

Round 1-6 :

sc in a mr

Round 2 :

sc inc(12)

Round 3 :

(6 times)1 sc into sc next inc(18)

Round 4 :

(6 times)2 sc into sc next inc(24)

Round 5 :

(6 times)3 sc into sc next inc(30)

Round 6 :

(6 times)4 sc into sc next inc(36)

Round 7 :

(6 times)5 sc into sc next inc(42)

Round 8 :

(6 times)6 sc into sc next inc(48)

Round 9 :

(6 times)7 sc into sc next inc(54)

Round 10-15 :

(6 ring)sc into sc(54)

Round 16-20 :

sc into sc(14 sc inc)20 sc into sc(68)

Round 17-23 :

(7 ring)sc into sc(68)

Round 24 :

20 sc into sc(14 sc dec)20 sc into sc(54)

Round 25 :

(6 times)7 sc into sc next dec(48)

Round 26 :

(6 times)6 sc into sc next dec(42)

Round 27 :

(6 times)5 sc into sc next dec(36)

Round 28 :

(6 times)4 sc into sc next dec(30)

Info :

Tightly fill the head

Round 29-31 :

(3 ring)sc into sc(30)

Round 32 :

(6 times)4 sc into sc next inc(36)

Round 33 :

(6 times)5 sc into sc next inc(42)

Round 34 :

(6 times)6 sc into sc next inc(48)

Round 35 :

(6 times)7 sc into sc next inc(54)

Round 36-43 :

(8 ring)sc into sc(54)

Round 44 :

in flo sc into sc(54)

Round 45-58 :

(14 ring)sc into sc(54)

Round 59 :

In flo sc into sc(54)

Round 60 :

(6 times)7 sc into sc next dec(48)

Round 61 :

(6 times)6 sc into sc next dec(42)

Round 62 :

(6 times)5 sc into sc next dec(36)

Round 63 :

(6 times)4 sc into sc next dec(30)

Round 64 :

(6 times)3 sc into sc next dec(24)

Round 65 :

(6 times)2 sc into sc next dec(18)

Round 66 :

(6 times)1 sc into sc next dec(12)

Round 67 :

6 sc dec fo.

β€” Lower Lip :

Round 1-6 :

sc in a mr

Round 2 :

sc inc(12)

Round 3 :

sc into sc(12)

Round 4 :

(6 times)1 sc into sc next inc(18)

Round 5 :

sc into sc (18)

Round 6 :

(6 times)2 sc into sc next inc(24)

Round 7 :

sc into sc(24)

Round 8 :

Straighten it. Dip the awl into both layers. 12 sc fo. Leave a long thread end to sew.

β€” Tail :

Round 1-6 :

sc in a mr

Round 2 :

sc into sc(6)

Round 3 :

2 sc inc(8)

Round 4 :

sc into sc(8)

Round 5 :

2 sc inc(10)

Round 6 :

sc into sc(10)

Round 7 :

2 sc inc(12)

Round 8 :

sc into sc(12)

Round 9 :

(6 times)1 sc into sc next inc(18)

Round 10-16 :

(7 ring)sc into sc(18)

Round 17 :

(2 times)8 sc into sc next inc(20)

Round 18 :

(2 times)9 sc into sc next inc(22)

Round 19 :

sc into sc(22)

Round 20 :

(2 times)10 sc into sc next inc(24)

Round 21 :

sc into sc(24)

Info :

Tightly fill the tail

Round 22 :

(6 times)4 sc into sc next inc(30)

Round 23-24 :

(2 ring)sc into sc(30)fo.Leave a long thread end to sew.

β€” Arms :

Note :

B COLOR - MAKE 2

Round 1-6 :

sc in a mr

Round 2 :

6 sc inc(12)

Round 3 :

sc into sc(12)

Round 4 :

2 sc inc(14)

Round 5-8 :

(4 ring)sc into sc(14)

Round 9 :

(4 times)2 sc into sc next dec(10)

Round 10 :

sc into sc(10)

Round 11 :

(5 times)1 sc into sc next inc(15)

Info :

Ana color-

Round 12-23 :

(12 ring)sc into sc(15)

Round 24 :

Straighten it. Dip the awl into both layers. 7 sc fo. Leave a long thread end to sew.

β€” Legs :

Note :

MAKE 2 - B COLOR

Round 1-6 :

sc in a mr

Round 2 :

6 sc inc(12)

Round 3 :

(6 times)1 sc into sc next inc(18)

Round 4 :

6 sc into sc(4 sc inc)6 sc into sc(22)

Round 5-7 :

(3 ring)sc into sc(22) Tightly fill the legs

Round 8 :

6 sc into sc(4 sc dec)6 sc into sc(18)

Round 9 :

7 sc into sc(2 sc dec)7 sc into sc(16)

Round 10-11 :

(2 ring)sc into sc(16)

Round 12 :

in flo sc into sc(16) MAIN COLOR

Round 13-20 :

(8 ring)sc into sc(16)

Round 21 :

Straighten it. Dip the awl into both layers. 8 sc fo. Leave a long thread end to sew.

Round 12 (Leg Details) :

in blo sc into sc(16)fo.clean the thread end.

β€” Spaghetti Bowl :

Note :

A COLOR

Round 1-6 :

sc in a mr

Round 2 :

6 sc inc(12)

Round 3 :

(6 times)1 sc into sc next inc(18)

Round 4 :

(6 times)2 sc into sc next inc(24)

Round 5 :

(6 times)3 sc into sc next inc(30)

Round 6 :

(6 times)4 sc into sc next inc(36)

Round 6 (continued) :

(6 times)5 sc into sc next inc(42)

Round 8 :

in flo sc into sc(42)

Round 9-10 :

(2 ring)sc into sc(42)

Round 11 :

in blo (6 times)6 sc into sc next inc(48)

Round 12 :

(6 times)7 sc into sc next inc(54)

Round 13 :

(6 times)8 sc into sc next inc(60)

Round 14-16 :

(3 ring)sc into sc(60)

Round 17 :

(6 times)7 sc into sc next dec(54)fo..

β€” Dinosaur Back :

Note :

B COLOR

Round 1-6 :

sc in a mr

Round 2 :

2 sc inc(8)

Round 3 :

2 sc inc(10)

Round 4 :

2 sc inc(12)

Round 5-6 :

(2 ring)sc into sc(12)fo.Leave a long thread end to sew.

β€” Spaghetties & Stick :

Note :

C COLOR - MAKE 7

Round 0 :

100 ch.

Stick - Light Brown Rnd 1 :

20 ch turn

Stick - Light Brown Rnd 2 :

20 ch into sc(40 sc)fo.Fold it up.

β€” Joining Parts :

Info :

Sew top of 1 sc "6 times" between eyes Rnd 14-15. there should be 8 sc between them.

Info :

Sew the tail back.

Info :

Sew sleeves to both sides, between rnd 30-33

Info :

Sew the legs to both sides, between rnd 55-59.

Info :

Sew the back to 2 heads, 2 body and tail ends.

Assembly Instructions

  • Sew top of 1 sc "6 times" between the eyes (between rounds 14-15) so there are 8 sc between them.
  • Sew the tail to the back at the tail base using the long thread end left from the tail; secure firmly and weave in ends.
  • Attach sleeves (arms) to both sides of the body between rounds 30-33, angle slightly forward and sew securely.
  • Position and sew the legs to both sides of the body between rounds 55-59, ensuring even spacing and stability for sitting pose.
  • Sew the dinosaur back (spikes) to the center back using the long thread ends, aligning with the back and tail for an even row of spikes.

Important Notes

  • πŸ’‘Use a 2.5 mm hook or a size that gives you firm stitches for amigurumi; adjust hook if your tension is loose or tight.
  • πŸ’‘Work in continuous rounds unless otherwise noted, and use a stitch marker to mark the beginning of each round for accurate shaping.
  • πŸ’‘Stuff parts firmly but gradually to maintain smooth shaping; overstuffing can distort the silhouette.
  • πŸ’‘Leave long thread ends when fastening off pieces that will be sewn on so you can easily join them and weave in ends neatly.

This sweet Dino Noodle amigurumi is a playful addition to your handmade toy collection and makes a charming gift for kids and collectors alike. The pattern includes small parts, a bowl and noodles to create a complete scene you can display or play with. Have fun personalizing colors and expressions as you crochet this character. 🧢🧡

You ask,

we answer.

FAQs

What size will the finished piece be?

The finished amigurumi measures around 20 cm in circumference and about 10 cm in length when using the recommended hook and yarn types.

Can I use different yarn weights for this pattern?

Yes, you can use different yarn weights, but this will affect the final size; choose an appropriate hook for your yarn and expect a proportionate size change.

Do I need prior crochet experience for this pattern?

This pattern is rated intermediate, so basic knowledge of single crochet, increases and decreases and sewing amigurumi parts is recommended for best results.

How long does this project typically take to complete?

Most crocheters complete this project in 5-7 hours, though time may vary based on experience level and working pace.