🧶 Beautiful ✨ Detailed 💝 Adorable

Toucan Amigurumi Pattern

Toucan Amigurumi Pattern
4.3★ Rating
5-7 Hours Time Needed
3.4K Made This
✂️

Intermediate Level

Ideal for those with basic crochet experience, featuring slightly more advanced stitches and techniques to expand your skills.

⏱️

Weekend Treat

Takes 5-7 hours, making it an enjoyable project to finish over a couple of days.

🐥

Charming Critter

Delightful animal designs with sweet details that capture the essence of your favorite woodland and farmyard friends.

About This Toucan Amigurumi Pattern

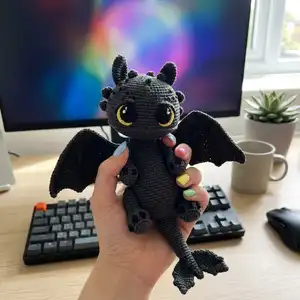
This pattern creates a cuddly toucan amigurumi with a colorful gradient beak and textured velvet body. You will crochet each element separately — eyes, beak (two beak options), body, wings, tail and legs — then assemble them for a polished finish. The instructions include exact round counts and helpful photos for placement and finishing.

Toucan Amigurumi Pattern crochet pattern - detailed view of completed project

Worked mainly in single crochet rounds with increases and decreases to shape each part. Uses plush/velvet yarn for a soft finished toy and bright colors for the beak.

Why You'll Love This Toucan Amigurumi Pattern

I absolutely love this pattern because the toucan's bright beak makes every piece a joy to stitch. I enjoy the mix of simple amigurumi shaping and small finishing details like embroidered feathers that bring personality. The pattern is structured so you can work part-by-part and see quick progress which keeps me motivated. I also love that you can choose either beak option to change the character's look and size.

Toucan Amigurumi Pattern step 1 - construction progress Toucan Amigurumi Pattern step 2 - assembly progress Toucan Amigurumi Pattern step 3 - details and accessories Toucan Amigurumi Pattern step 4 - final assembly and finishing

Switch Things Up

I love how easy it is to customize the beak colors to create different personalities — try pastel shades for a soft toy or neons for a playful look.

If you want a larger toy, I change to a bulkier velvet yarn and a larger hook for a chunkier friend.

To make a mini keychain version, I use thinner yarn and a smaller hook and add a keyring before finishing the beak.

I often swap the white eye patch for safety eyes instead of crocheting the pupils for a faster finish, but be careful with small parts if making for kids.

For texture variety I sometimes add surface slip-stitch markings or embroidered feathers for extra detail on the wings and back.

I also recommend experimenting with different wing shapes — longer or rounder wings change the silhouette a lot.

Try embroidering a smile or tiny eyebrows above the eye to change the expression and mood of your bird.

If you want posable legs or wings, I sometimes insert thin craft wire into the legs before stuffing to pose the toucan.

I like adding little accessories like a tiny crochet hat, bow or scarf to create themed versions for holidays or gifts.

Don’t be afraid to mix yarn brands — combining a smooth cotton beak with a plush body gives a really nice contrast in feel and look.

Common Mistakes & How to Fix Them

✗ Skipping stitch markers during rounds can lead to losing the start of a round; use a marker at the first stitch and move it every round to stay accurate. ✗ Not counting stitches after increases or decreases results in uneven shaping; count stitches at the end of each round, especially after shaping rounds. ✗ Stuffing too tightly or too loosely affects shape and seams; stuff gradually and evenly, adding small amounts to reach a firm but soft feel. ✗ Switching colors without securing tails can create gaps; weave in color change tails or carry yarn neatly and secure ends before finishing. ✗ Sewing parts without pinning can shift placement; pin or baste pieces in place and check spacing before permanently sewing them on.

Toucan Amigurumi Pattern

Make a bright, playful toucan plush you will love to display or gift. This pattern walks you through each piece — eyes, beak, body, wings, tail and legs — with clear step-by-step rounds. You will enjoy making the colorful beak and soft velvet body while learning useful assembly tips. Perfect for adding a handmade friend to your collection.

Intermediate 5-7 Hours

Materials Needed for Toucan Amigurumi Pattern

— Main Fabric

  • 01
    Himalaya Dolphin Baby (velvet) - Black - main body color (approx. 100-150g)
  • 02
    Himalaya Dolphin Baby (velvet) - White - eyes and face patch (small amount)
  • 03
    Himalaya Dolphin Baby (velvet) - Blue - small amount for eye accent and wing details
  • 04
    Himalaya Dolphin Baby (velvet) - Mint/Light grey - for wings and feet accents (small amount)
  • 05
    Himalaya Dolphin Baby (velvet) - Pink, Orange, Yellow - small amounts each for beak gradient (a bit in each color)
  • 06
    Yarn Art Jeans (or similar) - Black, White, Blue for crocheted eye details (small amounts)

— Tools Required

  • 01
    Crochet hook size 3.5 mm
  • 02
    Crochet hook size 2.0 mm (for eyes)
  • 03
    Toys stuffing (sintepon, holofiber)
  • 04
    Scissors
  • 05
    Large-eye sewing needle for joining parts
  • 06
    Yarn needle for weaving ends
  • 07
    Stitch markers
  • 08
    Pins for assembly and positioning

Progress Tracker

0% Complete

— Eyes :

Info :

Left and right eyes are crocheted different, with Yarn Art Jeans, using 2.0 mm hook

Left eye :

Round 1 : work in black, 6 sc into MR = 6 sc

Round 2 :

(inc)*6t = 12 sc

Round 3 :

(1 sc, inc)*6t = 18 sc

Round 4 :

work in blue, 2 sc, 3 inc, 2 sc, sl st (11 sts in blue in total), go on working in black, 10 sl st (21 sts)

Round 5 :

work in white, 1 sl st, (1 sc, inc)*3t, 1 sc, 3 sl st (14 sts), fasten off.

Round 6 :

turn the eye wrong side towards yourself and work 10 sl st in black. Leave 4 sc in white uncrocheted.

Right eye :

Round 1 : work in black, 6 sc into MR = 6 sc

Round 2 :

(inc)*6t = 12 sc

Round 3 :

(1 sc, inc)*6t = 18 sc

Round 4 :

work in blue, 1 sl st, 2 sc, 3 inc, 2 sc, (11 sts in blue in total), go on working in black, 10 sl st

Round 5 :

work in white, 3 sl st, 1 sc, (inc, 1 sc)*3t, 1 sl st (14 sts), fasten off.

Round 6 :

count the 5th st from the bottom of the round in white and place marker. Turn the eye wrong side towards yourself and work 9 sl st in black from the point you placed marker.

— Body :

Round 1 :

chain 2 in black, work 6 sc to the 2nd st from hook

Round 2 :

(inc)*6t = 12 sc

Round 3 :

(3 sc, 3 inc)*2t = 18 sc

Round 4 :

3 sc, (1 sc, inc)*3t, 3 sc, (1sc, inc)*3t = 24 sc

Round 5 :

3 sc, (2 sc, inc)*3t, 3 sc, (2 sc, inc)*3t = 30 sc

Round 6 :

3 sc, (3 sc, inc)*3t, 3 sc, (3sc, inc)*3t = 36 sc

Round 7 :

3 sc, (4sc, inc)*3t, 3 sc, (4sc, inc)*3t = 42 sc

Round 8 :

3 sc, (5 sc, inc)*3t, 21 sc = 45 sc

Round 9-16 :

45 sc

Round 17 :

15 sc, inc, 29 sc = 46 sc

Round 18 :

46 sc

Round 19 :

15 sc, inc, 30 sc = 47 sc

Round 20 :

47 sc

Round 21 :

16 sc, inc, 30 sc = 48 sc

Round 22 :

48 sc

Round 23 :

17 sc, inc, 30 sc = 49 sc

Round 24 :

49 sc

Round 25 :

18 sc, inc, 30 sc = 50 sc

Round 26 :

50 sc

Round 27 :

19 sc, inc, 30 sc = 51 sc

Round 28 :

19 sc, inc, 31 sc = 52 sc

Round 29 :

20 sc, inc, 31 sc = 53 sc

Round 30 :

21 sc, inc, 31 sc = 54 sc

Round 31 :

(dec, 7 sc)*6t = 48 sc

Round 32 :

3 sc, (dec, 6 sc)*5t, dec, 3 sc = 42 sc

Round 33 :

(dec, 5 sc)*6t = 36 sc

Round 34 :

2 sc, (dec, 4 sc)*5t, dec, 2 sc = 30 sc

Round 35 :

(dec, 3sc)*6t = 24 sc

Round 36 :

(dec, 2 sc)*6t = 18 sc

Round 37 :

(dec, 1 sc)*6t = 12 sc

Round 38 :

(dec)*6t, or stitch up the hole.

— White part (for eyes) :

Round 1 :

chain 21 in white, work from the 2nd st from hook as follows: (3 to 1 st, 18 sc)*2t = 42 sc

Round 2 :

(3 inc, 18 sc)*2t = 48 sc

Round 3 :

(1 sc, inc)*3t, 18 sc, (1sc, inc)*3t, 18 sc = 54 sc

Round 4 :

(2 sc, inc)*3t, 18 sc, (2 sc, inc)*3t, 18 sc = 60 sc

Round 5 :

7 sc, 2 sl st, fasten off leaving a yarn tail for sewing.

— Tail :

Large part, make 1 :

Round 1 : chain 2, 6 sc into the 2nd st from hook

Round 2 :

(inc)*6t = 12 sc

Round 3 :

12 sc

Round 4 :

dec, 10 sc = 11 sc

Round 5 :

dec, 9 sc = 10 sc

Round 6 :

dec, 8 sc = 9 sc

Round 7 :

dec, 7 sc = 8 sc

Round 8 :

dec, 6 sc = 7 sc

Round 9 :

dec, 5 sc = 6 sc

Round 10 :

dec, 4 sc = 5 sc

Round 11 :

dec, 3 sc = 4 sc, leave a yarn tail for sewing.

Small piece, make 2 :

Round 1 : chain 2, 6 sc into the 2nd st from hook

Round 2 :

(1 sc, inc)*3t = 9 sc

Round 3 :

9 sc

Round 4 :

dec, 7 sc = 8 sc

Round 5 :

dec, 6 sc = 7 sc

Round 6 :

dec, 5 sc = 6 sc

Round 7 :

dec, 4 sc = 5 sc

Round 8 :

dec, 3 sc = 4 sc, leave a yarn tail for sewing.

— Wings :

Wings, make 2 :

Round 1 : chain 2 in black, 6 sc into the 2nd st from hook

Round 2 :

(inc)*6t = 12 sc

Round 3 :

(3 sc, 3 inc)*2t = 18 sc

Round 4 :

3 sc, (1 sc, inc)*3t, 3 sc, (1sc, inc)*3t = 24 sc

Info :

Fold the piece in half and slip stitch 12 through both edges in blue.

Info :

I show in fare color smooth yarn for better demonstration how to fold the wing:

— Beak :

Beak Option 1 :

Round 1 : chain 6 in black, work from the 2nd st from hook as follows: (3 to 1 st, 3 sc)*2t = 12 sc

Round 2 :

6 sc, inc, 1 sc, inc, 3 sc = 14 sc

Round 3 :

6 sc, (inc, 1 sc)*3t, 2 sc = 17 sc

Round 4 :

9 sc, (inc, 1 sc)*3t, 2 sc = 20 sc

Round 5 :

2 sc in black, switch to pink: 18 sc

Round 6-8 :

20 sc

Round 9 :

2 sc in pink, switch to orange: 18 sc

Round 10-12 :

20 sc

Round 13 :

2 sc in orange, switch to yellow: 18 sc

Round 14-16 :

20 sc, leave a yarn tail for sewing

Beak Option 2 :

Round 1 : chain 2 in pink, 6 sc into the 2nd st from hook

Round 2 :

6 sc

Round 3 :

3 inc, 3 sc = 9 sc

Round 4 :

6 inc, 3 sc = 15 sc

Round 5 :

(2 sc, inc)*4t, 3 sc = 19 sc

Round 6-7 :

19 sc

Info :

Switch to orange yarn

Round 8-12 :

19 sc

Info :

Switch to yellow yarn

Round 13-16 :

19 sc, leave a yarn tail for sewing

— Legs :

Big toe :

Round 1 : chain 10, starting from the 2nd st from hook work 9 sc, turn your work, turning chain = 9 sc

Round 2 :

9 sc

Round 3 :

fold lengthwise and work 9 sl st, leave a yarn tail for sewing

Little toes :

Round 1 : chain 8, starting from the 2nd st from hook work 7 sc, turn your work, turning chain = 7 sc

Round 2 :

7 sc

Round 3 :

fold the piece and work 7 sl st, leave a yarn tail for sewing

— Toy decoration and Assembly notes :

Info :

Sew the eyes white piece over rounds 13-23 of the body

Info :

Sew on the beak and eyes. Eyes should be 2-3 sc away from the beak

Info :

Sew on the tail and legs

Info :

Sew on wings and embroider feathers in grey

Assembly Instructions

  • Sew the white eye piece over rounds 13-23 of the body, centering it so the eye placements align with the pattern photos.
  • Attach the beak to the face patch and sew the eyes beside the beak, spacing the eyes approximately 2-3 single crochet stitches away from the beak.
  • Position and sew the tail pieces to the back bottom of the body and secure the legs to the underside for stability.
  • Fold and stitch the wings, then sew them onto each side of the body; embroider small feather marks in grey over the wings and back for texture.
  • Pin each element in place first to check symmetry, then sew with a yarn needle using matching yarn tails left from each piece.

Important Notes

  • 💡Use stitch markers to mark the beginning of each round so you never lose the start point while working in continuous rounds.
  • 💡Stuff firmly but not too tightly; adding stuffing gradually while shaping gives the best, even result without stretching the stitches.
  • 💡Pin and position parts before sewing to double-check placement and symmetry; photos show approximate placement for reference.
  • 💡Weave in ends as you go to keep the finishing neat and prevent long tails becoming tangled during assembly.

This adorable Toucan Amigurumi is a colorful, soft companion you can make in a weekend — perfect for gifts or brightening your shelves. The plush velvet yarn and cheerful beak colors make this piece truly special and tactile. Happy crocheting and enjoy making your very own birdy friend! 🧶🕊️
You ask,

we answer.

FAQs

What size will the finished piece be?

The finished amigurumi measures approximately 12-16 cm tall when using the recommended plush yarn and the listed hook sizes; exact size varies with your tension.

Can I use different yarn weights for this pattern?

Yes, you can use different yarn weights but this will affect the final size; switch the hook to match your chosen yarn and expect proportional size changes.

Do I need prior crochet experience for this pattern?

This pattern is rated intermediate, so basic knowledge of single crochet, increases, decreases, and working in rounds is recommended.

How long does this project typically take to complete?

Most crocheters complete this project in 5-7 hours, but time may vary depending on experience, yarn choice, and how many details you add.