About This Animal Friends of Pica Pau Amigurumi Pattern
This pattern set teaches you how to crochet small amigurumi animal friends using basic stitches and simple shaping. It focuses on tight stitches and step-by-step construction to keep stuffing from showing. You will learn fundamental techniques like the magic ring, increases, decreases and simple embroidery for facial features. The patterns are designed to be approachable and rewarding for new crocheters.
Follow the photographed steps and clear stitch instructions to build each character piece by piece. Includes tool recommendations, yarn guidance and finishing tips to complete neat, durable toys.
Why You'll Love This Animal Friends of Pica Pau Amigurumi Pattern
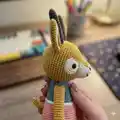
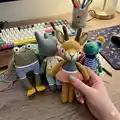
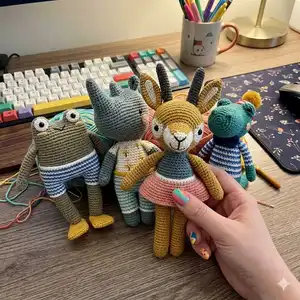
I absolutely love this pattern because it celebrates simple shapes and bold colors that give each toy a lot of personality. I enjoy how quickly a small amigurumi comes together — it feels so satisfying to finish one in an afternoon. The instructions and photos make the techniques accessible, and I love encouraging others to try amigurumi because it builds confidence. Every time I finish one of these little characters I feel proud to give or display it.
Switch Things Up
I love how versatile these amigurumi patterns are for personalization; swap colors to create your own unique characters.
You can change yarn weight and hook size to make larger or smaller versions; try bulky yarn with a larger hook for a cuddly oversized friend.
For a mini keychain, use fingering weight yarn and a 2.0–2.5 mm hook to make tiny portable pals.
I often add embroidered eyelashes, freckles or tiny accessories like scarves and hats to give each toy a distinct personality.
Mix fibers for texture contrast — cotton bodies with wool scarves or felted details can be very charming.
Try surface embroidery or duplicate stitch to add stripes, hearts or initials to clothing sections for personalization.
Make themed sets by changing color palettes — pastel for nursery, bold for modern decor, or seasonal palettes for holidays.
Use safety eyes for finished toys, or embroider eyes for a softer, child-safe toy suitable for babies.
Add wire inside limbs for posable toys, or sew in a flat base to help a character stand unaided.
I sometimes create tiny props like a crocheted ball or a felt leaf to give each friend a playful accessory and a storytelling element.
Common Mistakes & How to Fix Them
✗ Skipping stitch markers when working in rounds can lead to losing track of the start of the round; place a marker at the beginning of each round to maintain consistency.
✗ Overstuffing the toy will stretch the stitches and show the filling through the fabric; stuff gradually and evenly, adding small amounts until you achieve a firm but not bulging shape.
✗ Using the recommended hook size for garments rather than for toys will create a loose fabric; choose a hook two or three sizes smaller than recommended for garments to produce dense amigurumi fabric.
✗ Not counting stitches after increases and decreases causes uneven shaping; count your stitches regularly, especially after shaping rounds, to ensure the correct stitch total.
✗ Failing to weave in ends securely can result in loose tails or unraveling; weave ends through several rows inside the fabric and trim close after securing.