🧶 Beautiful ✨ Detailed 💝 Adorable

Crochet Flower Blanket Pattern

Crochet Flower Blanket Pattern
4.6★ Rating
12-15 Hours Time Needed
4.1K Made This
✂️

Beginner Friendly Level

Perfect for those just starting their crochet journey, with clear instructions and simple techniques

⏱️

Multi-Day Project

A rewarding 12+ hour journey—perfect for dedicated crafters who love detailed work.

🤗

Soft Hug

Gentle, plush, and full of warmth, creating a sense of comfort and coziness wherever they find a home.

About This Crochet Flower Blanket Pattern

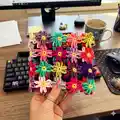
This pattern creates a colorful flower blanket made from many small crocheted flower motifs assembled into rows. The design uses basic stitches—chains, single crochet and slip stitches—so you can make each flower quickly. It is highly customizable: change colors for each flower or make a coordinated palette.

Crochet Flower Blanket Pattern crochet pattern - detailed view of completed project

You will make individual flowers (A–E) and join them as you go to form rows. The instructions include clear step-by-step directions and a joining diagram for reference.

Why You'll Love This Crochet Flower Blanket Pattern

I absolutely love this pattern because it turns small, cheerful flower motifs into a bold blanket full of color and texture. I enjoy how portable each flower is, which makes working on the project in short sessions easy and satisfying. The modular nature means you can use up yarn scraps or try endless color combinations, keeping every blanket unique. Sewing and joining the petals is a meditative finishing step that always makes me smile when I see the blanket come together.

Crochet Flower Blanket Pattern step 1 - construction progress Crochet Flower Blanket Pattern step 2 - assembly progress Crochet Flower Blanket Pattern step 3 - details and accessories Crochet Flower Blanket Pattern step 4 - final assembly and finishing

Switch Things Up

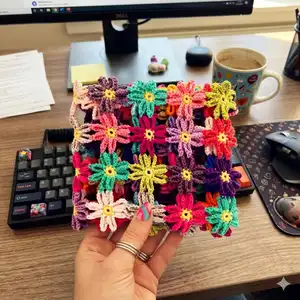
I love customizing this blanket by changing the color layout; try alternating two colors for a striped flower effect or go rainbow for maximum impact.

To make a smaller version, I often reduce the number of flowers per row or make fewer rows and then add a neat border to finish.

If I want a chunkier blanket, I switch to a thicker yarn and a larger hook to make oversized flowers that work up faster.

I sometimes embroider a small center on each flower or add a contrasting button to create more texture and interest.

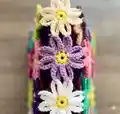
For a more subtle look, I pick tonal shades of one color and vary the petal and center colors slightly for a cohesive result.

I also like to mix yarn types for texture—cotton petals with a soft acrylic center can produce a lovely hand feel.

Try changing the petal length by adjusting the chain count (for example chain 6 instead of 8) to create tighter or looser petals.

If you want a portable project, I make each flower as I travel and then join them at home so the work is easy to carry.

Consider adding a simple single crochet border around the finished blanket to give it a polished edge and stabilize the joins.

Sometimes I create small matching accessories like cushions or coasters using the same flowers to make a coordinated set that looks great together.

Common Mistakes & How to Fix Them

✗ Skipping the slip stitch to join the initial chain can create an unstable centre; always join the chain with a slip stitch so your ring is secure. ✗ Not changing color neatly after the slip stitch can leave loose tails; change color at the indicated stitch and weave in ends as you go for a tidy finish. ✗ Making all 8 petals without counting can cause uneven flowers; count your chains and petals carefully and verify you have eight bows before continuing. ✗ Joining leaves to adjacent flowers without checking placement can misalign the pattern; refer to the joining diagram and attach leaves 5–8 carefully to previous flowers.

Crochet Flower Blanket Pattern

Make a bright, modular flower blanket using simple crochet stitches and small flower motifs. This pattern walks you through creating individual flower units and joining them into colorful rows so you can customize size and color. Perfect for using up scraps or making a cheerful, handmade throw you'll love to display or gift.

Beginner Friendly 12-15 Hours

Materials Needed for Crochet Flower Blanket Pattern

— Main Fabric

  • 01
    Drops Paris by Garnstudio - yarn used in sample (use multiple colors as desired; amount depends on blanket size and color choices)

— Tools Required

  • 01
    Crochet hook size 4mm
  • 02
    Scissors
  • 03
    Yarn needle for weaving in ends and sewing pieces
  • 04
    Stitch markers (optional for keeping track of rounds)

Progress Tracker

0% Complete

— Notes :

Info :

I used Drops Paris by Garnstudio for this blanket, and a crochet hook size 4mm. You can use any other yarn you like, but if you want to make the blanket just like mine, I recommend using a crochet hook size 4mm.

Info :

Contact: annemarieshaakblog@hotmail.com. Blog: www.annemarieshaakblog.blogspot.com. Etsy: www.etsy.com/shop/annemariesbreiblog

— The pattern :

Round 1 :

Flower A - 1. Chain 4, attach the first chain to the last with a slip stitch.

Round 2 :

Flower A - 2. Do 8 single crochet in the ring you made in the first row.

Round 3 :

Flower A - 3. Do a slip stitch in the first single crochet. Change colour while doing so. If you don't know how to change colour, go here: http://annemarieshaakblog.blogspot.nl/2012/04/how-to-change-colour.html

Round 4 :

Flower A - 4. *Chain 8, make a slip stitch in the next single crochet.* Repeat what's in between * seven more times. You now have 8 bows.

Round 5 :

Flower A - 5. *Do 9 single crochet in the first 8-chain-bow. Make a slip stitch in the single crochet below. That's the same single crochet where you did a slip stitch in in the previous row.* Repeat what's in between * seven more times. Fasten off after the last slip stitch.

Info :

You've now finished your first flower. On the drawing on the last page, that's flower A. You'll now start working on flower B.

Round 1 :

Flower B - 1. Repeat rows 1-4 of flower A. Start with row 5 but only make the first 6 leaves of row 5.

Round 2 :

Flower B - 2. Make leaf 7 as follows: do 4 single crochet in the 8-chain-bow. Now make the fifth single crochet in the fifth single crochet of one of the leaves of flower A. See the drawing on the last page for a clear instruction. Do the same with leaf 8 and finish the flower as you did with flower A.

Round 1 :

Flower C - Make flower C in the same way as flower B. Ofcourse you can add as many flower to this row as you like. I made a row of 12 flowers in total.

Round 1 :

Flower D - Flower D is the first flower of the second row of flowers. Make flower D in the same way as flower B.

Round 1 :

Flower E - 1. Repeat rows 1-4 of flower A. Start with row 5 but only make the first 4 leaves of row 5.

Round 2 :

Flower E - 2. Now attach the leaves 5, 6, 7 and 8 the same way you attached them with flower B. See the drawing on the last page for a clear instruction.

Info :

Now all other flowers are made like flower E. I made 8 rows of flowers, so in total my blanket has 96 flowers. You can use as many colours as you like.

— Notes & Usage :

Info :

Designing crochet patterns is a time-consuming and difficult job. Please do not make copies of this pattern for distribution, don't share it or sell it as your own design. If you post your own flower blanket online, please refer to the designer or shop.

Info :

See the diagram on the last page for clear joining instructions showing how petals 5-8 attach into neighbouring flowers to form joined rows.

Assembly Instructions

  • Attach leaves 5, 6, 7 and 8 of a new flower into the corresponding petals of adjacent, previously made flowers as shown in the joining diagram, working one leaf at a time to secure placement.
  • When attaching leaf 7 (and leaf 8) to the previous flower, work 4 single crochet into the 8-chain bow then make the fifth single crochet into the fifth single crochet of the neighboring flower's leaf as instructed.
  • Work rows of flowers in sequence: the first row uses Flower C pattern (row of 12 in sample), then continue building subsequent rows starting with Flower D and E to interlock motifs into a blanket.
  • Fasten off and weave in ends after completing each flower to keep joins neat before moving on to the next motif for joining.
  • Use pins to temporarily position flowers according to the diagram before final sewing or slip-stitch joining to ensure symmetry and even spacing.

Important Notes

  • 💡Use consistent tension throughout each flower to ensure petals match in size and the blanket lies flat.
  • 💡Change colours neatly when indicated; weave in ends as you go to avoid bulky joins in the center of the flowers.
  • 💡Refer to the joining diagram carefully when attaching petals 5–8 to neighbouring flowers to ensure correct alignment.

This cheerful flower blanket pattern turns small motifs into a bright, handmade throw that brings joy to any room. Use lots of contrasting colors for a playful look or a limited palette for a modern feel. Share your finished blanket online and please credit the pattern designer if you post photos. 🧶🌼

You ask,

we answer.

FAQs

What size will the finished piece be?

The finished blanket size depends on the number of flowers you make; the sample used 8 rows of 12 flowers (96 flowers total). Final dimensions will vary by yarn and tension.

Can I use different yarn weights for this pattern?

Yes, you can use different yarns, but the size of each flower and the overall blanket will change; adjust your hook size appropriately if you change yarn weight.

Do I need prior crochet experience for this pattern?

This pattern is beginner friendly and uses basic stitches such as chains, single crochet and slip stitch; basic crochet experience is helpful for smooth assembly.

How long does this project typically take to complete?

Most crafters will take multiple days to finish this blanket; the sample project required approximately 12-15 hours in total, depending on pace and joining time.