๐Ÿงถ Beautiful โœจ Detailed ๐Ÿ’ Adorable

Tiffy the Sleepy Unicorn Amigurumi Pattern

Tiffy the Sleepy Unicorn Amigurumi Pattern
4.5โ˜… Rating
5-7 Hours Time Needed
4.0K Made This
โœ‚๏ธ

Beginner Friendly Level

Perfect for those just starting their crochet journey, with clear instructions and simple techniques

โฑ๏ธ

Weekend Treat

Takes 5-7 hours, making it an enjoyable project to finish over a couple of days.

๐Ÿงธ

Cute Companion

An adorable friend to cherish, handcrafted with love to bring comfort and joy for years to come.

About This Tiffy the Sleepy Unicorn Amigurumi Pattern

This pattern creates Tiffy the Sleepy Unicorn, a soft amigurumi with a long segmented body made from colorful donut rings, a fluffy mane and tail, and sweet facial details. The design uses 100% cotton yarn and a 2.5 mm hook for neat stitch definition. Clear round-by-round instructions and helpful assembly photos guide you through making each piece and joining everything together.

Tiffy the Sleepy Unicorn Amigurumi Pattern crochet pattern - detailed view of completed project

The pattern is beginner/easy level and includes full instructions for donuts, head, butt, pillar, legs, horn, mane, tail, wings and ears. Perfect as a gift or nursery decor, Tiffy is approx. 29 cm long when finished.

Why You'll Love This Tiffy the Sleepy Unicorn Amigurumi Pattern

I absolutely love this pattern because it combines simple amigurumi construction with playful colorwork that really lets your creativity shine. I enjoy how the donut rings give the body a unique segmented look that is both fun to crochet and visually delightful. The mane and tail are quick, satisfying pieces that add lots of character with minimal effort. Sewing the parts together and watching Tiffy come to life is always a joyful, rewarding moment for me.

Tiffy the Sleepy Unicorn Amigurumi Pattern step 1 - construction progress Tiffy the Sleepy Unicorn Amigurumi Pattern step 2 - assembly progress Tiffy the Sleepy Unicorn Amigurumi Pattern step 3 - details and accessories Tiffy the Sleepy Unicorn Amigurumi Pattern step 4 - final assembly and finishing

Switch Things Up

I love how easily you can customize this pattern by swapping yarn colors; try pastel tones for a soft nursery look or bright shades for a playful toy.

I often change the number of donut rings or the pillar length to make Tiffy longer or shorter โ€” just add or remove rounds on the pillar to adjust overall length.

I sometimes use a thicker cotton or a DK-weight yarn with a larger hook for a chunkier, cuddlier version of Tiffy that works great as a pillow.

For a mini keychain-sized version, use thinner yarn and a smaller hook, and make fewer donut rings to keep proportions balanced.

I like to mix embroidery and tiny felt accents for facial details if I want a different expression or a more durable finish for small children.

Try adding tiny safety eyes instead of embroidered eyes if you prefer a different look โ€” just make sure they are suitable for the recipient.

Swap the mane pattern to all-long or all-short pieces for a uniform look, or alternate long and short for extra texture like the original design.

I sometimes add a loop or ribbon to the pillar to turn Tiffy into a hanging decoration for a nursery or playroom.

Embellish with beads, tiny bells inside the donut rings, or metallic yarn for a magical sparkle in the mane and tail.

If you like a more posable toy, consider inserting a flexible wire inside the pillar before closing to allow gentle shaping while still being safe and soft.

Common Mistakes & How to Fix Them

โœ— Skipping stitch markers during continuous rounds can make it hard to find the start of each round; place a stitch marker at the first stitch of every round to maintain correct stitch counts. โœ— Not stuffing gradually causes uneven shaping and lumps; stuff small amounts as you go and shape the piece gradually for smooth curves. โœ— Forgetting to change colors exactly where indicated will shift stripe placement; follow the color change notes and change yarn before the indicated round. โœ— Using inconsistent tension alters the finished size and fit of donut rings and pillar; work with a steady tension and check gauge by comparing finished donuts as you go.

Tiffy the Sleepy Unicorn Amigurumi Pattern

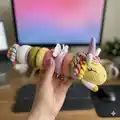
Make a whimsical, cuddly unicorn toy with this detailed crochet pattern. You will create a segmented body with colorful donut rings, a curly mane and tail, plus charming details like wings, horn and ears. The pattern is designed to guide you step-by-step so you can enjoy crocheting a delightful handmade companion.

Beginner Friendly 5-7 Hours

Materials Needed for Tiffy the Sleepy Unicorn Amigurumi Pattern

โ€” Main Fabric

  • 01
    100% Cotton yarn (combed, gassed, mercerised) 50 g / 125 m per skein - White yarn (main body)
  • 02
    100% Cotton yarn (combed, gassed, mercerised) 50 g / 125 m per skein - Assorted colors of your choice for mane, tail, donut rings and accents (small amounts of each color)
  • 03
    Small scraps of colored cotton yarn for details (approx. 10-30 g total of accent colors)

โ€” Tools Required

  • 01
    Crochet hook size 2.5 mm
  • 02
    Tapestry needle
  • 03
    Pins and scissors
  • 04
    Fiberfill / toy stuffing
  • 05
    Stitch marker or a strand of thinner yarn

Progress Tracker

0% Complete

โ€” DONUT RING (make 6) :

Info :

With color of choice

Round 0 :

Ch 24, join with sl st to the first chain / Do not twist the yarn.

Round 1 :

ch 1, sc in same space as prev. sl st, sc around, join round with sl st [24]

Round 2 :

ch 1, (3 sc, inc) x 6, join round with sl st [30]

Info :

Change color of your choice.

Round 3 :

ch 1, 2 sc, inc, (4 sc, inc) x 5, 2 sc, join round with sl st [36]

Round 4 :

ch 1, (5 sc, inc) x 6, join round with sl st [42]

Round 5 :

ch 1, 3 sc, inc, (6 sc, inc) x 5, 3 sc, join with sl st [48]

Info :

Change color of your choice.

Round 6-9 :

(4 rows): ch 1, sc around, join with sl st [48]

Info :

Change color of your choice.

Round 10 :

ch 1, (6 sc, dec) x 6, join round with sl st [42]

Round 11 :

ch 1, 2 sc, dec, (5 sc, dec) x 5, 3 sc, join round with sl st [36]

Round 12 :

ch 1, (4 sc, dec) x 6, join round with sl st [30]

Info :

Change color of your choice.

Round 13 :

ch 1, (3 sc, dec) x 6, join round with sl st [24]

Round 14 :

ch 1, sc around, join round with sl st [24]

Info :

Fasten off, leaving a long tail for sewing.

Info :

Using needle and thread, sew Rnd 1 and Rnd 14 together while stuffing with fiberfill before finishing.

โ€” HEAD :

Info :

With white yarn

Round 1 :

6 sc in magic ring [6]

Round 2 :

6 inc [12]

Round 3 :

(sc, inc) x 6 [18]

Round 4 :

sc, inc, (2 sc, inc) x 5, sc [24]

Round 5 :

(3 sc, inc) x 6 [30]

Round 6-7 :

(2 rows): sc around [30]

Round 8 :

12 sc, 6 inc, 12 sc [36]

Round 9 :

12 sc, (sc, inc) x 6, 12 sc [42]

Round 10 :

12 sc, (2 sc, inc) x 6, 12 sc [48]

Round 11 :

13 sc, inc, (3 sc, inc) x 5, 14 sc [54]

Round 12-18 :

(7 rows): sc around [54]

Round 19 :

13 sc, dec, (3 sc, dec) x 5, 14 sc [48]

Round 20 :

12 sc, (2 sc, dec) x 6, 12 sc [42]

Round 21 :

12 sc, (sc, dec) x 6, 12 sc [36]

Round 22 :

(4 sc, dec) x 6 [30]

Round 23 :

2 sc, dec, (3 sc, dec) x 5, sc [24]

Info :

Stuff the head firmly with fiberfill.

Round 24 :

(dec, 2 sc) x 6 [18]

Info :

Fasten off, leaving a long tail for sewing and sew close.

Info :

Using your yarn needle, weave the yarn tail through the frohnt loop of each remaining stitch and pull it tight to close.

โ€” BUTT :

Info :

Start with white yarn

Round 1 :

6 sc in magic ring [6]

Round 2 :

6 inc [12]

Round 3 :

(sc, inc) x 6 [18]

Round 4 :

sc, inc, (2 sc, inc) x 5, sc [24]

Round 5 :

(3 sc, inc) x 6 [30]

Round 6 :

2 sc, inc, (4 sc, inc) x 5, 2 sc [36]

Round 7 :

(5 sc, inc) x 6 [42]

Round 8 :

3 sc, inc, (6 sc, inc) x 5, 3 sc [48]

Round 9-14 :

(6 rows): sc around [48]

Info :

Change color of your choice.

Round 15 :

(6 sc, dec) x 6 [42]

Round 16 :

3 sc, dec, (5 sc, dec) x 5, 2 sc [36]

Round 17 :

(4 sc, dec) x 6 [30]

Info :

Change color of your choice.

Round 18 :

sc, dec, (3 sc, dec) x 5, 2 sc [24]

Round 19 :

(2 sc, dec) x 6 [18]

Info :

Stuff the butt firmly with fiberfill.

Info :

Fasten off, weave in ends.

โ€” INSIDE OF THE BUTT :

Info :

With color of your choice

Round 1 :

6 sc in magic ring [6]

Round 2 :

6 inc [12]

Round 3 :

(sc, inc) x 3 [18]

Round 4-10 :

(7 rows): sc around [18]

Info :

Fasten off, leaving a long tail for sewing.

Info :

Sew inside of the butt into the butt.

โ€” PILLAR :

Info :

With color of you choice

Round 1 :

6 sc in magic ring [6]

Round 2 :

6 inc [12]

Round 3 :

(3 sc, inc) x 3 [15]

Info :

Stuff the pillar firmly with fiberfill as you go along

Round 4-47 :

(44 rows): sc around [15]

Info :

Fasten off, leaving a long tail for sewing and sew to the head.

Info :

Tipp! Check the correct length of the pillar before cutting the yarn by trying to insert every donut into the pillar and the butt.

โ€” LEG (make 4) :

Info :

Starting with yellow gold yarn

Round 1 :

6 sc in magic ring [6]

Round 2 :

(sc, inc) x 3 [9]

Round 3 :

sc around [9]

Info :

Change color to white yarn

Round 4-14 :

(11 rows): sc around [9]

Round 15 :

Flatten the opening of the leg and sc in each of next 4 stitches through both layers to close the opening.

Info :

Fasten off, leaving a long tail for sewing.

โ€” HORN :

Info :

With color of your choice

Round 1 :

4 sc in magic ring [4]

Round 2 :

(sc, inc) x 2 [6]

Round 3 :

(2 sc, inc) x 2 [8]

Round 4 :

(3 sc, inc) x 2 [10]

Round 5 :

(4 sc, inc) x 2 [12]

Round 6-12 :

(7 rows): sc around [12]

Info :

Join with sl st, ch 1, turn

Info :

BLO >> we\'ll work now in back loop only

Info :

FLO >> we\'ll work now in front loop only sl st in every stitch from Rnd 12 till Rnd 3.

Info :

Fasten off, leaving a long tail for sewing.

Info :

Stuff the horn with fiberfill.

โ€” MANE :

Info :

SHORT (make 5)

Info :

With color of your choice.

Round 1 :

Ch 30,

Round 1 :

(starting from 2nd chain from hook), inc in every st to the end.

Info :

Fasten off, leaving a long tail for sewing.

Info :

LONG (make 5)

Round 1 :

With color of your choice Ch 40,

Round 1 :

(starting from 2nd chain from hook), inc in every st to the end.

Info :

Fasten off, leaving a long tail for sewing.

โ€” TAIL (make 5) :

Info :

With color of your choice

Round 1 :

Ch 30,

Round 1 :

(starting from 2nd chain from hook), inc in every st to the end.

Info :

Fasten off, leaving a long tail for sewing.

โ€” WING (make 2) :

Info :

With white yarn

Round 1 :

Ch 6,

Round 1 :

(starting from 2nd chain from hook), 4 sc, 5 sc in last ch, continue all round to other side of chain, 2 sc, ch 1, turn [11]

Round 2 :

3 sc, 3 inc, 5 sc, ch 3, turn [14]

Round 3 :

(starting from 2nd chain from hook), 2 sc, 12 sc, ch 1, turn [14]

Round 4 :

2 sc, 3 inc [8]

Info :

Fasten off invisibly, leaving a long tail for sewing.

โ€” EAR (make 2) :

Info :

With white yarn

Round 1 :

6 sc in magic ring [6]

Round 2 :

(sc, inc) x 3 [9]

Round 3 :

(2 sc, inc) x 3 [12]

Round 4 :

(3 sc, inc) x 3 [15]

Round 5 :

(4 sc, inc) x 3 [18]

Round 6-9 :

(4 rows): sc around [18]

Round 10 :

(sc, dec) x 6 [12]

Info :

Flatten the opening of the ear and sc in each of next 6 stitches through both layers to close the opening.

Info :

Fold the ear and sew a few stitches.

Info :

Fasten off, leaving a long tail for sewing.

โ€” ASSEMBLY :

Item (P1) :

1. Sew the donut rings, using needle and thread, sew Rnd 1 and Rnd 14 together while stuffing with fiberfill before finishing.

Item (P2) :

2. Stuff the butt with fiberfill, using your two thumbs, push out the center poly fiber into a hole wide and deep enough to fit the insert, sew inside the butt into the butt.

Item (P3) :

3. Sew the tail to the butt. The top of each tail should be sewn between Rnd 7 and 8 of the butt, sew all the tails together to form a bunch.

Item (P4) :

4. Sew the wings onto the donut ring between Rnd 7 and 8 of the donut ring.

Item (P5) :

5. Sew the horn over rows 15 and 17.

Item (P6) :

6. Sew the ears to the head, over rows 15 and 17, keep 3 stitches from the horn apart.

Item (P7) :

7. Sew the mane to the head. Switch between long and short.

Item (P8) :

8. Sew the legs to the head. The top of each leg should be sewn between Rnd 20 and 21 of the head, between both legs keep 8 stitches apart. Sew a few extra stitches (4-5 stitches) along each leg to hold the legs snug against the head.

Item (P9) :

9. Embroider the eyes with black yarn over rows 11 and 15.

Item (P10) :

10. Embroider the nose with black yarn over rows 4 and 5.

Item (P11) :

11. Sew the legs to the butt. The top of each leg should be sewn between Rnd 14 and 15 of the butt, between both legs keep 7 stitches apart. Sew a few extra stitches (4-5 stitches) along each leg to hold the legs snug against the butt.

Item (P12) :

12. Sew the pillar to the head.

Assembly Instructions

  • Sew the donut rings, using needle and thread, sew Rnd 1 and Rnd 14 together while stuffing with fiberfill before finishing.
  • Stuff the butt with fiberfill; using your two thumbs, push out the center poly fiber into a hole wide and deep enough to fit the insert, then sew the inside piece into the butt.
  • Sew the tail to the butt; the top of each tail should be sewn between Rnd 7 and 8 of the butt and sew all the tails together to form a bunch.
  • Sew the wings onto the donut ring between Rnd 7 and 8 of the donut ring, positioning them evenly.
  • Sew the horn to the head over rows 15 and 17 and secure firmly with stitches.
  • Sew the ears to the head over rows 15 and 17, keeping 3 stitches from the horn apart, then fold and secure the ears.
  • Sew the legs to the head between Rnd 20 and 21 (keep 8 stitches apart) and sew the legs to the butt between Rnd 14 and 15 (keep 7 stitches apart), adding extra stitches to hold snug.

Important Notes

  • ๐Ÿ’กUse a stitch marker or a strand of thinner yarn to mark the start of each round for accurate stitch counts and smooth shaping.
  • ๐Ÿ’กStuff pieces firmly but gradually; overstuffing can distort shapes while understuffing can cause floppy parts.
  • ๐Ÿ’กWhen decreasing (dec) in this pattern, use the invisible decrease (working in the front loop only) for a neater finish.

This adorable Tiffy the Sleepy Unicorn pattern brings a playful, colorful friend to life with donut ring segments and a curly mane. ๐Ÿฆ„ Create a handmade gift full of charm and personality that will brighten any nursery or shelf. ๐ŸŽ Enjoy every stitch as Tiffy comes together in bright cotton yarn and soft stuffing. ๐Ÿงถ

You ask,

we answer.

FAQs

What size will the finished piece be?

The finished amigurumi measures approximately 29 cm long when using the recommended 100% cotton yarn and 2.5 mm hook.

Can I use different yarn weights for this pattern?

Yes, you can use different yarn weights, but this will affect the final size. Adjust your hook size accordingly and be prepared that the donut rings and pillar proportions will change.

Do I need prior crochet experience for this pattern?

This pattern is beginner/easy, so basic knowledge of single crochet, increases and decreases is helpful, and clear round-by-round instructions guide you through assembly.

How long does this project typically take to complete?

Most crocheters complete this project in 5-7 hours, though time may vary depending on experience and customization choices.