🧢 Beautiful ✨ Detailed πŸ’ Adorable

The Cornflower Sweater Pattern

The Cornflower Sweater Pattern
4.7β˜… Rating
12-15 Hours Time Needed
2.8K Made This
βœ‚οΈ

Intermediate Level

Ideal for those with basic crochet experience, featuring slightly more advanced stitches and techniques to expand your skills.

⏱️

Multi-Day Project

A rewarding 12+ hour journeyβ€”perfect for dedicated crafters who love detailed work.

πŸ‘•

Casual Chic

Relaxed style with a modern twist, perfect for everyday wear while maintaining that handcrafted uniqueness.

About This The Cornflower Sweater Pattern

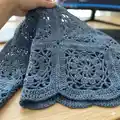
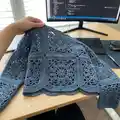
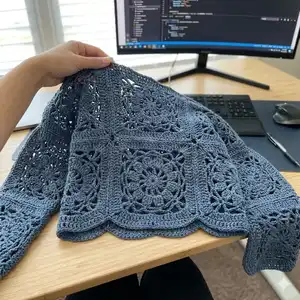
This pattern creates an oversized, openwork sweater constructed from textured flower squares. You'll crochet repeated floral squares, block them for a neat shape, then sew panels together for an effortless, drapey sweater. Techniques include triple crochet petals, chain-loop rounds, and simple seaming for a braided seam detail.

The Cornflower Sweater Pattern crochet pattern - detailed view of completed project

Follow the step-by-step rounds for each square, then assemble two panels to create the front and back. The pattern is adjustable β€” change the number of squares to suit your desired width and sleeve room.

Why You'll Love This The Cornflower Sweater Pattern

I absolutely love this pattern because the floral squares bring a delicate, handcrafted texture to a modern, oversized silhouette. I enjoy how quick each square works up β€” they feel productive and meditative as a set. The assembly gives such a satisfying braided seam detail that looks professional when blocked and sewn correctly. I also love that it's easy to customize: change the number of squares for more length or a roomier fit.

The Cornflower Sweater Pattern step 1 - construction progress The Cornflower Sweater Pattern step 2 - assembly progress The Cornflower Sweater Pattern step 3 - details and accessories The Cornflower Sweater Pattern step 4 - final assembly and finishing

Switch Things Up

I love to change up the look by swapping yarn colors between the center flower and outer rounds β€” try a contrast center for a pop of color.

I often make the sweater longer by adding additional rows of squares to the bottom for a tunic-style version.

I sometimes use a bulkier yarn and a larger hook to create a chunkier, warmer sweater with fewer squares needed.

I also experiment with linen or cotton blends for a lighter, breathable summer version that drapes beautifully.

I recommend adding an extra row of squares at the arms if you want more room or a more dramatic batwing sleeve effect.

I occasionally embroider small accents on a few squares before joining to add a subtle custom detail.

I also try asymmetrical layouts β€” offsetting the squares on one side for a modern, off-center look.

I like to change up the seam finish too: try slip-stitch join or visible whipstitch for different visual effects on the seam.

I sometimes add a crocheted border around the assembled panels for a framed, finished look.

I enjoy making matching accessories like a headband or bag using the same flower-square motif to complete the set.

Common Mistakes & How to Fix Them

βœ— Not blocking your squares before assembly can leave uneven shapes and gaps; block each square flat to the correct measurements before sewing to get tidy seams. βœ— Skipping stitch counts in the petal rounds leads to missing petals and uneven shape; count each petal and verify you have 12 petals before joining the round. βœ— Misplacing slip stitches at the end of rounds will distort your motif edges; locate the starting chain (ch 4 or ch 3) and slip stitch to the correct chain number each round. βœ— Working with inconsistent tension makes squares vary in size and shape; maintain consistent tension and use the same hook for all squares so they measure about 8 inches wide.

The Cornflower Sweater Pattern

Make a drapey, oversized Cornflower Sweater built from large floral crochet squares. This pattern walks you through a flower-square motif, how to block and assemble panels, and finishing tips so you can customize fit and length. Perfect for makers who love relaxed silhouettes and textured stitches.

Intermediate 12-15 Hours

Materials Needed for The Cornflower Sweater Pattern

β€” Main Fabric

  • 01
    Weight 4 yarn of choice (I used a cotton/nylon blend)
  • 02
    Use enough yarn to make multiple 8-inch flower squares for two panels (estimate yarn quantity based on your size and number of squares)

β€” Tools Required

  • 01
    5mm - 6mm crochet hook
  • 02
    Yarn needle for sewing squares together
  • 03
    Blocking materials
  • 04
    Stitch markers, as needed

Progress Tracker

0% Complete

β€” Square :

Round 1 :

Slip knot. Ch 6 and sl st to the first stitch.

Round 2 :

Ch 4, tc in the same st where you placed the sl st, ch 1. [All in the same stitch: tc, ch1, tc, ch1] x5. You should now count 12 tc st total, including the 'ch 4'. Find the 'ch 4' you started this round with and sl st to the 3rd ch st.

Info :

*Note that chains at the beginnings of rounds count as stitches! Think of this 'ch 4' as a 'tc, ch 1'.

Tc instructions :

Yo twice, insert hook into stitch and pull up a loop. Yo and pull through the first 2 loops. You should have 3 loops. Yo and pull through the next 2 loops. You should have 2 loops now. Yo and pull through the remaining 2 loops.

Round 3 :

Each of the flower petals is essentially a tc 4 together, placed in the same stitch. The first petal will be a bit different from the others. Ch 2. Yo 2 times. Insert the hook under the next ch st of the round below. Pull up a loop. Yo and pull through the first 2 loops. You will have 3 loops left on your hook. Yo and pull through the next 2 loops. You should have 2 loops left on your hook.

Round 3 :

[Yo 2 times and insert the hook under the same ch st. Pull up a loop. Yo and pull through the first 2 loops. Yo and pull through the next 2 loops.] x2 You should now have 4 loops on your hook. Yo and pull through all 4 loops. Ch 4.

Round 3, continued :

[Yo 2 times and insert the hook under the next ch st of the row below. Pull up a loop. Yo and pull through the first 2 loops. Yo and pull through the next 2 loops.] x4. You should have 5 loops on your hook. Yo and pull through all 5 loops. Ch 4. Repeat the above 'petal stitch' for every ch st you made in round 2. You should have 12 petals total. Sl st to the stitch at the top of the first petal.

Round 4 :

[Ch 7 sk 4 sl st] x12. Place your last sl st right before the first st of the round.

Round 5 :

Ch 7, sk 3, sl st (the sl st should be in the peak of that first chain loop).

Round 5 :

[Ch 7, sk 7, sl st] x2. Ch 4, sk 3, tc, ch 4, sk 3, sl st. ← Repeat this whole line a total of 3 times.

Round 5 :

[Ch 7, sk 7, sl st] x2. Ch 4. Find the first chain of this round and sl st to the 4th ch st.

Round 6 :

For this round, you will be placing one tc in each ch st. Ch 3, tc 3, ch1, sk1. [Tc 3, ch 1, sk1] x4. Tc 4, ch3, sk1.

Round 6 :

Tc 4, ch1, sk1. [Tc 3 ch 1 sk1] x4. Tc 4, ch3, sk1. ← Repeat this line a total of 3 times.

Info :

Find the chain that started this round - sl st to the 3rd ch st. Tie off.

Info :

Repeat from the beginning to create several squares before moving on to assembly. Each square should measure about 8 inches wide.

Info :

For best results, you will need to block your squares to even out the shape before assembly!

Assembly Instructions

  • Make two panels of squares (one front panel, one back panel) in the layout shown in the diagram; adjust number of squares for desired width and arm span before assembly.
  • After blocking, put two squares together with wrong sides facing and use a running stitch along the edge, threading the yarn back and forth through each stitch to join.
  • When you reach the 'ch 3' corner spaces while sewing, sew the first chain stitch of the corner to secure the angle and maintain square shape.
  • When you unfold joined squares, expect a double braided texture at the seam β€” this is the intended finish for a neat seam appearance.
  • Line up your front and back panels and sew the shoulder and side seams according to the diagram, leaving openings for the arm span as desired.
  • Weave in any stray ends after sewing all seams and trim excess yarn for a clean finish.

Important Notes

  • πŸ’‘Each square should be blocked to roughly 8 inches wide for consistent panels and tidy seams during assembly.
  • πŸ’‘The sweater is designed to be oversized, so plan your panel layout and number of squares according to the drape and fit you prefer.
  • πŸ’‘Use a running stitch with wrong sides facing when sewing squares so the seam forms a braided texture when unfolded.

This Cornflower Sweater Pattern celebrates large floral squares and easy seaming for a soft, oversized sweater. Make it longer or wider by adding more squares until the fit is just right. Enjoy the blocking and assembly β€” the braided seams are a beautiful finishing touch! 🧢✨

You ask,

we answer.

FAQs

What size will the finished piece be?

The final size depends on how many squares you arrange for the front and back panels; each blocked square should measure about 8 inches wide, so plan panel width and length based on that.

Can I use a different yarn weight or hook size?

Yes, you can use different yarn weights but your square size will change; if you change yarn weight, adjust hook size and block a test square to determine how many squares you need for fit.

Do I need to block squares before assembly?

Yes, blocking is recommended to even out the shape of each square and ensure consistent sizing so the panels sew together cleanly and the braided seam looks its best.

How long does this project typically take?

This is a multi-day project and typically requires around 12-15 hours total, depending on the number of squares you make and your sewing time for assembly.