🧢 Beautiful ✨ Detailed πŸ’ Adorable

Willow bag Pattern

Willow bag Pattern
4.5β˜… Rating
5-7 Hours Time Needed
3.1K Made This
βœ‚οΈ

Intermediate Level

Ideal for those with basic crochet experience, featuring slightly more advanced stitches and techniques to expand your skills.

⏱️

Weekend Treat

Takes 5-7 hours, making it an enjoyable project to finish over a couple of days.

✨

Stylish Touch

An elegant detail to elevate any look, combining traditional techniques with contemporary design sensibilities.

About This Willow bag Pattern

This pattern teaches you how to crochet a beaded Willow bag from raffia yarn, creating a textured canvas studded with large beads. You will make a rectangular beaded panel, crochet a matching bottom piece, assemble the bag, and create two twisted beaded handles. The pattern uses chain, single crochet and slip stitch techniques and includes tips for steaming and finishing.

Willow bag Pattern crochet pattern - detailed view of completed project

Perfect for gifting or as a statement summer accessory, the bag measures approximately 25 x 3 x 40 cm when made as shown. The instructions include bead placement, joining steps, and handle construction for a polished final result.

Why You'll Love This Willow bag Pattern

I absolutely love this pattern because it transforms simple raffia yarn into a luxurious, beaded accessory that catches the eye. I adore the tactile contrast between soft crochet and glossy beads, and how the repeating motif builds quickly into a striking canvas. I also love that the handle is a wearable design feature β€” a twisted beaded chain that adds personality and polish. Making this bag feels both meditative and rewarding, perfect for creating a special handmade piece to keep or gift.

Willow bag Pattern step 1 - construction progress Willow bag Pattern step 2 - assembly progress Willow bag Pattern step 3 - details and accessories Willow bag Pattern step 4 - final assembly and finishing

Switch Things Up

I love how easy it is to customize this Willow bag by changing bead sizes and colors; try contrast beads for a bold statement or subtle tones for an elegant look.

If you want a sturdier bag, use a slightly thicker raffia or double your raffia strands and increase your hook size accordingly to create a chunkier texture.

Change the spacing of the beads along the chain to create more open or dense bead coverage; smaller beads allow you to add more decorative detail.

For a lined interior, cut a fabric rectangle to match the inner dimensions and sew it in before finishing the top edge to protect contents and conceal glue areas.

I sometimes add a magnetic snap or small zipper to the top for extra security; attach the closure to the inside fabric lining for a clean finish.

To alter the bag size, adjust the number of beads across (width) and the number of row repeats (height) β€” keep the bead pattern repeat consistent for a neat grid.

Swap the twisted beaded handle for a plain raffia braided strap for a simpler look, or use a leather strap for a mixed-material, high-end finish.

Add charms, tassels, or a crocheted flower to one corner for a playful accent that personalizes each bag you make.

If you prefer a softer shape, lightly stuff the inner panels with interfacing or sew a thin interfaced lining to soften edges and reduce slippage of beads.

I also recommend experimenting with metallic or colored beads for an evening-ready clutch β€” just ensure bead holes are compatible with your raffia thickness.

Want a mini keychain version? Use thinner raffia, smaller beads, and reduce the grid to a 4x4 bead square to create a tiny, beaded charm.

For a bold seasonal twist, use bright summer colors or deep autumn tones for fall-ready bags β€” the same pattern works beautifully across color palettes.

Common Mistakes & How to Fix Them

βœ— Skipping bead placement or failing to slide beads on the yarn before beginning can interrupt the flow of the row; thread all beads you'll need for a working section ahead of time and keep them organized. βœ— Using inconsistent tension when crocheting around beads makes circles uneven and irregular; maintain even tension and practice a few sample beads to match the pattern gauge. βœ— Applying too much pressure when steaming the canvas can deform or flatten beads; always steam from the wrong side through a damp cloth and use light pressure. βœ— Cutting the thread too early or not securing tails can cause unravelling later during assembly; follow finishing steps exactly, pull ends back to the wrong side, tie a knot and hide ends before trimming. βœ— Not changing to the smaller hook when inserting beads can make it hard to pass the bead through the loop; switch to the 2.0 mm hook when slipping beads as instructed to ease bead placement.

Willow bag Pattern

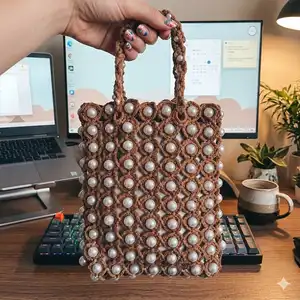
Create a stylish beaded Willow bag using raffia yarn and a simple bead-in-loop technique. This pattern walks you through crocheting a bead canvas, shaping the bottom, assembling the bag, and making twisted beaded handles. Perfect for crafters who love texture and handmade details, the finished bag is lightweight and eye-catching.

Intermediate 5-7 Hours

Materials Needed for Willow bag Pattern

β€” Main Fabric

  • 01
    Raffia yarn, approximately 380 yards (350 meters) - Ispie, Autumn color (used in example)
  • 02
    Beads diameter 16 mm, hole 2.5 mm - 167 pieces (large beads for main canvas)
  • 03
    Beads diameter 8 mm, hole 2 mm - 50 pieces (small beads for handles and accents)

β€” Tools Required

  • 01
    Crochet hook size 2.5 mm
  • 02
    Crochet hook size 2.0 mm (for slipping beads)
  • 03
    Scissors
  • 04
    Plastic needle with large eyelet
  • 05
    Iron (for steaming through a damp cloth)
  • 06
    Glue (PVA glue or glue stick) to secure and fix ends

Progress Tracker

0% Complete

β€” Crochet the canvas (16*10 beads) :

Info :

No need to steam or straighten the raffia yarn, when crocheting this model of the bag. Take the 2.5 mm hook.

Round 1 :

1 row. Crochet 13 CH. Join in the circle, SlSt.

Info :

Put on the bead, insert the hook in the 7th loop of the circle, crochet 1 SC together with the bead. Next 10 SC (=11);

Info :

Repeat to the end of the row.

Info :

There are 10 beads in the row now.

Round 2 :

2 row. Crochet to the other side (11 SC, SlSt)*9,

Info :

Next, 6 SC.

Round 3 :

3 row. Crochet 13 CH. Join in the circle, SlSt. Put on the bead, insert the hook in the 7th loop of the circle, crochet 1 SC together with the bead. Next 5 SC (=6);

Info :

Crochet 13 CH. Join in the circle, SlSt.

Info :

Put on the bead, insert the hook in the 7th loop of the circle, crochet 1 SC together with the bead. Next 4 SC. Then insert the hook in the 6th loop of the circle of the previous row, crochet 1 SC together, 5 SC (=11).

Info :

Repeat to the end of the row.

Round 4 :

4 row. Crochet to the other side (11 SC, SlSt)*9,

Info :

Next 6 SC.

Round 5-31 :

5-31 rows. Repeat the pair of the 3rd - 4th rows.

Info :

Steam the canvas with an iron on the wrong side through a damp cloth. Don’t push too hard, so as not to deform the beads.

Info :

Bend the edges of the canvas to each other.

Round 32 :

32 row. 5 SC, insert the hook in the 6th loop of the circle of the 1st row, crochet 1 SC together, 5 SC (=11), SlSt.

Info :

Repeat to the end of the row.

Info :

Don’t cut the thread.

β€” Crochet the bottom (7 beads) :

Info :

Crochet the bottom in the same way as the 1st - 2nd row of the canvas. The bottom consists of 7 beads.

Info :

Cut the thread, pull out the end. Insert the hook under the 1st SC of the 1st row, pull out the end, tighten the end back to the wrong side. Tie the knot. Strengthen and hide the ends.

Info :

Steam the bottom with an iron on the wrong side through a damp cloth. Don’t push too hard, so as not to deform the beads.

β€” Assembly :

Info :

Take the base of the bag, join with the bottom.

Round 1 :

Insert the hook in the 6th loop of the circle of the 1st row of the bottom, crochet 1 SC together, 5 SC, SlSt.

Round 2 :

Next, 5 SC, insert the hook in the 6th loop of the circle of the 1st row of the bottom, crochet 1 SC together, 5 SC (=11), SlSt.

Info :

Crochet to the end of the bottom.

Info :

Turn the part side of the bag to himself.

Round 3 :

Crochet 5 SC. Bend the bottom 90 degrees. Insert the hook in the 6th loop of the last circle of the bottom, crochet 1 SC together, 5 SC (=11), SlSt.

Info :

Turn the base of the bag to the other side.

Round 4 :

Crochet 5 SC. Insert the hook in the 5th loop of the circle of the 2nd row of the bottom, crochet 1 SC together, 5 SC (=11), SlSt.

Info :

Crochet to the beginning of the bottom.

Info :

Turn the part side of the bag to himself.

Round 5 :

Crochet 5 SC, insert the hook in the 5th loop of the 1st circle of the bottom, crochet 1 SC together.

Info :

Cut the thread, pull out the end. Insert the hook under the 1st SC of the row, pull out the end, tighten the end back to the wrong side. Tie the knot.

Info :

Turn the bag inside out. Strengthen and hide the ends.

Info :

Fix the ends with a glue (stick or PVA glue).

β€” Crochet the handle(*2) :

Info :

Take the 2.5 mm hook. Crochet the chain with CH five meters long.

Info :

Slip the 25 small beads at random intervals (1 meter - 5 beads). Change the hook to 2 mm when slip the bead.

Info :

Cut the thread, pull out the end. Join in the circle. Tie the knot.

Info :

Strengthen and fix the ends with a glue.

Info :

Straighten the chain and twist in a spiral. Hook one end to something for convenience.

Info :

Next fold in half and twist in a spiral again.

Info :

Then fold in half and twist in a spiral again.

Assembly Instructions

  • Take the base of the bag and align the edge beads with the bottom; join the base to the bottom by inserting the hook in the specified loops and crocheting 1 SC together followed by 5 SC, finishing with a SlSt as described.
  • Work around the edge to the end of the bottom, turning the part side of the bag as instructed and bending the bottom 90 degrees to form the bag shape, joining last circles with 1 SC together and 5 SC for each corner.
  • When assembling the sides, insert the hook into the specified loops (5th or 6th loop as noted) to crochet 1 SC together and continue 5 SC (=11) to secure panels evenly.
  • After finishing the joins, cut the threads, pull the ends through to the wrong side, tighten, tie a knot, strengthen and hide the ends and fix with PVA or glue stick for durability.
  • Make two handles by crocheting long chains with beads at intervals, switch to the 2.0 mm hook when sliding beads, join the chain ends in a circle and strengthen them with glue before twisting into a spiral.
  • Steam the canvas and bottom on the wrong side through a damp cloth to set shape, then bend and assemble edges carefully to avoid deforming the beads.

Important Notes

  • πŸ’‘Do not steam or press the beads directly; always steam the wrong side through a damp cloth to avoid deforming bead surfaces.
  • πŸ’‘Change to the 2.0 mm hook when slipping beads onto the chain to make bead placement easier and avoid stretching the raffia.
  • πŸ’‘Do not cut the working thread until instructed to pull the end back to the wrong side and knot securely to hide and strengthen joins.
  • πŸ’‘Seal and secure exposed ends with glue (PVA or glue stick) after knotting to prevent unravelling of raffia threads.
  • πŸ’‘Work with consistent tension when crocheting circles around beads to ensure uniform bead circles and an even canvas.

This Willow bag pattern brings raffia and beads together for a chic handmade accessory you can be proud to wear. πŸ‘œ Follow the step-by-step photos and clear instructions to build a beaded canvas, join a fitted bottom, and craft twisted beaded handles. 🧢 Finish with light steaming and a little glue for a polished, wearable result. ✨

You ask,

we answer.

FAQs

What size will the finished piece be?

The finished bag measures approximately length - 10 inches (25 cm), width - 1 1/8 inches (3 cm), height - 16 inches (40 cm), with handle length about 21 1/8 inches (54 cm) when using the specified materials.

Can I use different yarn weights for this pattern?

You can experiment with different yarns, but the pattern is designed for raffia-type yarn; changing yarn weight will alter finished size, bead fit, and may require adjusting hook sizes and bead hole sizes.

Do I need any special tools when working with beads?

Yes - a 2.0 mm hook is recommended for slipping beads onto the chain and a plastic needle with a large eyelet is useful for threading beads and securing ends.

How long will this project take to complete?

Most crocheters finish this bag in about 5-7 hours depending on experience and bead handling speed; steaming, assembly and handle finishing are included in this time estimate.