🧢 Beautiful ✨ Detailed πŸ’ Adorable

Bonnie Amigurumi Pattern

Bonnie Amigurumi Pattern
4.3β˜… Rating
5-7 Hours Time Needed
2.9K Made This
βœ‚οΈ

Intermediate Level

Ideal for those with basic crochet experience, featuring slightly more advanced stitches and techniques to expand your skills.

⏱️

Weekend Treat

Takes 5-7 hours, making it an enjoyable project to finish over a couple of days.

🧸

Cute Companion

An adorable friend to cherish, handcrafted with love to bring comfort and joy for years to come.

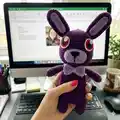
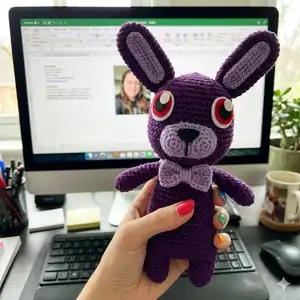
About This Bonnie Amigurumi Pattern

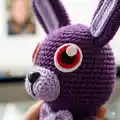
This pattern creates a sweet Bonnie amigurumi with expressive anime-style eyes, long ears, and a cute bow tie. You will work the head, body, arms, legs, ears and facial features in rounds, then assemble and add felt details. It uses Hobby Lobby 'I Love This Cotton' yarn colors and felt sheets for the eyes and nose.

Bonnie Amigurumi Pattern crochet pattern - detailed view of completed project

Clear step-by-step rounds are provided for each piece along with tips for stuffing and joining the legs to the body. Eye templates and a linked video tutorial help you create the anime eyes pictured.

Why You'll Love This Bonnie Amigurumi Pattern

I absolutely love this pattern because it brings a playful character to life with simple yet expressive details like the anime eyes and bow tie. I enjoy how the design balances straightforward rounds with chances to customize color and facial expression. The joining of the legs into the body creates a neat silhouette that I find very satisfying to finish. I also appreciate that the pattern includes tips and a video reference so makers can achieve a polished result.

Bonnie Amigurumi Pattern step 1 - construction progress Bonnie Amigurumi Pattern step 2 - assembly progress Bonnie Amigurumi Pattern step 3 - details and accessories Bonnie Amigurumi Pattern step 4 - final assembly and finishing

Switch Things Up

I love how easy it is to customize Bonnie's colorsβ€”try pastel shades for a softer friend or bold hues for a striking look.

I sometimes increase the hook size and use bulky yarn to make a chunky, cuddly version for younger kids.

I also enjoy making mini versions by using fingering yarn and a smaller hook to create keychain-sized Bonnies.

I often swap the felt eyes for safety eyes for a different finish, but be sure to choose child-safe options if giving to children.

I add embroidered freckles or eyebrows to change Bonnie's expression and personality.

I occasionally make a small outfit or scarf to dress Bonnie up for the seasonsβ€”scarves or tiny hats work great.

I recommend experimenting with different bow tie colors or adding a small bell or button in the center for extra detail.

I sometimes add a bit of wire into the ears for posability, but only if the finished toy is for display and not for small children.

I enjoy making matching setsβ€”try making a small Bonnie and a larger companion in coordinating colors for a gift set.

I often change the eye spacing slightly to create different expressions; place the eyes and check the look before permanently attaching them.

Common Mistakes & How to Fix Them

βœ— Not using a stitch marker when joining the left leg to the body can cause misalignment; place a stitch marker in the last stitch of the left leg to mark your new start and align the legs correctly. βœ— Overstuffing the head and body will make shaping difficult and distort the stitches; stuff gradually and firmly but stop before pieces become too rigid to shape. βœ— Skipping stitch counts during increases and decreases leads to uneven shaping and mismatched rounds; count your stitches after every round and mark each round as you finish. βœ— Pulling yarn too tightly while crocheting makes the fabric stiff and can show stuffing; maintain consistent, moderate tension throughout to keep the amigurumi soft and even.

Bonnie Amigurumi Pattern

Make your own Bonnie plush with this detailed intermediate amigurumi pattern. Follow clear, step-by-step rounds to crochet the head, body, limbs, ears, and charming bow tie. Includes eye templates and assembly tips so your Bonnie looks just like the photos. Perfect for crafters who love character toys and a fun weekend project.

Intermediate 5-7 Hours

Materials Needed for Bonnie Amigurumi Pattern

β€” Main Fabric

  • 01
    Hobby Lobby "I Love This Cotton" - Color 252 Purple
  • 02
    Hobby Lobby "I Love This Cotton" - Color 250 Amethyst
  • 03
    Hobby Lobby "I Love This Cotton" - Color 60 Red
  • 04
    Felt sheet - White (for eyes)
  • 05
    Felt sheet - Black (for pupils and nose)
  • 06
    Felt sheet - Pink (accent for eyes)
  • 07
    Polyester fiberfill - sufficient amount to stuff head, body, legs, and arms

β€” Tools Required

  • 01
    Crochet hook D/3.25mm
  • 02
    Polyester fiberfill
  • 03
    Darning needle (yarn needle)
  • 04
    Scissors
  • 05
    Stitch markers
  • 06
    Felt and glue or fabric glue for eyes
  • 07
    Cricut or cutting tool for felt (optional) for anime eye templates

Progress Tracker

0% Complete

β€” Head :

Round 01 :

MR and place 6SC (6)

Round 02 :

[INC] x6 (12)

Round 03 :

[SC, INC] x6 (18)

Round 04 :

[SC1, INC, SC1] x6 (24)

Round 05 :

[SC3, INC] x6 (30)

Round 06 :

[SC2, INC, SC2] x6 (36)

Round 07 :

[SC5, INC] x6 (42)

Round 08 :

[SC3, INC, SC3] x6 (48)

Round 09-20 :

[SC] across (48)

Info :

TIP: I place eyes between rounds 13-14 two inches apart.

Round 21 :

[SC3, DEC, SC3] x6 (42)

Round 22 :

[SC5, DEC] x6 (36)

Round 23 :

[SC2, DEC, SC2] x6 (30)

Round 24 :

[SC3, DEC] x6 (24)

Round 25 :

[SC1, DEC, SC1] x6 (18)

Round 26 :

[SC1, DEC] x6 (12)

Round 27 :

[DEC] x6 (6)

Info :

Slip stitch off, and make sure you leave enough yarn to sew into last 6 stitches. Weave in tails

β€” Bow Tie :

Bow Tie :

Chain 25, attach first stitch to last with a slip stitch. [SC] around for four rounds. Slip stitch off, make a long tail (16') and wrap around the center as shown in video tutorial.

β€” Legs :

Info :

TIP: Stuff the legs as you go

Round 01 :

MR, [SC] x5 inside ring and tighten the loop (5)

Round 02 :

[INC] x5 (10)

Round 03 :

[SC1, INC] x5 (15)

Round 04-05 :

[SC] across (15)

Round 06 :

[SC] across (15)

Info :

- Break the yarn and fasten off your work. The right leg is done. - Repeat R1-6 with left leg as well, but this time do not fasten off. - Place a stitch marker into the last stitch you made on the left leg. This is your new start for your rounds. - Continue next to the body.

β€” Body :

Round 07 :

8SC in the stitches of the left leg, CH9 and join to the right leg with a SC (this counts as the 1st SC of the following SC), SC in the next stiches of the right leg, 9SC in the 9CH, 7SC in the stitches of the left leg. (48)

Round 08 :

[SC] across (48)

Round 09 :

[SC22, DEC] x2 (46)

Round 10 :

[SC] across (46)

Round 11 :

[SC21, DEC] x2 (44)

Round 12 :

[SC] across (44)

Round 13 :

[SC20, DEC] x2 (42)

Round 14 :

[SC] across (42)

Round 15 :

[SC19, DEC] x2 (40)

Round 16 :

[SC] across (40)

Round 17 :

[SC18, DEC] x2 (38)

Round 18 :

[SC] across (38)

Round 19 :

[SC17, DEC] x2 (36)

Round 20 :

[SC] across (36)

Round 21 :

[SC16, DEC] x2 (34)

Round 22 :

[SC] across (34)

Round 23 :

[SC15, DEC] x2 (32)

Round 24 :

[SC] across (32)

Round 25 :

[SC14, DEC] x2 (30)

Round 26 :

[SC] across (30)

Round 27 :

[SC3, DEC] x6 (24)

Info :

Break yarn and fasten off.

β€” Arms :

Round 01 :

MR with 6SC (6)

Round 02 :

[INC] x6 (12)

Round 03-11 :

[SC] across (12)

Info :

TIP: I stuff the tips of the hands up to round 5, but leave the rest of the arms empty.

β€” Eyes :

Round 01 :

With pink yarn, MR with 6SC (6)

Round 02 :

[INC] x6 (12)

Round 03 :

Change to white, [SC1, INC] x6 (18)

Info :

Slip stitch off. I have a tutorial on how to make "anime" eyes which will be linked at the end of this PDF.

β€” Nose :

Round 01 :

MR and place 5SC (5)

Round 02 :

[INC] x5 (10)

Round 03 :

[SC1, INC] x5 (15)

Info :

Repeat 1-3 but this time don't slip stitch off. Sew first piece down the side for 3 stitches on both pieces. Check out our tutorial for further instructions.

Round 03-05 :

[SC] around both pieces. (24)

β€” Outer Ear :

Round 01 :

MR with 6SC (6)

Round 02 :

[INC] x6 (12)

Round 03 :

[SC1, INC] x6 (18)

Round 04-17 :

[SC] around (18)

Round 18 :

[SC1, DEC] x6 (12)

Info :

Slip stitch off and attach to top of the head.

β€” Inner Ear :

Inner Ear :

Chain 13, skip first chain and [SC] inside 11 chains, INC2 in final chain, turn and [SC11, INC2] in the backs of the foundational chains. Slip stitch off and attach to the fronts of the ears.

Assembly Instructions

  • Place and attach the outer ears to the top of the head, then sew the inner ear pieces to the fronts of the ears for the layered ear look.
  • Sew the nose pieces together along their sides for 3 stitches on both pieces, then attach the assembled nose to the muzzle area centered under the eyes.
  • Position the eyes between rounds 13-14 on the head about two inches apart and attach either with felt or sewn pieces per the eye tutorial.
  • Attach the head to the body by aligning the neck opening to the top of the body and sewing securely with the long tail left after finishing the head.
  • Attach arms to the sides of the body at the desired height (use photos for reference) and sew needle-wrapped bow tie around the neck center.
  • Pin parts in place before sewing to ensure correct symmetry and weave in all tails after assembly for a neat finish.

Important Notes

  • πŸ’‘Use stitch markers to keep track of your rounds and when joining the left leg to the body to prevent misalignment.
  • πŸ’‘Stuff legs as you go and stuff the head firmly but avoid overstuffing which will distort shaping and stitches.
  • πŸ’‘Leave enough yarn at the end of the head to sew into the last 6 stitches and always weave in tails after assembly.
  • πŸ’‘If you change yarn weight, adjust your hook and eye sizes accordingly to maintain correct proportions and placement.

This Bonnie amigurumi pattern brings a playful, characterful companion to your hands with a few simple supplies and lots of charm. Whether you make one as a gift or for your own shelf, the expressive eyes and bow tie give her so much personality. Enjoy the making process and share your finished Bonnie with the crafting community! 🧢🧡

You ask,

we answer.

FAQs

What size will the finished piece be?

The finished amigurumi measures approximately 8-10 inches tall depending on yarn tension and hook size used.

Can I use different yarn weights for this pattern?

Yes, you can use different yarn weights but this will change the final size; adjust your hook and eye templates accordingly.

Do I need prior crochet experience for this pattern?

This pattern is rated intermediate, so basic knowledge of single crochet, increases, decreases, and magic ring is recommended.

How long does this project typically take to complete?

Most crocheters complete this project in 5-7 hours, though time may vary based on experience level and how much time you spend on assembly and eyes.