🧶 Beautiful ✨ Detailed 💝 Adorable

Squid Coraline Amigurumi Pattern

Squid Coraline Amigurumi Pattern
4.7★ Rating
2-4 Hours Time Needed
3.1K Made This
✂️

Intermediate Level

Ideal for those with basic crochet experience, featuring slightly more advanced stitches and techniques to expand your skills.

⏱️

Bite-Sized Project

Finishes in 2-4 hours—perfect for an afternoon of creative relaxation.

🧸

Cute Companion

An adorable friend to cherish, handcrafted with love to bring comfort and joy for years to come.

About This Squid Coraline Amigurumi Pattern

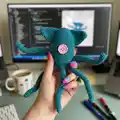
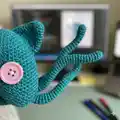
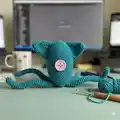
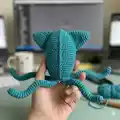
This pattern creates a Coraline-inspired squid amigurumi crocheted in 2.5 mm cotton yarn. It includes full round-by-round instructions for the body, ears, and six tentacle arms, plus photos to guide assembly. The finished squid stands approximately 21 cm high when made with the recommended yarn and hook.

Squid Coraline Amigurumi Pattern crochet pattern - detailed view of completed project

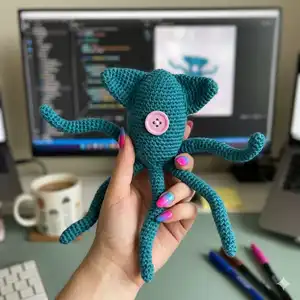
You will work in continuous rounds using single crochet increases and decreases for shaping. The arms contain pipe cleaners for posability and the ears are sewn flat to the head.

Why You'll Love This Squid Coraline Amigurumi Pattern

I absolutely love this pattern because it transforms simple stitches into a whimsical character with personality. I enjoy how the shaping gives the squid a distinctive Coraline-inspired silhouette and how the pipe cleaner tentacles let you pose it playfully. The pattern is satisfying to crochet start-to-finish and the finished size is just right for gifting. I also love that you can easily customize colors and add small details like buttons or embroidery to make each squid unique.

Squid Coraline Amigurumi Pattern step 1 - construction progress Squid Coraline Amigurumi Pattern step 2 - assembly progress Squid Coraline Amigurumi Pattern step 3 - details and accessories Squid Coraline Amigurumi Pattern step 4 - final assembly and finishing

Switch Things Up

I love how easy it is to change colors for a completely different look; try pastel shades for a soft, whimsical squid or bright neons for something bold.

I often make a mini version by using thinner yarn and a smaller hook to create keychain-friendly squids that are adorable gifts.

I like adding embroidered accents or small felt shapes around the button to make expressive faces or thematic details.

I sometimes use safety eyes instead of a button for a different eye style, but always secure them well if the toy is for a child.

For a more vintage look, I switch to a cotton-blend yarn with a slightly fuzzy finish and use larger buttons for character.

I recommend experimenting with stuffing levels: lighter stuffing gives a floppy, playful creature while firmer stuffing makes it more structured.

I also enjoy creating outfits or tiny accessories—crochet a collar or tiny hat to change the character's personality.

To make the tentacles extra posable, try using two thinner wires instead of a single pipe cleaner and wrap them in tape before inserting to prevent fraying.

I sometimes vary the tentacle length to create a more dynamic, uneven silhouette that looks very organic and sea-like.

Finally, I like to personalize each squid by sewing initials or a small heart on the back—these small touches make each piece uniquely mine.

Common Mistakes & How to Fix Them

✗ Using a different hook size without adjusting yarn can change the final size dramatically; always check your gauge and adjust hook size to match the recommended proportions. ✗ Forgetting to leave a long thread when fastening off the ears makes sewing them to the body difficult; leave a generous tail and use a wool needle to secure them between the specified rounds. ✗ Not inserting the pipe cleaner properly in the arms will cause poor posability; fold the pipe cleaner in half, insert it fully lengthwise, and trim any excess before closing the end. ✗ Overstuffing the body will distort the shape and make sewing the button and parts tricky; stuff gradually and check the silhouette often to maintain even shaping.

Squid Coraline Amigurumi Pattern

Make your own Coraline-inspired squid with this charming amigurumi pattern. You will follow clear, step-by-step rounds to crochet the body, ears, and six tentacle arms using 2.5 mm cotton yarn. The pattern is photo-supported and great for making a handmade gift or a shelf buddy. Enjoy a fun, creative project that lets you personalize colors and finishing details.

Intermediate 2-4 Hours

Materials Needed for Squid Coraline Amigurumi Pattern

— Main Fabric

  • 01
    2.5mm cotton yarn - Medium Blue (approx amount to make a 21 cm squid)
  • 02
    2 cm light pink button (1 piece)
  • 03
    Synthetic cotton filling (small amount to stuff body)
  • 04
    6 pipe cleaners (for tentacle arm support)

— Tools Required

  • 01
    Crochet hook size 2.5mm
  • 02
    Needle and thread to sew the button
  • 03
    Wool needle (yarn needle) for sewing pieces
  • 04
    Scissors
  • 05
    Stitch markers
  • 06
    Polyester stuffing (synthetic cotton filling)
  • 07
    6 pipe cleaners

Progress Tracker

0% Complete

— Body :

Info :

With 2.5 mm blue cotton yarn.

Round 1 :

6 sc in a magic ring (6)

Round 2 :

6 inc (12)

Round 3 :

1 sc (12)

Round 4 :

1 sc, 1 inc (18)

Round 5 :

2 sc, 1 inc (24)

Round 6 :

1 sc (24)

Round 7 :

3 sc, 1 inc (30)

Round 8 :

4 sc, 1 inc (36)

Round 9-23 :

1 sc (36) (15 turns)

Round 24 :

4 sc, 1 dec (30)

Round 25-26 :

1 sc (30)

Round 27 :

3 sc, 1 dec (24)

Round 28 :

1 sc (24)

Info :

Sew the button between R.14 and R.19 and stuffing.

Round 29 :

2 sc, 1 dec (18)

Round 30 :

1 sc, 1 dec (12)

Round 31 :

6 dec (6)

Info :

Fasten off with slst, cut and hide the thread.

— Ears :

Info :

With 2.5 mm blue cotton yarn.

Round 1 :

6 sc in a magic ring (6)

Round 2 :

1 sc, 1 inc (9)

Round 3 :

1 sc (9)

Round 4 :

2 sc, 1 inc (12)

Round 5 :

1 sc (12)

Round 6 :

3 sc, 1 inc (15)

Round 7 :

1 sc (15)

Round 8 :

4 sc, 1 inc (18)

Round 9 :

1 sc (18)

Round 10 :

5 sc, 1 inc (21)

Round 11 :

1 sc (21)

Info :

Fasten off with slst and leave a thread to sew to body between R.4 and R.15. This piece is not stuffed.

— Arms :

Info :

With 2.5 mm blue cotton yarn. Make six equal pieces.

Round 1 :

4 sc in a magic ring (4)

Round 2 :

4 inc (8)

Round 3-31 :

1 sc (8) (24 turns)

Info :

Insert the pipe cleaner folded in half and cut off the excess piece.

Info :

Fasten off with slst, leave a thread and sew to body between R.27 and R.28.

Assembly Instructions

  • Sew the 2 cm light pink button to the front of the body between rounds R.14 and R.19 before or while stuffing to secure it in place.
  • Sew the two ears to the top sides of the body using the reserved tail from the ears, positioning each ear to attach between rounds R.4 and R.15 for correct placement.
  • Insert a folded pipe cleaner into each arm (tentacle), trim the excess so the ends are flush, then sew each arm to the base of the body, attaching between R.27 and R.28 and spacing the six arms evenly.
  • Stuff the body gradually through the opening while shaping; close the body by working the final decreases and hiding the tail securely.
  • Pin parts in place before final sewing to check symmetry and adjust angles, then sew securely using a wool needle and weave in any loose ends.

Important Notes

  • 💡Use 2.5 mm crochet hook and similar cotton yarn to match the shown size and shape for best results.
  • 💡Do not stuff the ears; they are sewn flat to the body and should remain unstuffed for correct shaping.
  • 💡Insert pipe cleaners into each arm folded in half for posability and trim any protruding wire before final sewing.
  • 💡Leave long thread tails when fastening off pieces you will sew (ears and arms) to make assembly easier.
  • 💡Sew the button while stuffing the body so it sits flush and the stuffing supports its placement.

This handmade Coraline squid is a delightful little companion to make and gift, full of quirky personality and charm. It arrives to life with simple stitches, tiny details, and poseable tentacles that make it playful and unique. Share your finished squid with friends or keep it for cozy shelf display—every stitch holds a bit of joy. 🧶🧵✨

You ask,

we answer.

FAQs

What size will the finished piece be?

The finished amigurumi measures approximately 21 cm high when using the recommended 2.5 mm cotton yarn and hook size.

Can I use different yarn weights for this pattern?

Yes, you can use different yarn weights, but this will affect the final size and texture; adjust your hook size accordingly and expect a different finished measurement.

Do I need prior crochet experience for this pattern?

This pattern is rated intermediate, so basic knowledge of single crochet, increases, decreases, and sewing pieces together is recommended for best results.

How long does this project typically take to complete?

Most crocheters complete this project in 2-4 hours, though time may vary based on experience level, customization, and finishing details.