🧢 Beautiful ✨ Detailed πŸ’ Adorable

Smurf Amigurumi Pattern

Smurf Amigurumi Pattern
4.2β˜… Rating
2-3 Hours Time Needed
2.7K Made This
βœ‚οΈ

Intermediate Level

Ideal for those with basic crochet experience, featuring slightly more advanced stitches and techniques to expand your skills.

⏱️

Bite-Sized Project

Finishes in 2-4 hoursβ€”perfect for an afternoon of creative relaxation.

🧸

Cute Companion

An adorable friend to cherish, handcrafted with love to bring comfort and joy for years to come.

About This Smurf Amigurumi Pattern

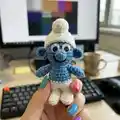
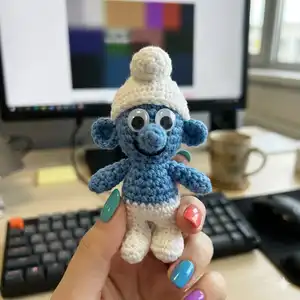
This pattern creates a small Smurf amigurumi approximately 10 cm tall using light blue and white acrylic yarn. It includes round-by-round instructions for the head, body, legs, arms, ears, nose and hat, with assembly and finishing notes. The design is compact and perfect for gifts, keychain-style keepsakes, or display on a shelf.

Smurf Amigurumi Pattern crochet pattern - detailed view of completed project

You will learn simple shaping techniques and basic decreases to form facial features and limbs. The pattern is written in rounds with clear stitch counts for easy tracking.

Why You'll Love This Smurf Amigurumi Pattern

I absolutely love this pattern because it captures the classic Smurf look in a very small, lovable package. I enjoy how quickly it comes together while still offering fun shaping challenges for the head, legs and hat. The tiny size makes it perfect for gifting or for trying new color variations. Every finished Smurf feels special β€” small details like the hat and nose bring so much personality to the piece.

Smurf Amigurumi Pattern step 1 - construction progress Smurf Amigurumi Pattern step 2 - assembly progress Smurf Amigurumi Pattern step 3 - details and accessories Smurf Amigurumi Pattern step 4 - final assembly and finishing

Switch Things Up

I love to change colors to create different personalities β€” try pastel blues or even a green 'forest' version for variety.

I often use different yarn weights to change size; a bulkier yarn with a larger hook makes a chunky, cuddly Smurf.

For a keychain version, use thinner yarn and an even smaller hook to make a tiny portable Smurf.

I sometimes embroider a smile instead of using glue for the mouth to make the toy more child-safe.

Try swapping plastic eyes for embroidered eyes for a fully handmade finish and safer toy for children.

I like to add tiny accessories like a crocheted scarf or little button to personalize each Smurf I make.

To make a posable figure, consider adding thin wire inside the arms before stuffing, then cover with the usual stuffing.

Experiment with slightly different placements for the eyes and nose to change the expression and character of your Smurf.

I recommend practicing the decreases on scrap yarn first if you find sctog or 2sctog tricky β€” it helps to keep even tension.

When giving as a gift, I sometimes make a matching small hat pompom in a contrasting color to add a playful detail.

Common Mistakes & How to Fix Them

βœ— Skipping stitch counts during rounds can cause the body to become misshapen; always count stitches at the end of each round and correct any mistakes immediately. βœ— Not stuffing evenly leads to lumps or flat areas in the head or body; stuff gradually and shape with small amounts of fiberfill as you go. βœ— Forgetting to join the white yarn at the correct round can leave an obvious color gap; follow the join instruction exactly at the end of round 16 before continuing in white. βœ— Attaching limbs without pinning first can result in uneven placement; pin and check symmetry before sewing to the body to ensure a balanced look.

Smurf Amigurumi Pattern

Make a charming pocket-sized Smurf amigurumi with this clear, photo-accompanied pattern. You will create a 10 cm high Smurf using light blue and white acrylic yarn, with simple shaping for the head, body, limbs and hat. The pattern includes round-by-round instructions, stuffing and assembly tips so you can finish a cute handmade toy to gift or keep. Perfect for crafters who enjoy small, detailed amigurumi projects.

Intermediate 2-3 Hours

Materials Needed for Smurf Amigurumi Pattern

β€” Main Fabric

  • 01
    Wool acrylic 100% Light Blue and White (as listed in pattern)

β€” Tools Required

  • 01
    Crochet hook size 2mm
  • 02
    Tapestry needle
  • 03
    Stuffing (polyester fiberfill)
  • 04
    Plastic eyes

Progress Tracker

0% Complete

β€” Head and body :

Info :

Work in circular rows.

Round 1 :

with Light Blue yarn 10sc in magic ring. (10sts)

Round 2 :

2sc in each st [20sts]

Round 3-9 :

1sc in each st [20sts]

Round 10 :

(2sctog) rep to end [10sts]

Round 11 :

1sc in each st [10sts]

Round 12 :

(1sc, 2sc in next st) rep to end [15sts]

Round 13-14 :

1sc in each st [15sts]

Round 15 :

(2sc, 2sc in next st) rep to end [20sts]

Round 16 :

1sc in each st [20sts]

Info :

join White yarn

Round 17-19 :

1sc in each st [20sts]

Info :

stuff

Info :

Now we work a leg, continues with the white yarn.

Info :

Counts 10 stitches and join with a chain the last point made with 10Β° stitch.

Round 20 :

3sc, 2sctog, 3sc, 2sctog + chain initially made [9sts]

Round 21 :

2sctog working in the chain and in the first sc [8sts]

Round 22 :

1sc in each st [8sts]

Info :

Now we will work a foot, continues with the white yarn

Round 23 :

2hdc in next st, 1dc and 1tr in next st, 2tr in next st, 1tr and 1dc in next st, 2hdc in next st, 1sc in next 3st [13st]

Round 24 :

1sc in each st [13sts]

Round 25 :

work sl st for all the way around in back loop [13sts]

Info :

Fill with stuffing, sew the two ends and cut the thread.

Info :

Work the other leg and foot in the same way.

β€” Arms :

Round 1 :

with Light Blue yarn 6sc in magic ring. [6sts]

Round 2 :

1sc in each st [6sts]

Round 3 :

(1sc, 2sctog) rep to end [4sts]

Round 4-6 :

1sc in each st [4sts]

Info :

Fill with stuffing, cut the thread, sew them to the body.

β€” Ears :

Round 1 :

with Light Blue yarn 5sc in magic ring. [5sts]

Round 2 :

2sc in each st [10sts]

Info :

Cut the thread, sew them to the body.

β€” Nose :

Round 1 :

with Light Blue yarn 6sc in magic ring. [6sts]

Round 2 :

(1sc, 2sctog) rep to end [4sts]

Round 3 :

1sc in each st [4sts]

Info :

Fill with stuffing, cut the thread, sew it to the center of the head.

β€” Hat :

Round 1 :

with White yarn 10sc in magic ring. [10sts]

Round 2-9 :

1sc in each st [10sts]

Round 10 :

2sc in each st [20sts]

Round 11 :

(1sc in next 3st, 2sc in next st) rep to end [25sts]

Round 12-14 :

1sc in each st [25sts]

Info :

Fill the top with a bit of stuffing and sew it on the head, glue the eyes and here it is your Smurf :)

Info :

As always you can use my patterns to make and sell your creations, all I ask is that design credit and a link are posted in the description of the item

Info :

If you have any questions feel free to contact me.

Info :

I'd love to see your work, share photos of your creations to page me on Fb Valery Lab.

Info :

Thanks again for visiting this page, and happy crocheting! Bye bye!

Assembly Instructions

  • Sew the two legs together at the top opening created after round 25 and attach them to the bottom of the body, securing firmly and hiding seams inside the body.
  • Pin and sew the arms to the sides of the body at about rounds 12-14 for a natural position, then secure with a tapestry needle using whipstitch.
  • Attach the ears on either side of the head by sewing them at the base, positioning symmetrically about the eye level for balance.
  • Sew the stuffed nose to the center of the head and ensure it is firmly anchored through several passes with the tapestry needle.
  • Fill the hat top with a bit of stuffing, sew the hat to the head opening, and glue or attach plastic eyes in place to finish the face.

Important Notes

  • πŸ’‘Use a stitch marker to mark the beginning of each round so you do not lose your place during shaping.
  • πŸ’‘Stuff the head and body gradually, checking shape often to avoid overstuffing or creating lumps.
  • πŸ’‘Weave in ends as you go to keep the assembly tidy and reduce finishing time at the end.

This little Smurf is a delightful tiny project that brings classic character charm to your hands. Perfect as a quick gift or shelf buddy, the pattern is compact and satisfying to finish. Give it as a handmade keepsake or make a whole family of Smurfs to display. 🧢😊

You ask,

we answer.

FAQs

What size will the finished piece be?

The smurf is about 10cm high when made with the recommended yarn and 2mm hook.

Can I use different yarn weights for this pattern?

Yes, but changing yarn weight and hook size will alter the final size; choose a hook appropriate to your yarn and expect a different finished height.

Do I need prior crochet experience for this pattern?

This pattern is rated intermediate, so familiarity with basic stitches (sc, hdc, dc) and working in the round is recommended.

How long does this project typically take to complete?

Most crocheters complete this small Smurf in around 2-3 hours, though time may vary with experience and finishing details.