Make a sweet, snuggly Bunny Lovey with this complete crochet pattern. You will create a soft head, ears, legs, tail and a cozy lovey body using clear step-by-step rounds and helpful photos. The pattern includes full materials, abbreviations, assembly and embroidery instructions so you can finish a lovely handmade toy for a baby or a special gift. You can do it!
Progress Tracker
0% Complete
— Instruments and Materials :
Info :
hook 2,5 mm (B) and 3,0 mm. gray and teal blue yarn; I used Himalaya Deluxe BAMBOO, colors 124-19 and 124-24, the ball is275 yards (250 m) longand and its weight 100 g; black and teal blue DMC floss for embroidering eyes and nose (DMC floss colors 310 and 597); stuffing material; sewing needle; sewing pins; scissors; Love.
— Abbreviations :
Info :
ch - chain Stitch. sl st - sliped Stitch. sc - single Crochet. hdc - Half Double Crochet. st - Stitch. inc - Increase. dec - Decrease. rep - Repeat.
— Recommendation :
Info :
The toys should be crocheted with tight stitches, so that when filling and stretching the material, the stuffing willnot become visible. To do this, it is necessary to select a hook which is smaller than it is recommended on the yarn tag. It all depends on the density of knitting that you get. Every experienced amigurumi maker feels which hook is needed for certain to obtain high knitting density and achieve a neat result.
— Head :
Round 1 :
6 sc in Magic Ring (6)
Round 3 :
(Inc, 1 sc) rep 6 times around (18)
Round 4 :
(2 sc, inc) rep 6 times around (24)
Round 5 :
1 sc, (Inc, 3 sc) rep 5 times around, Inc, 2 sc (30)
Round 6 :
(4 sc, inc) rep 6 times around (36)
Round 7 :
2 sc, (Inc, 5 sc) rep 5 times around, Inc, 3 sc (42)
Round 8 :
(6 sc, Inc) rep 6 times around (48)
Round 9 :
3 sc, (Inc, 7 sc) rep 5 times around, Inc, 4 sc (54)
Round 10 :
(8 sc, Inc) rep 6 times around (60)
Round 11-20 :
60 sc (10 rows should be without changes) (60)
Round 21 :
(8 sc, dec) rep 6 times around (54)
Round 22 :
3 sc, (dec, 7 sc) rep 5 times around, dec, 4 sc (48)
Round 23 :
(6 sc, dec) rep 6 times around (42)
Round 24 :
2 sc, (dec, 5 sc) rep 5 times around, dec, 3 sc (36)
Round 25 :
(4 sc, dec) rep 6 times around (30)
Round 26 :
1 sc, (dec, 3 sc) rep 5 times around, dec, 2 sc (24)
Info :
Stuff detail with stuffing material.
Round 27 :
(2 sc, dec) rep 6 times around (18)
Round 28 :
(1 sc, dec) rep 6 times around (12)
Round 29 :
6 dec, sl st (6)
Info :
Add even more filler (you can use a wooden chopstick for this, it is very convenient). Then, with the help of a needle, tighten the hole, namely, move the needle inwards from the outside in the outer wall of each loop in row 29 and tighten. Pull out the yarn at the beginning of the third row from the end on the head (see pic).
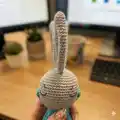
— Ears :
Info :
Make 2 of them. Gray yarn and 2,5 mm hook should be used for this part. This detail is made with the help of spiral technique.
Round 1 :
6 sc in Magic Ring (6)
Round 3 :
12 sc (1 row should be without changes) (12)
Round 4 :
(1 sc, inc) rep 6 times around (18)
Round 5 :
18 sc (1 row should be without changes) (18)
Round 6 :
(2 sc, inc) rep 6 times around (24)
Round 7 :
24 sc (1 row should be without changes) (24)
Round 8 :
(3 sc, inc) rep 6 times around (30)
Round 9-18 :
30 sc (10 rows should be without changes) (30)
Round 19 :
(3 sc, dec) rep 6 times around (24)
Round 20 :
24 sc (1 row should be without changes) (24)
Round 21 :
(2 sc, dec) rep 6 times around (18)
Round 22 :
18 sc (1 row should be without changes) (18)
Round 23 :
(1 sc, dec) rep 6 times around (12)
Round 24 :
Fold the ear and we tie two sides together 6 sc - all the way, to close. (6)
Info :
We need to fold the ear and tie two sides together making 6 sc till the end. Then, we should fold it again and attach the two sides together making three stitches with a needle. After that, we need to fasten off, leaving about 7.9 inches (20 cm) of yarn end to attach the ears to the head later. Ears are made without stuffing.
— Forelegs :
Info :
Make 2 of them. Gray yarn and 2.5 mm hook should be used for this part. This detail is made with the help of spiral technique.
Round 1 :
6 sc in Magic Ring (6)
Round 3 :
(1 sc, inc) rep 6 times around (18)
Round 4 :
(2 sc, inc) rep 6 times around (24)
Round 5 :
24 sc (1 row should be without changes) (24)
Round 6 :
(3 sc, inc) rep 6 times around (30)
Round 7 :
30 sc (1 row should be without changes) (30)
Round 8 :
(4 sc, inc) rep 6 times around (36)
Round 9-10 :
36 sc (2 rows should be without changes) (36)
Round 11 :
(4 sc, dec) rep 6 times around (30)
Round 12-14 :
30 sc (3 rows should be without changes) (30)
Round 15 :
(3 sc, dec) rep 6 times around (24)
Round 16-18 :
24 sc (3 rows should be without changes) (24)
Round 19 :
(2 sc, dec) rep 6 times around (18)
Round 20-22 :
18 sc (3 rows should be without changes) (18)
Info :
Fill the detail with the stuffing material. After that, we need to fasten off, leaving about 7.9 inches (20 cm) of yarn end. Then, we should fold the foreleg and attach the two sides together making 9 stitches at the same time. (9)
— Hind legs :
Info :
Make 2 of them. Gray yarn and 2.5 mm hook should be used for this part. This detail is made with the help of spiral technique.
Round 1 :
6 sc in Magic Ring (6)
Round 2 :
6 inc with sc (12)
Round 3 :
(1 sc, inc) rep 6 times around (18)
Round 4 :
(2 sc, inc) rep 6 times around (24)
Round 5 :
(3 sc, inc) rep 6 times around (30)
Round 6 :
30 sc (1 row should be without changes) (30)
Round 7 :
(4 sc, inc) rep 6 times around (36)
Round 8-10 :
36 sc (3 rows should be without changes) (36)
Round 11 :
14 sc, dec, sc, dec, sc, dec, 14 sc (33)
Round 12 :
33 sc (1 row should be without changes) (33)
Round 13 :
12 sc, dec, sc, dec, sc, dec, 13 (30)
Round 14 :
30 sc (1 row should be without changes) (30)
Round 15 :
(3 sc, dec) rep 6 times around (24)
Round 16-18 :
24 sc (3 rows should be without changes) (24)
Round 19 :
(2 sc, dec) rep 6 times around (18)
Round 20-22 :
18 sc (3 rows should be without changes) (18)
Info :
Sl st, fasten off, cut the yarn. Fill the detail with the stuffing material.
— Tail :
Info :
Gray yarn and 2.5 mm hook should be used for this part. This detail is made with the help of spiral technique.
Round 1 :
6 sc in Magic Ring (6)
Round 3 :
(1 sc, inc) rep 6 times around (18)
Round 4 :
(2 sc, inc) rep 6 times around (24)
Round 5 :
(3 sc, inc) rep 6 times around (30)
Round 6-9 :
30 sc (4 rows should be without changes) (30)
Round 10 :
(3 sc, dec) rep 6 times around (24)
Info :
Fill the detail with the stuffing material.
Round 11 :
(2 sc, dec) rep 6 times around (18)
Round 12 :
(1 sc, dec) rep 6 times around (12)
Round 13 :
6 dec, sl st (6)
Info :
Add more filler. Fasten off, leaving about 7.9 inches (20 cm) of yarn end to attach this part to the body later. Fill the detail with the stuffing material.
— Body :
Info :
Teal blue yarn, as well as 2.5 mm and 3 mm hooks should be used for this part. Each row is crocheted with lift loops at the beginning of the row and with a slip stitch at the end of it. We should start crocheting this detail with a 2.5 mm hook.
Round 1 :
Trouser leg 1: 6 sc in Magic Ring, sl st (6)
Round 2 :
ch, 2 sc in the same st (6 inc with sc), sl st (12)
Round 3 :
ch, (1 sc, inc) rep 6 times around, sl st (18)
Round 4 :
ch, 2 sc in the same st (18 inc with sc), sl st (36)
Info :
Change the hook to 3.0 mm.
Round 5-7 :
ch, 36 hdc, sl st (3 rows should be without changes) (36)
Info :
Fasten off and cut the yarn. Trouser leg 2: Repeat the same the second pant leg, but do not cut the yarn on it.
Round 8 :
Use the end of the yarn from the first pant leg and connect both legs together. Make two stitches to attach the 1st loop of the seventh row of the of first pant leg, the 18th loop of the seventh row of the second pant leg, and the last loop of the seventh row of the first pant leg to the 19th loop of the seventh row of the second pant leg. We should continue crocheting the second pant leg. At the beginning of the row, we need to make a chain stitch (ch), then, it is necessary to make hdc in the next 17 loops of the second pant leg and hdc at the point where pant legs are connected (in the 18th loop of the previous row). Next, we need to make hdc at the point where pant legs are connected, along the first pant leg (in the first loop of the first pant leg). After that, we should crochet in a circle along the first pant leg making 35 hdc (to the point where pant legs are connected), hdc in the connection point of the second pant leg, and then, along the second pant leg, till the end of the row, we should make 17 hdc and close the circle with sl st. There are 72 loops in this row. (72)
— Body (continue) :
Round 9-27 :
ch, 72 hdc, sl st (19 rows should be without changes) (72)
Round 28 :
ch, (6 hdc, dec) rep 9 times around, sl st (63)
Round 29 :
ch, 63 hdc, sl st (1 row should be without changes) (63)
Round 30 :
ch, (5 hdc, dec) rep 9 times around, sl st (54)
Round 31 :
ch, 54 hdc, sl st (1 row should be without changes) (54)
Round 32 :
ch, (4 hdc, dec) rep 9 times around, sl st (45)
Round 33 :
ch, 45 hdc, sl st (1 row should be without changes) (45)
Round 34 :
ch, (3 hdc, dec) rep 9 times around, sl st (36)
Round 35 :
ch, (2 hdc, dec) rep 9 times around, sl st (27)
Round 36 :
ch, (1 hdc, dec) rep 9 times around, sl st (18)
Round 37 :
ch, 9 dec hds , sl st (9)
Info :
Fasten off, leaving about 7.9 inches (20 cm) of yarn end. Then, with the help of a needle, tighten the hole.
— Assembling :
Step 1 :
We should attach the head to the body. It is necessary to join the third from the end row of the head and the second last row of the body. These rows of the head and the body contain the same number of loops (18). In order to attach them together, we need to make 18 double stitches.
Step 2 :
After that, it is necessary to attach forelegs to the body on the sides, at the distance of one row from the head. We should make 9 double stitches.
Step 3 :
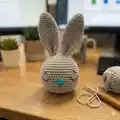
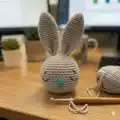
Then, we need to attach the ears using the ends of the yarn that we left before. Ears are attached to the fourth row of the head. The distance between the ears should be 9 sc (across the face). Then we need to fasten off and cut the yarn, hiding the ends inside of the head.
Step 4 :
Now, we will make the face. Using the teal blue DMC floss, embroider the nose between rows 16 and 17. The stitch width of the triangle nose is 3 sc and its height is 2 rows.
Step 5 :
After that, we should pull the needle out of the lower part of the nose and move it down by 2 rows to make a mouth. We need to pull the needle to the beginning of the mouth stitch and fix the yarn. Then, make a couple more stitches for the nose, fix the yarn, and cut it hiding the ends inside of the head. Then we should take the black thread and embroider the eyes.
This Bunny Lovey Crochet pattern makes a cuddly, heirloom-quality lovey that babies and toddlers will adore. The combination of amigurumi shaping and a soft lovey body creates a comforting companion you can customize with color and embroidery. Enjoy making this handmade treasure and gifting it with love. 🧶🐰