๐Ÿงถ Beautiful โœจ Detailed ๐Ÿ’ Adorable

Sleeping Pink Puff (Sleeping Kirby) Amigurumi Pattern

Sleeping Pink Puff (Sleeping Kirby) Amigurumi Pattern
4.0โ˜… Rating
5-7 Hours Time Needed
3.8K Made This
โœ‚๏ธ

Intermediate Level

Ideal for those with basic crochet experience, featuring slightly more advanced stitches and techniques to expand your skills.

โฑ๏ธ

Weekend Treat

Takes 5-7 hours, making it an enjoyable project to finish over a couple of days.

๐Ÿงธ

Cute Companion

An adorable friend to cherish, handcrafted with love to bring comfort and joy for years to come.

About This Sleeping Pink Puff (Sleeping Kirby) Amigurumi Pattern

This pattern creates a soft, sleepy Kirby amigurumi complete with a removable floppy sleepy hat, pom pom, and decorative stars. You will work mainly in continuous rounds using bulky and worsted weight yarn for plush texture. The instructions include step-by-step rounds for hat pieces, body shaping, arms, feet, and facial stitching. It is fully customizable so you can pick your favorite color combinations for the hat and details.
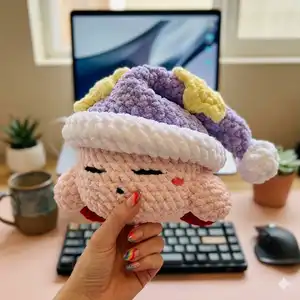
Sleeping Pink Puff (Sleeping Kirby) Amigurumi Pattern crochet pattern - detailed view of completed project

The pattern uses American crochet terms and is worked in continuous rounds for smooth shaping. Photos and clear round-by-round instructions help you assemble and style your finished Kirby.

Why You'll Love This Sleeping Pink Puff (Sleeping Kirby) Amigurumi Pattern

I absolutely love this pattern because it combines simple amigurumi shaping with a playful hat that brings so much personality to Kirby. I enjoy how the bulky yarn makes the toy squishy and quick to work up, giving a satisfying result in a short time. Sewing on the tiny stars and adding the pom pom is one of my favorite finishing touches โ€” it makes each piece unique. I also love that you can easily change colors and sizes to create a whole family of sleepy Kirbys.

Sleeping Pink Puff (Sleeping Kirby) Amigurumi Pattern step 1 - construction progress Sleeping Pink Puff (Sleeping Kirby) Amigurumi Pattern step 2 - assembly progress Sleeping Pink Puff (Sleeping Kirby) Amigurumi Pattern step 3 - details and accessories Sleeping Pink Puff (Sleeping Kirby) Amigurumi Pattern step 4 - final assembly and finishing

Switch Things Up

I love how easy it is to customize this pattern by changing colors โ€” try pastel shades for a softer Kirby or bright neons for a playful look.

If you want a smaller Kirby, switch to a lighter weight yarn and a smaller hook; conversely use chunkier yarn and a larger hook for a giant plush.

I often add felt cheeks or embroidered eyelids instead of yarn for a cleaner finish on facial features.

Make outfits or tiny accessories for Kirby, like a sleep mask or tiny blanket, to create a whole scene for your plush.

Try different motifs on the hat: replace stars with hearts, moons, or embroidered polka dots for seasonal variations.

I sometimes add a little wire inside the hat seam for a different flop or to make the hat poseable.

Use safety eyes for a different look but be sure to secure them properly if the toy is for a child.

I enjoy mixing yarn textures โ€” a fuzzy pom pom yarn for the hat tip creates great contrast with the bulky blanket yarn.

For unique expressions, move the eyes and mouth placement slightly to change Kirby's mood from sleepy to surprised or smiling.

Don't be afraid to experiment with stripes or color panels on the hat; I often make stripe combinations for holiday-themed Kirbys.

Common Mistakes & How to Fix Them

โœ— Skipping stitch count checks during increases and decreases leads to uneven shaping; count stitches at the end of each round and correct mistakes immediately. โœ— Overstuffing the head or body can distort the shape and prevent the toy from laying flat; stuff gradually, checking shape and squishiness frequently. โœ— Not leaving long yarn tails when finishing pieces makes sewing difficult later; leave a generous tail and use it to sew pieces securely. โœ— Forgetting to try the hat on the head while stuffing can result in the hat not fitting; try the hat on around row 10 of the head/body as you stuff to ensure proper fit. โœ— Sewing features without pinning first can place them asymmetrically; pin or baste pieces in place and check placement from multiple angles before permanent stitching.
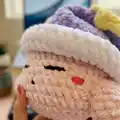
Sleeping Pink Puff (Sleeping Kirby) Amigurumi Pattern

Make a cuddly Sleeping Kirby plush with an adorable floppy sleepy hat and playful star details. This pattern walks you through crocheting the hat, pom pom, stars, body, arms, feet, and facial features using bulky and worsted yarn. You can customize colors and sizes to create your own sleepy companion. Perfect for gifting or keeping as a soft, handmade friend.

Intermediate 5-7 Hours

Materials Needed for Sleeping Pink Puff (Sleeping Kirby) Amigurumi Pattern

โ€” Main Fabric

  • 01
    Bulky weight yarn (Bernat Blanket / Bernat Baby Blanket recommended) - Light Pink (Blush Pink) for Kirby's head/body
  • 02
    Bulky weight yarn (Bernat Blanket / Bernat Baby Blanket recommended) - Purple (Lilac) for the hat base
  • 03
    Bulky weight yarn (Bernat Blanket / Bernat Baby Blanket recommended) - White for the hat border and pom pom
  • 04
    Bulky weight yarn (Bernat Blanket / Bernat Baby Blanket recommended) - Yellow (Buttercup) for stars or circles on hat
  • 05
    Bulky weight yarn (Bernat Blanket / Bernat Baby Blanket recommended) - Black (Coal) for embroidered facial features
  • 06
    Bulky weight yarn (Bernat Blanket / Bernat Baby Blanket recommended) - Red (Crimson) for Kirby's feet
  • 07
    Worsted weight yarn (Big Twist Value Worsted recommended) or bulky weight - Dark Pink (Watermelon) for blush or accents
  • 08
    Polyester stuffing for stuffing head, body, pom pom, arms, and feet

โ€” Tools Required

  • 01
    Crochet hook size 8 mm
  • 02
    Optional crochet hook size 4 mm (used to make smaller stars)
  • 03
    Scissors
  • 04
    Yarn needle for sewing parts and weaving in ends
  • 05
    Embroidery needles for facial features
  • 06
    Stitch markers
  • 07
    Polyester stuffing
  • 08
    Pins for assembly (optional)

Progress Tracker

0% Complete

โ€” Kirby's Sleepy Hat :

Info :

We will first work on Kirby's sleepy hat! Use purple yarn (or the yarn color you're choosing for your hat base) and white yarn. ~Start off using purple yarn.~

Round 1 :

MR 5 (5)

Round 2 :

INC X 5 (10)

Round 3-5 :

10 SC [3 rounds] (10)

Round 6 :

(1 SC, INC) X 5 (15)

Round 7 :

15 SC (15)

Round 8 :

(2 SC, INC) X 5 (20)

Round 9 :

20 SC (20)

Round 10 :

(3 SC, INC) X 5 (25)

Round 11 :

25 SC (25)

Round 12 :

(4 SC, INC) X 5 (30)

Round 13 :

30 SC (30)

Round 14 :

(5 SC, INC) X 5 (35)

Round 15-16 :

35 SC (35)

Round 17 :

(6 SC, INC) X 5 (40)

Round 18 :

40 SC (40)

Round 19 :

(7 SC, INC) X 5 (45)

Round 20 :

45 SC (45)

Round 21 :

(8 SC, INC) X 5 (50)

Round 22 :

50 SC (50)

Round 23 :

(9 SC, INC) X 5 (55)

Round 24-25 :

55 SC [2 rounds] (55)

Info :

Change to white yarn.

Round 26-30 :

55 SC [5 rounds] (55)

Info :

Finish off. I liked the look of the hat inside out, so I flipped the hat inside out. Sew in any remaining ends. Fold the hat's white border (between rows 25-26, where the color change happens) to create a raised border on the hat.

โ€” Hat's Pom Pom :

Info :

Use white yarn.

Round 1 :

MR 4 (4)

Round 2 :

INC x 4 (8)

Round 3 :

(1 SC, INC) X 4 (12)

Round 4-5 :

12 SC [2 rounds] (12)

Round 6 :

(1 SC, DEC) X 4 (8)

Info :

Begin to stuff the pom pom.

Round 7 :

DEC X 4 (4)

Info :

Finish stuffing. Finish off and leave a long yarn tail to close the hole. Weave the yarn tail through the front loops of the last round and pull tightly to close the hole. Use the yarn tail to sew the pom pom onto the end of the hat. Sew in any remaining ends.

โ€” Styling & Stars on Kirby's Hat :

Info :

Fold down the top part of the hat based on how you would like it to flop. This will help you determine where you want to place the stars on Kirby's hat. I also included how to make polka dots/circles if you want to make a classic sleeping Kirby.

Info :

STARS ON HAT (X 3) : Use yellow yarn. Make 3 stars: 2 big stars and 1 small star. To make the big stars, use the same hook size you have been using (8 mm). To make the small star, use half the hook size you've been using (4 mm) instead.

Round 1 :

MR 10 (10)

Round 2 :

(SC, INC) X 5 (15)

Round 3 :

(SLST, [*HDC, DC, HDC* -> all three of these are in one stitch], SLST) X 5 (25)

Info :

Finish off and leave a long yarn tail. Use the yarn tail to sew the stars onto the hat.

Info :

[OPTIONAL] CIRCLES ON HAT: Use yellow yarn. Make as many circles as you want.

Round 1 :

MR 8 (8)

Round 2 :

(SC, INC) X 4 (12)

Info :

Finish off and leave a long yarn tail. Use the yarn tail to sew the circles onto the hat. You have completed making Kirby's sleeping hat!

โ€” Kirby's Body :

Info :

Next we'll make Kirby's body! Use light pink yarn.

Round 1 :

MR 6 (6)

Round 2 :

INC X 6 (12)

Round 3 :

(1 SC, INC) X 6 (18)

Round 4 :

(1 SC, INC, 1 SC) X 6 (24)

Round 5 :

(3 SC, INC) X 6 (30)

Round 6 :

(2 SC, INC, 2 SC) X 6 (36)

Round 7 :

(5 SC, INC) X 6 (42)

Round 8 :

(3 SC, INC, 3 SC) X 6 (48)

Round 9-16 :

48 SC [8 rounds] (48)

Round 17 :

(6 SC, DEC) X 6 (42)

Round 18 :

(5 SC, DEC) X 6 (36)

Round 19 :

(4 SC, DEC) X 6 (30)

Info :

Begin stuffing the body. Try on Kirby's sleepy hat as you stuff his head to make sure you do not overstuff or understuff and that the hat fits right. The hat should fit comfortably around row 10 of Kirby's head. You also want to avoid overstuffing so that Kirby's body is able to lay flat on its stomach - the ending rounds make up the bottom of his stomach.

Round 20 :

(3 SC, DEC) X 6 (24)

Round 21 :

(2 SC, DEC) X 6 (18)

Round 22 :

(1 SC, DEC) X 6 (12)

Round 23 :

DEC X 6 (6)

Info :

Finish stuffing. Again, try on Kirby's sleeping hat to make sure it fits just right! Finish off and leave a yarn tail to close the hole. Weave the yarn tail through the front loops of the last round and pull tightly to close the hole. Weave in the remaining end.

โ€” Kirby's Facial Features :

Info :

Use black bulky weight yarn and darker pink worsted weight yarn. HAT: Try on Kirby's hat! The hat is removable and should fit around row 10 of his head. You may need to sew down the top of the hat to the bottom part of the hat so it stays flopped down. EYES (black yarn): Cut a piece of black bulky weight yarn. Sew on a straight line for each eye in between row 12-13. Each eye should be across 4 stitches, and the eyes should be 3 stitches apart. MOUTH (black yarn): Using a new piece of black bulky weight yarn, sew Kirby's mouth between row 14 and 15 of his head, in between Kirby's eyes. Make an overhand/basic knot and then insert it back into the same hole that you came out of to create a small circle for the mouth. Alternatively, cut a small circle out of felt and glue it. BLUSH (darker pink yarn): Cut a long piece of dark pink worsted weight yarn. Sew on the blush for Kirbyโ€™s cheeks between row 13 and 14, just below the eyes. The blush should be sewed one stitch to the side of the eyes and each blush should be across 2 stitches.

Info :

Fig A: How to tie an overhand knot (for Kirby's mouth). Fig B: How to make Kirby's mouth using the bottom and top yarn strands as shown in the photos. Pull bottom yarn strand so knot hits Kirby's face, thread top yarn strand onto needle and insert back into same hole then pull top yarn strand through Kirby's face and out his stomach so knot hits his face. Tighten knot by pulling yarn to the sides of the knot. If stitches are looser, a double knot may be needed.

โ€” Kirby's Arms :

Info :

Make 2. Use light pink yarn.

Round 1 :

MR 5 (5)

Round 2 :

INC X 5 (10)

Round 3 :

(SC, INC) X 5 (15)

Round 4-5 :

15 SC [2 rounds] (15)

Info :

Stuff lightly. Finish off and leave a long tail for sewing.

Info :

Sew the arms onto row 13-17 of Kirbyโ€™s body. The arms should be near the outer edge of Kirbyโ€™s blush.

โ€” Kirby's Feet :

Info :

Make 2. Use red yarn.

Round 1 :

MR 6 (6)

Round 2 :

(SC, INC) X 3 (9)

Round 3 :

(2 SC, INC) X 3 (12)

Round 4-8 :

12 SC [5 rounds] (12)

Info :

Start stuffing the feet lightly.

Round 9 :

(2 SC, DEC) X 3 (9)

Round 10 :

(SC, DEC) X 3 (6)

Info :

Finish stuffing. Finish off and leave a long tail for sewing. You do not need to close the hole.

Info :

Attach the feet onto row 16-17 of Kirbyโ€™s body, ~4 stitches apart from each other.

โ€” Finished! :

Info :

Congrats! You finished crocheting Sleeping Kirby! Sew in any remaining ends, style the hat to your liking, and enjoy your new plushie.

Assembly Instructions

  • Sew the arms onto row 13-17 of Kirby's body, positioning them near the outer edge of Kirby's blush and securing firmly with the long yarn tails left when finishing the arms.
  • Attach the feet onto row 16-17 of Kirby's body, spacing them approximately 4 stitches apart so Kirby can lay flat on his stomach; use the long tails to sew through the body securely.
  • Position and sew the stars or circles onto the hat using the long yarn tails left from each motif; arrange them after folding the hat top to determine how the hat will flop.
  • Sew the pom pom onto the tip of the hat using the long yarn tail from the pom pom; weave and knot securely then sew in remaining ends.
  • Embroider or sew on the eyes between rows 12-13 (each eye across 4 stitches, eyes 3 stitches apart) and sew the mouth between row 14 and 15 using an overhand knot method described in the pattern.

Important Notes

  • ๐Ÿ’กUse stitch markers to keep track of the start of each round and to mark key placement rows for features like eyes and hat alignment.
  • ๐Ÿ’กStuff gradually and evenly; overstuffing will distort the shape while understuffing will make the toy floppy and unable to hold its form.
  • ๐Ÿ’กPin parts in place before sewing to ensure correct positioning and symmetry, especially for eyes, blush, arms, and feet.
  • ๐Ÿ’กWeave in ends as you go where possible to make finishing easier and neater when the toy is complete.

Thank you for making Sleeping Pink Puff โ€” I hope this sleepy Kirby brings a smile to your day! ๐Ÿงถ This pattern invites you to play with colors and textures to make a unique little friend you can cherish. โœจ Share your finished creation and spread the handmade joy โ€” happy crocheting! ๐Ÿงต๐Ÿ’–

You ask,

we answer.

FAQs

What size will the finished piece be?

The finished amigurumi measures approximately 7 inches (17.8 cm) tall and about 8.5 inches (21.6 cm) wide using the recommended bulky yarn and hooks.

Can I use different yarn weights for this pattern?

Yes, you can use different yarn weights, but changing yarn weight and hook size will affect final size and texture; adjust stuffing and gauge accordingly.

Do I need prior crochet experience for this pattern?

This pattern is rated intermediate, so basic knowledge of crochet stitches (SC, INC, DEC, SLST) and sewing amigurumi pieces is recommended for best results.

How long does this project typically take to complete?

Most crocheters complete this project in 5-7 hours, depending on experience level, assembly time, and whether you make additional hat decorations.