🧢 Beautiful ✨ Detailed πŸ’ Adorable

Sharkito the Polite Shark Amigurumi Pattern

Sharkito the Polite Shark Amigurumi Pattern
4.4β˜… Rating
2-3 Hours Time Needed
3.2K Made This
βœ‚οΈ

Beginner Friendly Level

Perfect for those just starting their crochet journey, with clear instructions and simple techniques

⏱️

Bite-Sized Project

Finishes in 2-4 hoursβ€”perfect for an afternoon of creative relaxation.

🧸

Cute Companion

An adorable friend to cherish, handcrafted with love to bring comfort and joy for years to come.

About This Sharkito the Polite Shark Amigurumi Pattern

This pattern creates a sweet, pocket-sized shark named Sharkito using simple amigurumi techniques and clear color-coded rounds. It includes full step-by-step rounds for the head/body, fins, feet, tail, and a tiny cup accessory. The pattern is worked in continuous rounds with helpful notes on where to switch to the white belly color. Photos and short assembly directions help you place and sew each part for a polished finish.

Sharkito the Polite Shark Amigurumi Pattern crochet pattern - detailed view of completed project

Perfect for beginners, this design uses basic stitches like sc, increases and decreases, plus a few simple joining steps. Make the mini or the larger Mama version by switching yarn and hook size.

Why You'll Love This Sharkito the Polite Shark Amigurumi Pattern

I absolutely love this pattern because it’s playful and forgiving β€” small shaping creates a huge amount of personality without complex techniques. I adore how the color-coded rounds make color switches easy to follow and achieve a neat belly seam. The tiny accessories, like the tea cup, add whimsical character and are quick to make. Sewing and pinning tips help the finished piece look professional, and I always enjoy making a small set to cheer up a shelf or give as a thoughtful handmade gift.

Sharkito the Polite Shark Amigurumi Pattern step 1 - construction progress Sharkito the Polite Shark Amigurumi Pattern step 2 - assembly progress Sharkito the Polite Shark Amigurumi Pattern step 3 - details and accessories Sharkito the Polite Shark Amigurumi Pattern step 4 - final assembly and finishing

Switch Things Up

I love experimenting with color palettes for Sharkito β€” try muted pastels for a softer look or bright contrasting colors for maximum character.

You can make a pocket-sized keychain version by using thinner thread and a 1.10mm hook, or a larger cuddle-size by using worsted weight yarn and a 3.5mm hook.

I often add felt cheeks or tiny embroidered freckles to give each shark its own personality; felt eye highlights also make the eyes pop.

Change the eye size to affect expression: smaller eyes create a cuter, more delicate face while larger safety eyes make Sharkito look more playful.

Make seasonal versions β€” add a tiny Santa hat for holidays or a pastel bow for spring gifts.

Experiment with different mouth expressions by varying the stitch count and placement of the embroidered 'w' β€” it can look sleepy, shy, or cheerful.

If you want posable fins, insert a small piece of floral or craft wire into the fin tails before sewing them in place.

Mix yarn textures β€” a boucle or fuzzy yarn for the grey body gives a very different, plush finish compared to smooth cotton.

Create matching sets: make a Mama, a mini baby, and a tiny tea cup accessory for a coordinated gift trio.

I also sometimes add small weighted beads in the base before closing to help versions sit upright on shelves or desks.

Common Mistakes & How to Fix Them

βœ— Skipping the stitch marker when working continuous rounds leads to losing track of the start of rounds; place a marker at the start of every round and move it up as you work. βœ— Using a too-large hook will make the stuffing show through the stitches; use a slightly smaller hook than recommended and crochet tightly for a neat fabric. βœ— Forgetting to stuff gradually causes lumps and uneven shaping; stuff a little at a time, especially around shaping decreases, to keep a smooth silhouette. βœ— Not counting stitches after increases or decreases will throw off later shaping; count stitches at the end of each round to ensure the correct stitch count. βœ— Cutting yarn too short at color switches makes sewing in ends difficult; leave a longer tail when switching colors so you can weave and secure it neatly.

Sharkito the Polite Shark Amigurumi Pattern

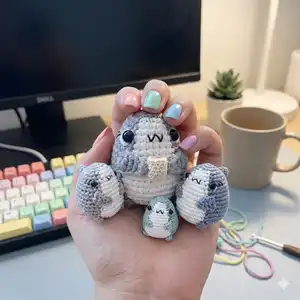
Bring home Sharkito, a tiny, polite shark amigurumi that is full of charm and easy-to-follow shaping. This color-coded version guides you through each round so you can crochet a neat, tidy finish with seamless color switches. Perfect for gifting or adding to your amigurumi zoo β€” you will enjoy every stitch as Sharkito comes to life.

Beginner Friendly 2-3 Hours

Materials Needed for Sharkito the Polite Shark Amigurumi Pattern

β€” Main Fabric

  • 01
    Monaco Mercerized Cotton Thread (for Mini Sharkito) - use 1.10mm thread, small quantity
  • 02
    4-ply Medium Worsted Weight Acrylic Yarn (for Sharkito Mama) - quantities as needed for one amigurumi
  • 03
    White felt - small scrap for eye highlights/details
  • 04
    Assorted small scraps for cup/accessories

β€” Tools Required

  • 01
    Crochet hook size 1.10mm (for Monaco mercerized cotton thread / Mini Sharkito)
  • 02
    Crochet hook size 2.25mm (for 4-ply medium worsted acrylic yarn / Sharkito Mama)
  • 03
    Safety eyes 3mm (2 pieces) for Mini Sharkito
  • 04
    Safety eyes 8mm (2 pieces) for Sharkito Mama
  • 05
    Scissors
  • 06
    Tapestry/sewing needle
  • 07
    Stitch markers
  • 08
    Embroidery/sewing threads in black
  • 09
    Toy stuffing (polyester filling)
  • 10
    Glue (for felt or small embellishments)

Progress Tracker

0% Complete

β€” Head/Body :

R1 :

6sc in MR (6)

R2 :

inc x6 (12)

R3 :

(inc, 2sc) x2, inc, 2sc, inc, 2sc (16)

R4 :

(inc, 3sc) x2, sc, sc in same st, 4sc, sc in same st, 3sc (20)

R5 :

3sc, inc, 4sc, inc, 2sc, 2sc, inc, 2sc, 2sc, inc, sc (24)

R6 :

sc, (inc, 5sc) x2, sc, sc in same st, 6sc, sc in same st, 4sc (28)

R7 :

16sc, 7sc, 5sc (28)

R8 :

2sc, (inc, 6sc) x2, inc, 6sc, inc, 4sc (32)

R9 :

2sc, (inc, 7sc) x2, sc, sc in same st, 8sc, sc in same st, 5sc (36)

R10 :

21sc, 9sc, 6sc (36)

R11 :

inc, 12sc, inc, 7sc, 9sc, 6sc (38)

R12 :

8sc, inc, 9sc, inc, 4sc, 4sc, inc, 4sc, 5sc, inc (42)

R13 :

25sc, 10sc, 7sc (42)

R14 :

inc, 19sc, inc, 4sc, 10sc, 7sc (44)

Info :

Insert the eyes between rounds 6 & 7 around 2 stitches from the white belly.

R15 :

27sc, 10sc, 7sc (44)

R16 :

dec, 19sc, dec, 4sc, 10sc, 7sc (42)

R17 :

(dec, 5sc) x3, dec, 2sc, 3sc, dec, 5sc, dec, 5sc (36) cut off white yarn.

R18 :

(dec, 4sc) x6 (30)

R19 :

(dec, 3sc) x6 (24)

R20 :

(dec, 2sc) x6 (18)

Info :

Stuff amigurumi well.

R21 :

(dec, sc) x6 (12)

R22 :

(dec) x6 (6) Finish off and sew close.

β€” Dorsal fin :

R1 :

4sc in MR (4)

R2 :

(inc, sc) x2 (6)

R3 :

(inc, 2sc) x2 (8)

R4 :

(inc, 3sc) x2 (10)

R5 :

(inc, 4sc) x2 (12)

Info :

Cut thread leave long tail for sewing.

β€” Fins (Make 2 in grey) :

Info :

Leave long tail before you start your chain.

Fins :

Ch 7, sk 2nd ch from hook, hdc, dc, dc, tc, tc.

Info :

Cut thread leave long tail for sewing.

β€” Feet (Make 2 in grey) :

R1 :

8sc in MR (8)

Info :

Cut thread leave long tail for sewing.

β€” Tail (Make in grey) :

1st piece R1 :

ch2, 4sc in 2nd ch from hook (4)

1st piece R2 :

(inc, sc) x2 (6)

Info :

Cut thread and fasten off, then start on the 2nd piece.

2nd piece R1 :

ch2, 4sc in 2nd ch from hook (4)

Info :

You will now have 2 pieces of the tail. Join the 2nd piece that's on the hook to the 1st piece we made by crocheting the next round with the combined pieces. [Watch video demo: Joining the tail]

Joined round :

(inc, 2sc) x2, to the 1st piece, (inc, sc) x2, to the 2nd piece (14)

Info :

Cut thread and leave long tail for sewing. Do not stuff tail.

β€” Bonus: Cup of green tea :

Start :

Start in ecru or tan yarn

R1 :

6sc in MR (6)

R2 :

inc x6 (12)

R3 :

BLO sc around (12)

R4-6 :

sc around [3 rounds] (12)

Info :

Stuff cup with polyfill

R5 :

s2green BLO sc around (12)

R6 :

dec x6 (6)

Info :

Cut green yarn and sew hole shut, insert needle through the center of the tea and exit through the center MR on the other side. Pull down yarn tail hard. With the yarn used for the cup, cut long tail to sew on to the belly later.

β€” Assembly :

Step 1 :

Sew the fins slightly slanted facing the belly laying flat on Rounds 9-11. If you will be letting them hold the cup of tea, sew on the cup to the belly first and then attach the fins to the cup to let him hold it.

Step 2 :

Pin the dorsal fin at the back of the shark's body (between rounds 5 & 9) then sew it in place straight. Attach the tail at the back of the base of the body where it starts to curve. The larger tail fin is above the lower tail fin. [Watch video demo: Sewing dorsal fin]

Step 3 :

Sew the feet on the junction of the shark's belly where the grey and white yarns switches on Round 17. [Watch video demo: Sewing feet]

Step 4 :

Face details: Embroider a "w" mouth on the belly part on Round 6. It should be in line with the eyes and have 2 white stitches on either side. With black yarn, embroider the gills beside the eyes on round 7 by making 2 slanting lines. (Optional) Embroider the eye details with white yarn/felt. [Watch video demo: Face details]

Assembly Instructions

  • Sew the fins slightly slanted facing the belly, positioning them flat on rounds 9-11; if the shark will hold the cup, sew the cup to the belly first then attach the fins to the cup so they can hold it securely.
  • Pin and sew the dorsal fin at the back of the shark's body between rounds 5 & 9, attaching it straight; sew the tail to the back base where the body starts to curve, placing the larger tail fin above the lower tail fin.
  • Sew the feet at the junction where the grey and white yarns switch on Round 17, spacing them evenly so the shark stands balanced.
  • Add face details last: embroider a small 'w' mouth on Round 6 centered between the eyes, add two white stitches on either side for highlights, and embroider two slanting gill lines beside each eye on Round 7.

Important Notes

  • πŸ’‘Use a slightly smaller crochet hook than the suggested size for your yarn to crochet tightly and make seamless color switches.
  • πŸ’‘This pattern uses US terminology and is worked in continuous rounds β€” use a stitch marker to mark the start of each round.
  • πŸ’‘Insert safety eyes between rounds 6 and 7 around two stitches from the white belly before stuffing too firmly.
  • πŸ’‘Stuff the amigurumi firmly but evenly, especially before finishing shaping decreases to achieve a smooth silhouette.

This little Sharkito pattern is perfect for quick makes and thoughtful gifts β€” tiny, charming, and full of personality. Make a mini set or a Mama-sized version by switching yarn and hook size for variety. Share smiles with handmade cuteness that fits in the palm of your hand. 🧢🦈

You ask,

we answer.

FAQs

What size will the finished piece be?

Using 1.10mm thread and a 1.10mm hook the mini Sharkito measures about 3.5 cm tall; with 2.25mm hook and worsted yarn the Mama version measures about 7 cm tall.

Can I use different yarn weights for this pattern?

Yes, you can change yarn weight and hook size to adjust the finished size; remember tighter tension and a slightly smaller hook produce better color switch results.

Do I need prior crochet experience for this pattern?

This pattern is beginner friendly and uses basic stitches (sc, inc, dec) but you should be comfortable with continuous rounds, increases, decreases and simple sewing.

Where should I place the safety eyes?

Place the safety eyes between rounds 6 and 7, about two stitches from the edge of the white belly as noted in the pattern for correct facial placement.

How do I join the tail pieces correctly?

Make the two small tail pieces, then join the second piece (on the hook) to the first by crocheting the joined round as shown: (inc, 2sc) x2 to the first piece and (inc, sc) x2 to the second piece, creating a combined round of 14 stitches.