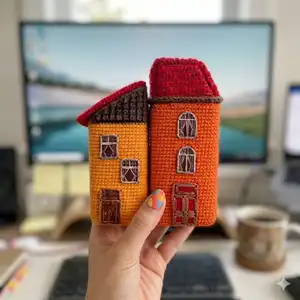
Make a charming pair of small crochet houses with clear step-by-step instructions, templates and photo guidance. This pattern uses DK cotton yarn, simple single crochet shaping, and cardboard inserts to create sturdy, decorative houses. Perfect for gifting or brightening a shelf, you will enjoy assembling and embellishing each house with felt doors, windows and embroidered roof tiles.
Progress Tracker
0% Complete
— Abbreviations (US) :
Info :
MR – magic ring. CH – chain. SC – single crochet. INC – increase (make 2 sc into one loop). DEC– decrease (two sc together through front loops). SL ST – slip stitch. (...) *8 – work instructions within brackets as many times as directed. (18) – the number of sc in the row.
— The Required Materials :
Info :
DK weight yarn - Alize Cotton Gold (55% cotton/45% acrylic; 100 g/330m). Alize Cotton Gold No.37, 83, 493, 56 (orange, pumpkin, brown, red). Embroidery thread 100% cotton – (brown, white, black). Thin and firm felt – (brown, red). 2.25 mm crochet hook. Tapestry needle. Scissors. Stitch markers (scrap of contrasting color yarn). Cardboard for the bottom of the houses. Cardboard for the wools of the houses. Cardboard for the roofs of the houses. Glue for the gluing of the cardboard. White permanent marker for drawing the curtains on windows.
Info :
NOTE! Yarn consumption, size, and appearance depend on crochet density and how you hold the yarn. The presented toy is crocheted with V and X look single crochet: (First, you grab yarn over the hook, and for making the second stitch grab it under the hook). You may crochet with any desirable method you used to crochet. The finished houses using the materials stated in this pattern are ~14,5 and 12,5 cm (5.7 and 4.9 inches) in height. Make sure you crochet tight enough; otherwise, the stuffing or cardboard will show through the holes. You may use any desired color and brand of yarn. ENJOY CROCHETING.
— HOUSE No.1 (the outer part) :
Info :
YARN - Alize Cotton Gold No.37 (orange) and a 2.25 mm crochet hook.
Info :
Place a stitch marker in the 2nd stitch (3 sc) not to lose the corner.
Round 2 :
1 sc, (3 sc in 1 stitch), 1 sc, (3 sc in 1 stitch), 1 sc, (3 sc in 1 stitch), 1 sc, (3 sc in 1 stitch) (16)
Round 3 :
2 sc, (3 sc in 1 stitch), 3 sc, (3 sc in 1 stitch), 3 sc, (3 sc in 1 stitch), 3 sc, (3 sc in 1 stitch) (24)
Round 4 :
4 sc, (3 sc in 1 stitch), 5 sc, (3 sc in 1 stitch), 5 sc, (3 sc in 1 stitch), 5 sc, (3 sc in 1 stitch) (32)
Round 5 :
6 sc, (3 sc in 1 stitch), 7 sc, (3 sc in 1 stitch), 7 sc, (3 sc in 1 stitch), 7 sc, (3 sc in 1 stitch) (40)
Round 6 :
8 sc, (3 sc in 1 stitch), 9 sc, (3 sc in 1 stitch), 9 sc, (3 sc in 1 stitch), 9 sc, (3 sc in 1 stitch) (48)
Round 7 :
10 sc, (3 sc in 1 stitch), 11 sc, (3 sc in 1 stitch), 11 sc, (3 sc in 1 stitch), 11 sc, (3 sc in 1 stitch) (56)
Round 8 :
12 sc, (3 sc in 1 stitch), 13 sc, (3 sc in 1 stitch), 13 sc, (3 sc in 1 stitch), 13 sc, (3 sc in 1 stitch) (64)
Round 9 :
14 sc, (3 sc in 1 stitch), 15 sc, (3 sc in 1 stitch), 15 sc, (3 sc in 1 stitch), 15 sc, (3 sc in 1 stitch) (72)
Round 10 :
72 sc (through the posts between stitches)
Round 11-13 :
72 sc (3 rounds)
Info :
Trace the bottom of the square on the cardboard and cut it out. If you use thin cardboard, then cut two squares. Continue crocheting in a circle.
Round 14-44 :
88 sc (31 rounds)
Info :
Insert the cardboard template into the bottom of the house. Do not cut yarn. Prepare the cardboard for the wools of the house (density of cardboard from a large tea box will suffice). Measure one side of the house with a ruler to cut off the required amount of cardboard. Trim and glue cardboard and insert the template into the crocheted part. Trim the edge of the cardboard to desired length shorter than the crochet part. Complete crocheting the required number of sc to the corner of the house – 3 sc (guide on your part). Cut yarn.
— JOIN THE PARTS OF THE HOUSE :
Info :
Insert the inner part into the outer part. Check if the height of both parts matches. Adjust the height. Complete or unravel the row if needed. Complete crocheting the required stitches to the corner of the house (guide on your part). Cut yarn, leaving a long tail. Draw the yarn tail of the outer part to the wrong side using a crochet hook. Sew both parts of the house in a circle. Hide the yarn tail inside the house. Cut the excess yarn.
— HOUSE No.1 (the inner part) :
Info :
YARN - Alize Cotton Gold No.37 (orange) and a 2.25 mm crochet hook.
Round 2 :
1 sc, (3 sc in 1 stitch), 1 sc, (3 sc in 1 stitch), 1 sc, (3 sc in 1 stitch), 1 sc, (3 sc in 1 stitch) (16)
Round 3 :
2 sc, (3 sc in 1 stitch), 3 sc, (3 sc in 1 stitch), 3 sc, (3 sc in 1 stitch), 3 sc, (3 sc in 1 stitch) (24)
Round 4 :
4 sc, (3 sc in 1 stitch), 5 sc, (3 sc in 1 stitch), 5 sc, (3 sc in 1 stitch), 5 sc, (3 sc in 1 stitch) (32)
Round 5 :
6 sc, (3 sc in 1 stitch), 7 sc, (3 sc in 1 stitch), 7 sc, (3 sc in 1 stitch), 7 sc, (3 sc in 1 stitch) (40)
Round 6 :
8 sc, (3 sc in 1 stitch), 9 sc, (3 sc in 1 stitch), 9 sc, (3 sc in 1 stitch), 9 sc, (3 sc in 1 stitch) (48)
Round 7 :
10 sc, (3 sc in 1 stitch), 11 sc, (3 sc in 1 stitch), 11 sc, (3 sc in 1 stitch), 11 sc, (3 sc in 1 stitch) (56)
Round 8 :
12 sc, (3 sc in 1 stitch), 13 sc, (3 sc in 1 stitch), 13 sc, (3 sc in 1 stitch), 13 sc, (3 sc in 1 stitch) (64)
Info :
* Crochet the next round through the posts between stitches. To do this, insert the hook in the first stitch and draw it out in the second stitch, grabbing the working yarn and making sc.
Round 9 :
64 sc (through the posts between stitches)
Info :
* Crochet all the next rounds through both loops.
Round 10-40 :
64 sc (31 rounds)
Info :
Draw the yarn tail to the right side. Insert the inner part into the outer part. Check heights, adjust, and complete or unravel a row if needed. Complete crocheting the required stitches to the corner of the house. Cut yarn leaving a long tail for sewing.
— HOUSE DESIGN :
Info :
Make the templates from a sheet of paper for two windows and a front door. Trace around the prepared templates on the felt and cut them out. Red felt is for the front door. Brown felt for the windows. Prepare felt pieces and glue or sew them onto the house after embroidery and marking.
— FRONT DOOR DESIGN :
Item Name (P1) :
Apply horizontal and vertical lines on the felt with a white marker. Embroider vertical and horizontal stitches with brown embroidery thread to create the door panels and details. Secure thread on wrong side and cut thread. Glue the ready part onto the house and position the door at the bottom front. Sew if desired for extra hold.
— WINDOWS DESIGN :
Item Name (P1) :
Draw curtains on the windows with a permanent white marker. Draw the curtains several times to make the drawing brighter as the marker sinks into the felt over time. Apply vertical and horizontal lines (the window frame) with the marker. Prepare a scrap of white embroidery thread and split into three threads. Use two threads to embroider vertical and horizontal stitches as window frames. Secure thread on wrong side and cut. Glue the windows onto the house.
— ROOF (back part) :
Info :
YARN - Alize Cotton Gold No.56 (red) and a 2.25 mm crochet hook.
Instruction :
Chain 16. Start crocheting in the second chain from hook - 15 sc, chain 1, turn.
Round 2-18 :
15 sc, chain 1, turn (17 rounds)
Info :
Cut yarn, leaving a long tail. Steam the part for a few seconds with the iron, through a damp cloth. Prepare the cardboard in half of the part. Fold the part in half, insert the cardboard, and sew the edges. Draw the needle to the other side of the part, and sew the edges too. Hide the yarn tail inside the part and cut excess yarn. Pin the part to the house and try it on.
— ROOF (make 2 – front and back parts) :
Info :
YARN - Alize Cotton Gold No.56 (red) and a 2.25 mm crochet hook. These instructions make two matching roof parts (front and back variations follow).
Instruction :
Chain 12. Start crocheting in the second chain from hook - 11 sc, chain 1, turn.
Round 2 :
11 sc, chain 2, turn
Round 3 :
12 sc, chain 1, turn
Round 4 :
12 sc, chain 2, turn
Round 5 :
13 sc, chain 1, turn
Round 6 :
13 sc, chain 2, turn
Round 7 :
14 sc, chain 1, turn
Round 8 :
14 sc, chain 2, turn
Round 9 :
15 sc, chain 1, turn
Round 10 :
15 sc, chain 1, turn
Round 11 :
15 sc, chain 1, turn
Round 13 :
14 sc, chain 1, turn
Round 15 :
13 sc, chain 1, turn
Round 17 :
12 sc, chain 1, turn
Info :
Cut yarn leaving a long tail for sewing. Steam the part for a few seconds through a damp cloth. Prepare the cardboard in half of the part, fold the crocheted piece in half, insert the cardboard and sew the edges. Hide yarn tail. Pin the part to the house and try it on.
— ROOF (outer part) :
Info :
YARN - Alize Cotton Gold No.56 (red) and a 2.25 mm crochet hook.
Instruction :
Chain 19. Start crocheting in the second chain from hook - 18 sc, chain 1, turn.
Round 2-26 :
18 sc, chain 1, turn (25 rounds)
Info :
Cut yarn leaving a long tail. Steam the part for a few seconds with the iron, through a damp cloth. Prepare the cardboard in half of the part. Fold the part in half, insert the cardboard, and sew the edges. Draw the needle to the other side of the part and sew the edges. Hide the yarn tail inside. Pin the part to the house and try it on.
— ROOF (front part) :
Instruction :
Chain 19. Start crocheting in the second chain from hook - 18 sc, chain 1, turn.
Round 2-24 :
18 sc, chain 1, turn (23 rounds)
Info :
Cut yarn leaving a long tail. Steam the part for a few seconds with the iron, through a damp cloth. Prepare the cardboard, fold, insert and sew edges. Hide tails. Pin and try on to check fit.
— ROOF ASSEMBLY :
Info :
Prepare a scrap of brown embroidery thread. Split it into three threads. Use two threads for embroidering the vertical and horizontal stitches. First, embroider the horizontal stitches at equal distances from each other. Embroider the vertical stitches in a checkerboard pattern to create tile lines. Secure thread on the wrong side and trim ends. Pin both roof halves to the house, adjust and sew the roof pieces to the top edges. Finalize by gluing or tacking any felt window or door pieces as needed.
These little houses make a delightful handmade accent for shelves, desks, and children's rooms — and they are super fun to personalize! 🏡 Decorate with felt windows and embroidered doors, change yarn colors, or make a whole village of tiny houses. Whether you give them as gifts or keep them for yourself, they bring warmth and handmade charm to any space. 🧵✨