🧶 Beautiful ✨ Detailed 💝 Adorable

Pumpkin Cup Cozy Pattern

Pumpkin Cup Cozy Pattern
4.0★ Rating
2-3 Hours Time Needed
1.9K Made This
✂️

Intermediate Level

Ideal for those with basic crochet experience, featuring slightly more advanced stitches and techniques to expand your skills.

⏱️

Bite-Sized Project

Finishes in 2-4 hours—perfect for an afternoon of creative relaxation.

Warm Welcome

A comforting piece for home or gifts that brings handmade warmth to everyday moments and special occasions.

About This Pumpkin Cup Cozy Pattern

This pattern creates a textured Pumpkin Cup Cozy featuring alternating pumpkin rows and tiny stems for a playful autumn look. It is adjustable by changing the pumpkin count by 3 stitches to fit different cup sizes. The pattern uses worsted weight cotton and a 5mm hook for a sturdy, well-shaped cozy. Photo guides for the Pumpkin and Stem stitches are included to help you master the technique.

Pumpkin Cup Cozy Pattern crochet pattern - detailed view of completed project

A simplified written version and a fully explained version are both provided so you can choose the pace that suits you. Perfect for gifts, seasonal markets, or cozying up your own mug.

Why You'll Love This Pumpkin Cup Cozy Pattern

I absolutely love this pattern because the pumpkin stitch creates such a delightful, tactile texture that instantly evokes autumn. I enjoy how quickly a single cozy comes together—it's a satisfying weekend or afternoon project. The design is flexible, so I can adapt it to different cup sizes or yarns depending on what I have on hand. Including photo guides for both the pumpkin and stem makes the more unusual stitches approachable and fun to learn.

Pumpkin Cup Cozy Pattern step 1 - construction progress Pumpkin Cup Cozy Pattern step 2 - assembly progress Pumpkin Cup Cozy Pattern step 3 - details and accessories Pumpkin Cup Cozy Pattern step 4 - final assembly and finishing

Switch Things Up

I love changing the colour palette to match seasons, so try Pale Pastels for spring or warm rusts and creams for a farmhouse look.

You can make the cozy bigger or smaller by adding or subtracting 3 chains per inch; I often add 3-6 chains for large travel mugs.

I sometimes switch to bulky yarn and a larger hook to make a chunkier, faster version that feels extra cozy.

For a delicate version, use sport or DK weight yarn with a smaller hook to create a mini cozy perfect for small cups or gifts.

I like to mix pumpkin colours across rows—try alternating Colour B and Colour D pumpkins for more contrast and visual interest.

Swap the green stem for a brown or gold yarn to create a rustic or metallic accent for holiday markets.

Add a sewn-on button or little bow to the side for a cute finishing detail that also helps keep the cozy in place.

I sometimes embroider tiny leaves around the stems to enhance the botanical feel; simple French knots add lovely texture.

If you want a set, make several with coordinating colours and package them as seasonal gifts—each cozy takes just a few hours.

Don’t be afraid to personalize by adding initials or small appliques; small changes make each cozy unique and memorable.

Common Mistakes & How to Fix Them

✗ Crocheting with inconsistent tension causes uneven pumpkins and distorted stitches; maintain even tension or try a larger hook if your fabric is too tight. ✗ Skipping the instruction to 'carry colour A through' during colour changes will leave loose floats; always carry the main colour through as directed to lock colours in place. ✗ Not pushing the pumpkins to face outwards can make the design look flat and unclear; after making pumpkin rows, gently push each pumpkin to the outside so the texture reads correctly. ✗ Failing to loosely chain the foundation (or using a foundation SC) when your SC is tight can make the cozy too small; try loosely chaining, a larger hook, or adding 3 STS to the chain to add length. ✗ Not finishing with slip stitches into the specified chain tops can change your stitch count and pattern alignment; always SL ST into the top of CH-2/CH-3 as stated to keep counts correct.

Pumpkin Cup Cozy Pattern

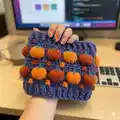
Make a charming Pumpkin Cup Cozy to keep your hands warm and add seasonal style to your favorite drinks. This adjustable pattern uses an alternating pumpkin stitch to create textured rows of pumpkins and stems, perfect for fall gifting. You can easily change the length by increasing or decreasing the pumpkin count to fit 12–16oz cups or larger. The pattern includes a photo guide for the pumpkin and stem stitches so you can master the look quickly.

Intermediate 2-3 Hours

Materials Needed for Pumpkin Cup Cozy Pattern

— Main Fabric

  • 01
    4 x Worsted Weight - Blue Sky Fibers Organic Cotton (main supply)
  • 02
    Colour A - Black - INK (BASE) 10.25 yds / 9.35 m (7 g)
  • 03
    Colour B - Orange - PUMPKIN (PUMPKIN) 10.5 yds / 9.6 m (7 g)
  • 04
    Colour C - Green - JASPER (STEM) 3.4 yds / 3.1 m (2 g)
  • 05
    Colour D - Orange - SPICEBERRY (PUMPKIN) 5.3 yds / 4.8 m (7 g)

— Tools Required

  • 01
    Crochet hook size 5.0mm (H/8)
  • 02
    Scissors
  • 03
    Yarn needle for sewing in ends
  • 04
    Stitch markers (optional for marking rounds)
  • 05
    Video links provided for stitch guidance

Progress Tracker

0% Complete

— Written (US): Simplified :

Info :

Increase/Decrease by 3 STS to change the length by 1". The colour in brackets is stated before the ST.

Round 0 :

Start with Colour A. Loosely CH-24

Round 1 :

SL ST into the first chain. SC around. SL ST into first SC. (24)

Info :

Pumpkin Stitch (Page 7)

Round 2 :

CH-3. (Counts as ST) 1 DC. (Colour B) *PUMPKIN, (Colour A) 2 DC, REP from * 7 more times finishing with PUMPKIN in the last ST. (Colour A) SL ST into top of CH-3. (24 ST/8 Pumpkins)

Info :

Warping is normal at this point

Info :

Stem (Page 8)

Round 3 :

Push your pumpkins to face outwards. 1 SC, (Colour C) *STEM, (Colour A) 2 SC, REP from * 7 more times. (Colour C) STEM, (Colour A) 1 SC. (24)

Round 4 :

CH-2, (Colour D) *PUMPKIN, (Colour A) 2 DC, REP from * 7 more times ending with 1 DC. SL ST into top of CH-2. Push pumpkins to face outwards. (24)

Round 5 :

(Colour C) *STEM, (Colour A) 2 SC, REP from * 7 more times ending with 2 SC. SL ST into first ST. (24)

Round 6 :

CH-3. (Counts as ST) 1 DC. (Colour B) *PUMPKIN, (Colour A) 2 DC, REP from * 7 more times finishing with the PUMPKIN in the last ST. (Colour A) SL ST into top of CH-3. (24 ST/8 Pumpkins)

Round 7 :

1 SC, (Colour C) *STEM, (Colour A) 2 SC, REP from * 7 more times. (Colour C) STEM, (Colour A) 1 SC. SL ST into first SC. (24)

Round 8 :

SC around, SL ST into first SC. (24)

Info :

Pop pumpkins out again as they're probably inverted at this point! Sew in loose ends. This fits the average 12 - 16oz cups! If your SC is too tight in the beginner try loosely chaining, increase hook size or increase the total ST count if you find the overall has no stretch. You can even try a foundation SC if the foundation is still too tight.

— Written (US): Explained - Part 1 :

Info :

Increase/Decrease by 3 STS to change the length by 1".

Round 0 :

Start with Colour A. Loosely CH-24

Round 1 :

SL ST into the first chain. SC around. SL ST into first SC. (24)

Round 2 :

CH-3. (Counts as ST) 1 DC. YO with Colour B. Carry Colour A through. *3 PUFF STS in next ST. Keep the last loop from each PUFF ST and the DC before on your hook (4 Loops total). Using the ST closest to your hook pull through all 4 loops to close off the pumpkin. YO with Colour A. Carry Colour B through. 2 DC, REP from * 7 more times finishing with a PUMPKIN in the last ST. SL ST into top of CH-3 with Colour A. (24 ST/8 Pumpkins)

Info :

Warping is normal at this point

Round 3 :

Push your pumpkins to face outwards. 1 SC,

Info :

Stem (Page 8) *Insert hook into the middle of pumpkin, under 6 loops. Pull up Colour C, YO and pull through with Colour A. Carry through Colour C. SC in next 2 STS. Rep from * 7 times. 1 more STEM, 1 SC. (24)

Round 4 :

CH-2, Pumpkin Stitch (Page 7) YO with Colour D. Carry Colour A through. *3 PUFF STS in next ST. Keep the last loop from each PUFF ST and the DC before on your hook (4 Loops total). Using the ST closest to your hook pull through all 4 loops to close off the pumpkin. YO with Colour A, 2 DC, REP from * 7 more times ending with 1 DC. SL ST into top of CH-2. Push pumpkins to face outwards. (24 ST/8 Pumpkins)

Round 5 :

(Colour C) *STEM, (Colour A) 2 SC, REP from * 7 more times ending with 2 SC. SL ST into first ST. (24)

— Written (US): Explained - Part 2 :

Round 6 :

CH-3. (Counts as ST) 1 DC. Pumpkin Stitch (Page 7) YO with Colour B. Carry Colour A through. *3 PUFF STS in next ST. Keep the last loop from each PUFF ST and the DC before on your hook (4 Loops total). Using the ST closest to your hook pull through all 4 loops to close off the pumpkin. YO with Colour A. Carry Colour B through. 2 DC, REP from * 7 more times. Finish with 1 PUMPKIN. (Colour A) SL ST into CH-3. (24 ST/8 Pumpkins)

Round 7 :

1 SC, Stem (Page 8) *Insert hook into the middle of pumpkin, under 6 loops. Pull up Colour C, YO and pull through with Colour A. Carry through Colour C. SC in next 2 STS. REP from * 7 more times. 1 more STEM, finish with 1 SC. SL ST into first SC. (24)

Round 8 :

SC around, SL ST into first SC. (24)

Info :

Pop pumpkins out again as they're probably inverted at this point! Sew in loose ends. This fits the average 12 - 16oz cups! If your SC is too tight in the beginner try loosely chaining, increase hook size or increase the total ST count if you find the overall has no stretch. You can even try a foundation SC if the foundation is still too tight.

— Pumpkin Stitch Photo Guide :

Info :

NOTE: These photos are from another make which is why the pumpkins are stacked on top of each other. Video Link: With Colour A already on your hook, YO with Colour B. Start PUFF ST in next ST.

Info :

PUFF: *YO, insert in ST, YO, pull up a loop. Rep 2 more times from *. YO, pull through 6 loops. Leaving the 7th loop on the hook.

Info :

Repeat PUFF ST 2 more times in the same space. (3 PUFF STS / 4 Loops on hook)

Info :

Using the ST closest to your hook pull through all 4 loops to close off the pumpkin.

Info :

YO with Colour A. DC in the next 2 stitches. Repeat from the top to continue building your line of pumpkins till the last mentioned STS in the pattern.

— Stem Photo Guide :

Info :

Video Link: With Colour A already on your hook insert hook into middle of pumpkin, under 3 stitches (6 loops). YO with Colour C. Pull up a loop with Colour C. YO with Colour A and pull through to carry Colour C through. SC in next 2 STS with Colour A. Repeat till the last number of STS mentioned in pattern.

Assembly Instructions

  • After finishing: pop the pumpkins out so they face outwards if they appear inverted and press each puff gently outward for the best look.
  • Weave and sew in all loose ends with a yarn needle ensuring ends are hidden and secure.
  • If making multiple rows, align pumpkin rows so the pumpkins alternate vertically and ensure stems line up between pumpkins for a neat finish.
  • Block or gently steam the cozy if needed to relax stitches and even out any warping before gifting.
  • Fit the cozy to a 12–16oz cup to check fit and adjust by adding or subtracting 3 STS to the starting chain if necessary.

Important Notes

  • 💡Written in US terms with a UK conversion chart included in the pattern for reference.
  • 💡Tension and patience are key; if you crochet tightly try a larger hook size or increase the pumpkin amount.
  • 💡Warping is normal when using pumpkin stitches; push pumpkins to face outwards and continue as directed.
  • 💡Photo guides for the Pumpkin and Stem portions are provided to clarify the special stitches and colour changes.

This Pumpkin Cup Cozy pattern adds seasonal charm to your favorite drinks and makes wonderful handmade gifts. Adjust the pumpkin count to fit a variety of cup sizes and enjoy a satisfying, quick project this autumn. 🧶🍂

You ask,

we answer.

FAQs

What size will the finished piece be?

The finished cozy fits the average 12–16oz cup using the recommended worsted weight yarn and 5mm hook; adjust by 3 stitches per 1" length change.

Can I use different yarn weights for this pattern?

Yes, you can use different yarn weights, but this will change the final size; use an appropriate hook and adjust your starting chain and stitch count accordingly.

Do I need prior crochet experience for this pattern?

This pattern is rated intermediate; basic knowledge of SC, DC, PUFF/PUFF-based pumpkin stitches and colour carrying is recommended for best results.

How long does this project typically take to complete?

Most crocheters complete this cozy in 2-3 hours, though time may vary based on experience and whether you use the simplified or explained version.