🧶 Beautiful ✨ Detailed 💝 Adorable

Monster Frankenstein Amigurumi Pattern

Monster Frankenstein Amigurumi Pattern
4.0★ Rating
5-7 Hours Time Needed
3.1K Made This
✂️

Intermediate Level

Ideal for those with basic crochet experience, featuring slightly more advanced stitches and techniques to expand your skills.

⏱️

Weekend Treat

Takes 5-7 hours, making it an enjoyable project to finish over a couple of days.

🧸

Cute Companion

An adorable friend to cherish, handcrafted with love to bring comfort and joy for years to come.

About This Monster Frankenstein Amigurumi Pattern

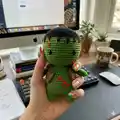
This pattern creates a sweet Monster Frankenstein amigurumi with a textured hair top, stitched scars and a little crocheted sweater. The design uses simple amigurumi shaping with increases and decreases for a rounded head and a flat-bottomed body. You can customize yarn colors and facial details to create your own spooky-cute companion.

Monster Frankenstein Amigurumi Pattern crochet pattern - detailed view of completed project

Clear rounds and helpful photos make assembly easier, and the pattern includes a small sweater accessory. Ideal for gift-making, seasonal decorations, or expanding your amigurumi skills.

Why You'll Love This Monster Frankenstein Amigurumi Pattern

I absolutely love this pattern because it blends classic amigurumi shaping with playful Frankenstein details that always make people smile. I enjoy the simple construction that still lets you add character with embroidered scars and a little sweater. The pattern is satisfying to crochet from start to finish and offers room for creative color choices. I also love how quick it is to complete compared to larger amigurumi projects, so you get a finished gift-worthy toy in a weekend.

Monster Frankenstein Amigurumi Pattern step 1 - construction progress Monster Frankenstein Amigurumi Pattern step 2 - assembly progress Monster Frankenstein Amigurumi Pattern step 3 - details and accessories Monster Frankenstein Amigurumi Pattern step 4 - final assembly and finishing

Switch Things Up

I love changing up the colors to give this monster a totally different vibe; try pastel greens and soft browns for a whimsical look or deep greens and grays for classic Frankenstein style.

I often swap the yarn weight and hook size to make either tiny keychain versions or larger huggable dolls—adjust the eye size accordingly when you change scale.

I like to experiment with facial details: embroidery, felt patches, or tiny safety buttons can create a unique personality for each doll.

Try adding wired limbs if you want a posable figure; I add florist wire inside the arms for adjustable poses and it works beautifully.

For the sweater, you can change the stitch pattern or add stripes to create a cozy wardrobe variety; I sometimes crochet a longer cardigan instead of a short sweater.

I sometimes make the scars with contrasting yarn colors or metallic threads for a playful accent; you can also add small beads to mimic stitches.

If you want a more vintage look, use natural fiber yarns and slightly larger hooks, then wash and lightly felt the finished piece for texture.

I recommend trying safety eyes of different sizes or embroidered eyes for a softer face; embroidered eyes are great if making toys for very young children.

Consider creating a set of monsters in different sizes and colors—mixing textures and accessories turns them into a charming collection that looks great displayed together.

Lastly, personalize each finished piece with a tiny tag or embroidered initial to make thoughtful, handmade gifts I always love giving to friends and family.

Common Mistakes & How to Fix Them

✗ Skipping the stitch counts during rounds can create uneven shaping; count your stitches at the end of each round to ensure accuracy. ✗ Changing yarn color without securing the tail can lead to loose ends and unraveling; weave and secure color joins before continuing to the next round. ✗ Understuffing or overstuffing the head and body will distort the shape; stuff gradually and evenly, checking the silhouette as you go. ✗ Cutting the leg thread too early will make joining to the body difficult; follow the instruction to leave the second leg's tail and continue into the body.

Monster Frankenstein Amigurumi Pattern

Make your own adorable Monster Frankenstein amigurumi with clear, step-by-step rounds and simple assembly. This pattern guides you through crocheting a cute stitched monster with a removable sweater and easy-to-follow shaping. Perfect for gifting or seasonal décor, you can customize colors and details to make it uniquely yours. Enjoy a cozy, satisfying crochet project with helpful photos and notes.

Intermediate 5-7 Hours

Materials Needed for Monster Frankenstein Amigurumi Pattern

— Main Fabric

  • 01
    Alize Cotton Gold 126
  • 02
    Alize Cotton Gold 493
  • 03
    Alize Cotton Gold 60
  • 04
    Any yarn of your preferred color and thickness

— Tools Required

  • 01
    2.00 mm crochet hook or a hook that fits your yarn
  • 02
    Polyester Fiberfill
  • 03
    6 mm safety eyes

Progress Tracker

0% Complete

— Head :

Round 1 :

6 sc in magic ring (6)

Round 2 :

(inc) x6 (12)

Round 3 :

(sc, inc) (18)

Round 4 :

(inc, 2 sc) x6 (24)

Round 5 :

(3 sc, inc) x6 (30)

Round 6 :

2 sc, inc, (4 sc, inc) x5, 2 sc (36)

Round 7 :

(5 sc, inc) (42)

Round 8 :

3 sc, inc, (6 sc, inc) x5, 3 sc (48)

Round 9 :

(7 sc, inc) x6 (54)

Round 10 :

4 sc, inc, (8 sc, inc) x5, 4 sc (60)

Round 11 :

sc around (60) *change to green yarn

Round 12 :

BLO Sc around (60)

Round 13-23 :

Sc around (60) (11 rnds)

Round 24 :

(3 sc, dec) x12 (48)

Round 25 :

(2 sc, dec) x12 (36)

Round 26 :

2 sc, dec, (4 sc, dec) x5, 2 sc (30)

Round 27 :

(3 sc, dec) x6 (24)

Round 28 :

sc around (24)

— Leg :

Round 1 :

7 sc in magic ring (7)

Round 2 :

(inc) x7 (14)

Round 3-5 :

sc around (14) *make 2 pieces.

Info :

*After making the first leg, cut the thread. When making the second leg, do not cut the thread and continue to the body.

— Body :

Round 6 :

ch4, join the first leg with the sc. Crochet on the first leg: 2 sc, (inc, 5 sc) x2, working on the chain: inc, 2 sc, inc, crochet on the second leg: (5 sc, inc) x2, 2 sc, working on the chain: 4 sc (42)

Round 7 :

(13 sc, inc) x3 (45)

Round 8-12 :

sc around (45) (5 rnds)

Round 13 :

(13 sc, dec) x3 (42)

Round 14-16 :

sc around (42) (3 rnds)

Round 17 :

(5 sc, dec) x6 (36)

Round 18-20 :

sc around (36) (3 rnds)

Round 21 :

(4 sc, dec) x6 (30)

Round 22-24 :

sc around (30)

Round 25 :

(3 sc, dec) x6, slst (24)

Info :

*Fasten off and leaving a long tail for sewing. Stuff the body. Sew the Head with the Body.

— Arm :

Round 1 :

6 sc in magic ring (6)

Round 2 :

(sc, inc) x3 (9)

Round 3-11 :

sc around (9) (9 rnds)

Info :

*I don't fill arms.

— Sweater :

Round 1 :

Ch 25, (sc, inc) x12 (36) ch1, turn

Round 2 :

(2 sc, inc) x12 (48) ch1, turn

Round 3 :

Sc around (48) ch1, turn

Round 4 :

7 sc, ch3, skip 10 sc, 14 sc, ch3, skip 10 sc, 7 sc, ch1, turn

Round 5-7 :

Sc around (34) (3 rnds) ch1, turn. Cut the yarn and hide.

Assembly Instructions

  • After completing the second leg, do not cut the yarn; continue with the body by chaining 4 and joining the first leg as instructed to join legs and build the body seamlessly.
  • Fasten off the body leaving a long tail and stuff the body firmly but evenly before sewing the head to the body using the long tail for a secure seam.
  • Attach arms to the sides of the body at an even height so they sit symmetrically; use pins to check placement before sewing with a yarn needle.
  • Place and secure 6 mm safety eyes on the head before closing the head completely, ensuring they are level and spaced evenly; then embroider scars and mouth details as desired.

Important Notes

  • 💡Use stitch markers to keep track of the beginning of each round to maintain correct stitch counts and shaping.
  • 💡Stuff the head and body gradually while shaping; overstuffing can cause distortion and under-stuffing can lead to collapse.
  • 💡When joining the second leg to continue the body, make sure your connection rounds are tight to avoid gaps between legs and body.
  • 💡Weave in yarn ends neatly and hide tails inside the amigurumi for a clean finish and secure seams.

This adorable Monster Frankenstein amigurumi is perfect for spooky-season gifting or as a cozy handmade friend. Customize the scars, sweater, and colors to make it uniquely yours—small changes create big personality. Happy crocheting and enjoy your new little monster creation! 🧶👻

You ask,

we answer.

FAQs

What size will the finished piece be?

The finished amigurumi size depends on your yarn and hook, but using the suggested cotton yarn and a 2.00 mm hook produces a small toy roughly 12-18 cm tall.

Can I use different yarn weights for this pattern?

Yes, you can use different yarn weights, but this will change the final size; choose an appropriate hook size for your yarn and adjust eye size if needed.

Do I need prior crochet experience for this pattern?

This pattern is rated intermediate and assumes you know single crochet, increases, decreases, and basic amigurumi assembly; beginners can attempt it with patience.

How long does this project typically take to complete?

Most crocheters finish this project in 5-7 hours, depending on experience, customization, and how much time you spend on embroidery and assembly.