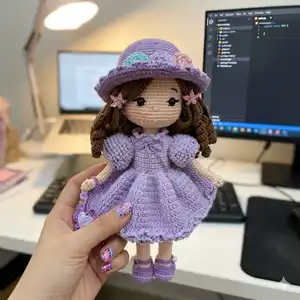
Create a charming 30cm Emma doll with this detailed crochet pattern. You will enjoy step-by-step instructions for body parts, hair, clothing and accessories. The pattern includes clear rounds, color changes and assembly tips so you can finish a lovely handmade doll to gift or display.
Progress Tracker
0% Complete
— ARMS (make 2) :
Info :
Work in spiral rounds. Don’t stuff. Use skin color yarn
Left arm - R2 :
6 inc (12)
Left arm - R6 :
(4 sc, dec)*2 (10)
Left arm - R7 :
(3 sc, dec)*2 (8)
Left arm - R9 :
(3 sc, inc)*2 (10)
Info :
Crochet 5 sc more (and 1 slst), the last stitch should be at the inside of the arm. Note the thumbs will be in front. Fasten off.
Right arm :
Do same as the left arm until R28, slst. Fasten off.
Info :
Note: No need to stuff the arms, but when connect the arms to the body, stuff a bit at the shoulder to make it looks better.
— LEGS (make 2) :
Info :
Work in spiral rounds. Stuff as you go. Start with skin color yarn
Left leg - R1 :
Ch 6, start to crochet on the second chain from the hook: inc, 3 sc, inc-4, 3 sc, inc (14)
Left leg - R2 :
2 inc, 3 sc, 4 inc, 3 sc, 2 inc (22)
Left leg - R3 :
(sc, inc)*2, 3 sc, (sc, inc)*2, (inc, sc)*2, 3 sc, (inc, sc)*2 (30)
Left leg - R6 :
7 sc, (sc, dec)*3, (dec, sc)*3, 5 sc (24)
Left leg - R7 :
7 sc, 6 dec, 5 sc (18)
Left leg - R8 :
6 sc, 4 dec, 4 sc (14)
Left leg - R25 :
7 sc, 4 hdc, 3 sc (14)
Info :
Note: To form the knee, 4 hdc must be at the center of the front.
Left leg - R26 :
3 sc, inc, 6 sc, inc, 3 sc (16)
Left leg - R28 :
(7 sc, inc)*2 (18)
Left leg - R37 :
BLO 18 sc
Left leg - R38 :
18 sc, slst.
Info :
Adjust how for the position of the last stitch is at the inside of the leg. Fasten off.
Right leg :
Do same as the left leg but add more 10 sc (adjustable) to make the position of the last stitch is at the inside of the leg. Don’t fasten off, continuing crochet to the body. Connect 2 legs with 3 chains.
Ruffle of shorts :
Attach white yarn to R36, (ch 1, slst)*18. Fasten off.
— BODY :
Body - R1 :
18 sc (left leg), 3 sc into 3 chains, 18 sc (right leg), 3 sc into 3 last chains (42)
Body - R2 :
(6 sc, inc)*6 (48)
Body - R3-9 :
48 sc. Leave white yarn to crochet ruffle of shorts.
Ruffle of shorts :
48 slst. Fasten off.
Body - R11 :
(6 sc, dec)*6 (42)
Body - R12 :
(5 sc, dec)*6 (36)
Body - R25 :
8 sc, 4sc (join with left arm), 14 sc, 4 sc (join with right arm), 6 sc (36)
Body - R26 :
8 sc, 6 sc (on left arm), 14 sc on the chest, 6 sc (on right arm), 6 sc (40)
Info :
Note: The position of the 2 thumbs should be in front and 2 arms should be even on the body.
Body - R28 :
(4 sc, dec, 4 sc)*4 (36)
Body - R29 :
(2 sc, dec, 2 sc)*6 (30)
Body - R30 :
(3sc, dec)*6 (24)
Body - R31 :
(sc, dec, sc)*6 (18)
Info :
Fasten off. Leave a long tail for sewing.
— EARS (make 2) :
Info :
Work in rows. Use skin color
Ears - R1 :
MR, 3 sc, turn
Ears - R2 :
Ch 1, 3 inc (6)
Info :
Fasten off. Leave a long tail for sewing.
— HEAD :
Head - R3 :
(sc, inc)*8 (24)
Head - R4 :
(3 sc, inc)*6 (30)
Head - R5 :
2 sc, inc, (4 sc, inc)*5, 2 sc (36)
Head - R6 :
(5 sc, inc)*6 (42)
Head - R7 :
3 sc, inc, (6 sc, inc)*5, 3 sc (48)
Head - R8 :
(7 sc, inc)*6 (54)
Head - R9 :
4 sc, inc, (8 sc, inc)*5, 4 sc (60)
Head - R10 :
(9 sc, inc)*6 (66)
Head - R27 :
(9 sc, dec)*6 (60)
Head - R28 :
4 sc, dec, (8 sc, dec)*5, 4 dec (54)
Head - R29 :
(7 sc, dec)*6 (48)
Head - R30 :
3 sc, dec, (6 sc, dec)*5, 3 sc (42)
Head - R31 :
(5 sc, dec)*6 (36)
Head - R32 :
18 dec. Fasten off.
Info :
Insert the eyes between R20 and R21, the distance is 12 stitches.
Info :
Sew ears at the same level as the upper eyelid, 6 stitches from the outer lash line. Embroider eyebrow with 1 stitch high, 3 stitches wide, 4 rows from the eye hole. Embroider nose with 2 stitches wide, 2 rows from the eye hole.
— HAIR :
Hair - Info :
Use brown yarn. Work in rounds to make cap then crochet long strand layers.
Hair - R2 :
BLO 8 inc (16)
Hair - R3 :
BLO (sc, inc)*8 (24)
Hair - R4 :
BLO (3 sc, inc)*6 (30), turn, start to crochet strands (BLO).
Layer 1 :
15 strands: (Ch 61, start to crochet on the second chain from the hook: 60 hdc, 2 slst)*15
Layer 2 :
12 strands: (Ch 61, start to crochet on the second chain from the hook: 60 hdc, 2 slst)*12
Layer 3 :
8 strands: (Ch 61, start to crochet on the second chain from the hook: 60 hdc, 2 slst)*8
Layer 4 :
4 strands: (Ch 61, start to crochet on the second chain from the hook: 60 hdc, 2 slst)*4
Info :
Fasten off. Leave a long tail for sewing the top of the hair to the head. Tie 5 bangs on each side and attach a bow/flower as you like.
— ASSEMBLY :
Item :
Assembly and finish the doll by inserting wire if desired, sew head to body using long tail, position arms and legs evenly and secure with whipstitch. Add stuffing to shoulders if needed then finish neck join.
Item :
Sew hair cap to head and attach layered strands, curl or style strands as shown in photos; sew bangs and side pieces symmetrically.
Item :
Sew eyes and embroider eyelids/eyebrows as instructed, then sew ears at indicated level and embroider nose two rows below eye hole.
Item :
Attach clothing: join legs to body as instructed, then add dress, sleeves, collar and decorative bow; sew buttons to dress back for closure.
— DRESS (Princess version) :
Dress - Intro :
Use light purple yarn. Ch 24 + ch 6 (make hole), start to crochet on the 7th chain from the hook.
Dress - R1 :
(2 sc, inc)*8, turn (32)
Dress - R2 :
Ch 1, (3 sc, inc)*8, turn (40)
Dress - R3 :
Ch 1, (4 sc, inc)*8, turn (48)
Dress - R4 :
Ch 1, 8 sc, ch 4 (skip 8), 16 sc, ch 4 (skip 8), 8 sc, turn (40)
Dress - R5 :
Ch 1, 8 sc, 4 sc on 4 chains, 16 sc, 4 sc on 4 chains, 8 sc, turn (40)
Dress - R6-7 :
Ch 1, 40 sc, turn
Dress - R8 :
Ch 1, 40 sc + ch 6 (make hole), turn
Dress - R10-11 :
Ch 1, 40 sc, turn
Dress - R12 :
Ch 1, 40 sc, slst to close the round
Dress - R13 :
Ch 2, dc-inc*40, slst
Dress - R14 :
Ch 2, (dc, dc-inc)*40, slst (120)
Dress - R15-22 :
Ch 2, 120 dc, slst
Dress - R23-24 :
(work in spiral rounds) BLO 120 sc
Dress - Info :
Don’t fasten off, turn to crochet: BLO (Ch 2, slst on the next stitch)*repeat 3 rounds.
— SLEEVES :
Sleeve - R1 :
Attach light purple yarn to the center of the armpit, Ch 1, 14 sc
Sleeve - R2 :
BLO 14 inc (28)
Sleeve - Info :
Don’t fasten off, turn to crochet: BLO (Ch 3, slst on the next stitch)*14, (ch 2, slst on the next stitch)*repeat to the last BLO stitch on the sleeve.
— COLLAR :
Collar - R1 :
Attach light purple yarn. (wrong side) Ch 1, 24 sc, turn
Collar - R2 :
(right side) (Ch 3, sc on the next stitch)*24
— DECORATIVE BOW :
Bow :
Thread purple yarn at the front of the collar and tie a bow.
— HAND BAG :
Handbag - R1 :
Start with light purple, crochet 2 heart-shaped pieces. MR, ch 2, 3 dc, 3 hdc, ch 1, dc, ch 1, 3 hdc, 3 dc, ch 2, slst
Handbag - R2 :
Ch 1, 4 inc, 4 sc, hdc, 4 sc, 4 inc, slst. Fasten off.
Handbag - R3 :
Put 2 heart-shaped pieces together, left sides facing each other. Attach purple yarn, count from the center to the sides 3 stitches, start crocheting on the 4th stitch: Ch 1, sc*repeat until the end, turn
Handbag - R4 :
Ch 2, (3 dc in a same stitch)*repeat until the end
Handbag - Info :
Don’t fasten off, ch 54, slst on the opposite of the handbag to make handle. Fasten off.
— HAT :
Hat - R1 :
Start with purple yarn. MR, 8 sc
Hat - R3 :
(sc, inc)*8 (24)
Hat - R4 :
(3 sc, inc)*6 (30)
Hat - R5 :
2 sc, inc, (4 sc, inc)*5, 2 sc (36)
Hat - R6 :
(5 sc, inc)*6 (42)
Hat - R7 :
3 sc, inc, (6 sc, inc)*5, 3 sc (48)
Hat - R8 :
(7 sc, inc)*6 (54)
Hat - R9 :
4 sc, inc, (8 sc, inc)*5, 4 sc (60)
Hat - R10 :
(9 sc, inc)*6 (66)
Hat - R11 :
5 sc, inc, (10 sc, inc)*5, 5 sc (72)
Hat - R12 :
(11 sc, inc)*6 (78)
Hat - R18 :
6 sc, inc, (12 sc, inc)*5, 6 sc (84)
Hat - Change to light purple yarn :
Hat - R22 :
(13 sc, inc)*6 (90)
Hat - Change to purple yarn :
Hat - R24 :
FLO (9 sc, inc)*9 (99)
Hat - R26 :
5 sc, inc, (10 sc, inc)*8, 5 sc (108)
Hat - R28 :
(11 sc, inc)*9 (127)
Hat - R30 :
6 sc, inc, (12 sc, inc)*8, 6 sc (136)
Hat - R32 :
BLO (Ch 2, slst on the next stitch)*136. Fasten off.
— FLOWERS (make 3) :
Flowers - R1 :
Use light blue, light pink and light purple yarn. MR, 6 sc
Flowers - R2 :
BLO 6 inc (12)
Flowers - R3 :
BLO (sc, inc)*6 (18)
Flowers - Info :
Don’t fasten off, turn to crochet: BLO (Ch 2, sc on the next stitch)*repeat until the end. Fasten off. Leave a long tail for sewing.
— SHOES (make 2) :
Shoes - Intro :
Start with purple yarn. Ch 7, start to crochet on the second chain from the hook:
Shoes - R1 :
inc, 4 sc, inc-4, 4 sc, inc (16)
Shoes - R2 :
2inc, 4 sc, 4 inc, 4 sc, 2 inc (24)
Shoes - R3 :
(sc, inc)*2, 4 sc, (sc, inc)*2, (inc, sc)*2, 4 sc, (inc, sc)*2 (32)
Shoes - R4 :
3 sc, inc, 5 sc, 6 hdc, 2 hdc-inc, 6 hdc, 5 sc, inc, 3sc (36)
Shoes - Change to light purple yarn - R5 :
BLO 36 sc
Shoes - Change to purple yarn - R6-7 :
36 sc
Shoes - R8 :
9 sc, (sc, dec)*3, (dec, sc)*3, 9 sc (30)
Shoes - R9 :
(3 sc, dec)*6 (24)
Shoes - Info :
Crochet 5 sc more, turn.
Left shoe - R10 :
Ch 1, 10 sc, ch 12, start to crochet on the 7th chain from the hook: 6 sc, turn.
Left shoe - R11 :
10 sc. Fasten off. Leave a long tail for sewing button.
Right shoe - R10 :
Ch 1, 10 sc, turn.
Right shoe - R11 :
Ch 1, 10 sc. Ch 12, start to crochet on the 7th chain from the hook: 6 sc, slst. Fasten off. Sew button.
Info :
Thank you for purchasing my pattern!
This Emma Doll pattern is made with love for crafters who enjoy detailed, playful projects. Create a charming 30cm doll with layered hair, a princess dress, hat and cute accessories. Perfect as a heartfelt gift or a special handmade keepsake. 🧶 Happy crocheting and enjoy every stitch! 🌸