🧢 Beautiful ✨ Detailed πŸ’ Adorable

Mini Hulk Amigurumi Pattern

Mini Hulk Amigurumi Pattern
4.9β˜… Rating
2-3 Hours Time Needed
4.0K Made This
βœ‚οΈ

Beginner Friendly Level

Perfect for those just starting their crochet journey, with clear instructions and simple techniques

⏱️

Bite-Sized Project

Finishes in 2-4 hoursβ€”perfect for an afternoon of creative relaxation.

🧸

Cute Companion

An adorable friend to cherish, handcrafted with love to bring comfort and joy for years to come.

About This Mini Hulk Amigurumi Pattern

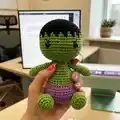
This pattern creates a small, adorable Hulk-inspired amigurumi about 13 cm tall using YarnArt Jeans yarn. You'll work continuous rounds, simple increases and decreases, and a few color changes for the hairline. The pattern is written clearly with step-by-step rounds for head, body, arms, and legs.

Mini Hulk Amigurumi Pattern crochet pattern - detailed view of completed project

Perfect for quick makes and gift projects, it uses basic stitches and finishes with embroidered eyebrows and sewn-on limbs. Detailed materials and tips are included to help you achieve a neat, professional finish.

Why You'll Love This Mini Hulk Amigurumi Pattern

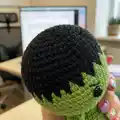
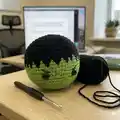
I absolutely love this pattern because it turns simple stitches into a character full of personality. I enjoy the small size β€” it makes a fast, satisfying project that still has room for cute details like the zigzag hairline. The alternating color rounds for the hair are a fun little challenge that gives great visual impact. I also appreciate how forgiving the shaping is, so you can customize tension and stuffing to create slightly different looks.

Mini Hulk Amigurumi Pattern step 1 - construction progress Mini Hulk Amigurumi Pattern step 2 - assembly progress Mini Hulk Amigurumi Pattern step 3 - details and accessories Mini Hulk Amigurumi Pattern step 4 - final assembly and finishing

Switch Things Up

I love customizing this pattern by changing the yarn colors to create different characters or moods.

I often swap the purple shorts for blue or red to make new versions quickly.

You can change yarn weight and hook size to make a larger or smaller amigurumi; larger yarn gives a cuddly, chunky toy, while thinner yarn makes a tiny keychain-sized friend.

I sometimes embroider different expressions to give each doll a unique personality; try angled brows or a small smile.

I like adding tiny crocheted accessories like a scarf, bow, or tiny prop to personalize gifts.

I also experiment with different eye sizes; smaller safety eyes give a cuter look, while larger ones feel more expressive.

For more stability, I add a bit more stuffing to the lower body so the toy sits nicely on shelves.

If you want posable limbs, consider inserting light craft wire inside the arms and legs before stuffing.

I recommend testing a color change method on a gauge swatch to make the hairline transition neat and consistent.

Finally, I always pin parts in place and take a photo before sewing to be sure of symmetrical placement and proportions.

Common Mistakes & How to Fix Them

βœ— Failing to use a stitch marker will make you lose track of rounds; place a marker at the beginning of every round to keep accurate counts. βœ— Overstuffing the head and body can distort the shape and hide stitch definition; stuff gradually and firmly but avoid compressing too much. βœ— Skipping color-carrying tips during color changes can leave loose loops; loop your new yarn color over the hook and pull through both loops to secure a tidy change. βœ— Not aligning limb openings before sewing causes uneven placement; press openings and align three stitches side by side, then pin before sewing. βœ— Crocheting too loosely will show stuffing through holes and make the toy look uneven; maintain a consistently tight tension for neat results.

Mini Hulk Amigurumi Pattern

Make a cute Mini Hulk amigurumi with simple stitches and clear, friendly instructions. This compact pattern guides you through color changes and shaping to create a 13 cm tall toy. You will enjoy easy rounds, little assembly, and fun detailing like embroidered eyebrows. Perfect for gifting or adding a handmade hero to your collection.

Beginner Friendly 2-3 Hours

Materials Needed for Mini Hulk Amigurumi Pattern

β€” Main Fabric

  • 01
    YarnArt Jeans (recommended by the designer) - Green yarn for body and limbs (approx 20-30g)
  • 02
    YarnArt Jeans - Purple yarn for lower body/shorts (approx 15-25g)
  • 03
    YarnArt Jeans - Black yarn for hair (approx 10-15g)

β€” Tools Required

  • 01
    Crochet hook Clover Soft Touch 2.00 mm
  • 02
    8 mm black safety eyes (2 pieces)
  • 03
    Toy stuffing / polyester filler
  • 04
    Black thin thread for embroidered eyebrows
  • 05
    Scissors
  • 06
    Tapestry needle for sewing and weaving ends
  • 07
    Pins for assembly/positioning
  • 08
    Stitch marker to mark rounds

Progress Tracker

0% Complete

β€” Body + head :

Round 1 :

6 scMR (6)

Round 2 :

6 inc(12)

Round 3 :

(1 sc, inc)x6 (18)

Round 4 :

(2 sc, inc)x6 (24)

Round 5 :

(3 sc, inc)x6 (30)

Round 6 :

(4 sc, inc)x6 (36)

Round 7 :

(5 sc, inc)x6 (42)

Round 8-10 :

42 sc (3 rounds) (42)

Round 11 :

(5 sc, dec)x6 (36)

Round 12 :

36 sc (36)

Round 13 :

36 hdc (36)

Info :

Continue on with green.

Round 14 :

(4 sc, dec)x6 (30)

Round 15 :

30 sc (30)

Round 16 :

(13 sc, dec)x2 (28)

Round 17 :

28 sc (28)

Round 18 :

(12 sc, dec)x2 (26)

Round 19 :

26 sc (26)

Round 20 :

(11 sc, dec)x2 (24)

Round 21 :

24 sc (24)

Round 22 :

(2 sc, dec)x6 (18)

Round 23 :

18 sc (18)

Info :

Cut the yarn. Stuff the body firmly.

β€” Arm x2 :

Info :

Crochet with green.

Round 1 :

6 sc MR(6)

Round 2 :

(2 sc, inc)x2 (8)

Round 3-8 :

8 sc (8)

Info :

Stuff only half of the arms.

Round 9-13 :

8 sc (8)

Info :

Do not stuff of the arms. This way the arm doesn't stick out too much after sewing it to the body. Press the opening with your fingers, aligning 3 stitches side by side. Break the yarn and leave a long tail to sew arms to body.

β€” Head :

Info :

Crochet with black yarn.

Round 1 :

6 sc MR(6)

Round 2 :

6 inc(12)

Round 3 :

(1 sc, inc)x6 (18)

Round 4 :

(2 sc, inc)x6 (24)

Round 5 :

(3 sc, inc)x6 (30)

Round 6 :

(4 sc, inc)x6 (36)

Round 7 :

(5 sc, inc)x6 (42)

Round 8 :

(6 sc, inc)x6 (48)

Round 9 :

(7 sc, inc)x6 (54)

Round 10-11 :

54 sc (2 rounds)(54)

Info :

In the next 12 and 13 rounds we will alternate green and black colors.

Round 12 :

(green 1 sc, black 2 sc)x18 (54)

Round 13 :

(green 2 sc, black 1 sc)x18 (54)

Info :

Continue on with green.

Round 14-19 :

54 sc (6 rounds)(54)

Round 20 :

(7 sc, dec)x6 (48)

Round 21 :

(6 sc, dec)x6 (42)

Info :

Place safety eyes between rounds 16 and 17, 11 stapart.

Round 22 :

(5 sc, dec)x6 (36)

Round 23 :

(4 sc, dec)x6 (30)

Round 24 :

(3 sc, dec)x6 (24)

Info :

Start to stuff the head.

Round 25 :

(2 sc, dec)x6 (18)

Round 26 :

Only through back loops, (1 sc, dec)x6 (12)

Round 27 :

6 dec. Leave the thread for sewing.

β€” Leg x2 :

Info :

Start working with green yarn.

Round 1 :

6 sc MR(6)

Round 2 :

6 inc(12)

Round 3 :

inc, 3 sc, 3 inc, 3 sc, 2 inc(18)

Round 4 :

7 sc, 3 inc, 8 sc (21)

Round 5 :

Only through back loops, 21 sc (21)

Round 6 :

7 sc, 3 dec, 8 sc (18)

Round 7 :

4 sc, 4 dec, 6 sc (14)

Round 8 :

2 sc, 4 dec, 4 sc (10)

Round 9 :

(3 sc, dec)x2 (8)

Info :

Stuff only half of the legs.

Round 10-15 :

8 sc(6 rounds) (8)

Round 16 :

Only 5 sc. Do not stuff of the legs. Press the opening with your fingers, aligning 3 stitches side by side. Break the yarn and leave a long tail.

β€” Finishing :

Info :

Sew the head to the body.

Info :

Sew the legs to the body.

Info :

Sew the arms to the body symmetrically.

Info :

Embroider eyebrows.

Assembly Instructions

  • Sew the head to the body by aligning the neck opening of the head with the top opening of the body and whipstitching evenly around the join, distributing stitches to avoid gaps.
  • Attach the legs to the bottom of the body, spacing them evenly and sewing through the rounds that finish the legs to ensure a flat, stable seated base.
  • Position the arms on either side of the body at the shoulder area, aligning three stitches side by side; pin, then sew arms symmetrically for a balanced look.
  • Place safety eyes between rounds 16 and 17 of the head, 11 stitches apart, then stuff the head before closing and sewing to secure a firm shape.
  • Embroider thin black eyebrows above the eyes using black thin thread, following the photo reference for placement and expression.

Important Notes

  • πŸ’‘Use stitch markers to keep track of the beginning of each round, especially during color changes and shaping sections.
  • πŸ’‘Crochet tightly enough so the filler is not visible through the holes between loops for a clean, finished toy.
  • πŸ’‘Stuff gradually and firmly as you go to shape the head and body without overfilling or distorting stitch work.
  • πŸ’‘Press openings with your fingers and align stitches before sewing limbs to ensure symmetry and tidy joins.

This little Mini Hulk is designed to be a quick, charming amigurumi you can finish in an afternoon. 🧢 It uses simple stitches and fun color changes to create characterful hair and expression. Perfect as a small gift or shelf friend to brighten someones day. ✨

You ask,

we answer.

FAQs

What size will the finished piece be?

The finished amigurumi measures approximately 13 cm (about 5.1 inches) tall when using the recommended yarn and 2.0 mm hook.

Can I use different yarn weights for this pattern?

Yes, you can use different yarn weights, but the final size will change. Match hook size to your yarn's label and adjust eye size accordingly.

Do I need prior crochet experience for this pattern?

This pattern is beginner friendly, so basic crochet skills (magic ring, sc, inc, dec) are recommended for best results.

How long does this project typically take to complete?

Most crocheters complete this project in 2-3 hours, though time may vary based on experience and how much finishing is needed.