🧢 Beautiful ✨ Detailed πŸ’ Adorable

Baby Cthulhu Amigurumi Pattern

Baby Cthulhu Amigurumi Pattern
4.8β˜… Rating
5-7 Hours Time Needed
1.7K Made This
βœ‚οΈ

Intermediate Level

Ideal for those with basic crochet experience, featuring slightly more advanced stitches and techniques to expand your skills.

⏱️

Weekend Treat

Takes 5-7 hours, making it an enjoyable project to finish over a couple of days.

🧸

Cute Companion

An adorable friend to cherish, handcrafted with love to bring comfort and joy for years to come.

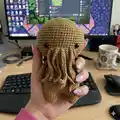
About This Baby Cthulhu Amigurumi Pattern

This pattern guides you through crocheting a charming Baby Cthulhu amigurumi with a rounded head, sculpted face, tiny legs and dangling tentacles. You will learn how to join legs to the body, shape the face using BLO rows, and attach decorative wings. The pattern uses small hooks for tight stitches, resulting in crisp details perfect for display or gifting.

Baby Cthulhu Amigurumi Pattern crochet pattern - detailed view of completed project

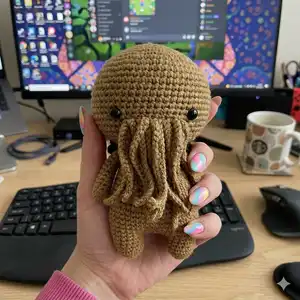
Includes step-by-step rounds for head, legs, body, arms and wings, plus instructions for adding safety eyes and tentacles. Photos are provided to help with assembly and finishing touches.

Why You'll Love This Baby Cthulhu Amigurumi Pattern

I absolutely love this pattern because it captures a whimsical creature in a compact, hug-ready form that is delightful to make. I enjoy how the sculpted face technique gives so much personality with just a few rounds. The tentacle detail is playful and allows for creative finishing choices. Designing this Baby Cthulhu let me combine simple amigurumi techniques with unique character details that really bring the piece to life.

Baby Cthulhu Amigurumi Pattern step 1 - construction progress Baby Cthulhu Amigurumi Pattern step 2 - assembly progress Baby Cthulhu Amigurumi Pattern step 3 - details and accessories Baby Cthulhu Amigurumi Pattern step 4 - final assembly and finishing

Switch Things Up

I love to experiment with color when I make this pattern, so I often switch the main yarn to a pastel for a softer look or a deep green for a classic Cthulhu vibe.

I sometimes change the yarn weight and hook size to create a mini keychain version or a larger cuddle-sized doll; thicker yarn with a larger hook gives a chunkier result.

I like to add embroidered details or tiny felt accents around the eyes to give a different expression and more character to each piece I make.

For tentacles, I try different lengths and textures: twisted chains, i-cords, or fringed pieces all change the final appearance dramatically.

I often swap the wing color or make a removable collar so the amigurumi can have multiple looks for gifting or display.

Try swapping safety eyes for embroidered eyes for a child-safe toy, or use different eye sizes to alter the expression and personality.

To give your Cthulhu some poseability, you can insert lightweight wire into the arms before sewing them in place to allow for subtle positioning.

Experiment with stuffing amounts: slightly firmer stuffing keeps the shape crisp, while a softer stuffing makes the toy squishier and cuddlier.

I sometimes add tiny accessories like a miniature scarf or a crocheted star to create a themed set or seasonal variation.

Don't be afraid to mix texturesβ€”pairing cotton yarn for the body with a wool-blend for tentacles can create an interesting tactile contrast that customers and gift recipients love.

Common Mistakes & How to Fix Them

βœ— Attaching safety eyes too early can make shaping difficult; attach the eyes between the specified rounds 18 and 19 to maintain correct placement and shaping. βœ— Skipping stitch counts during increases or decreases will distort the head shape; count your stitches after each round to ensure you have the correct total. βœ— Not stuffing gradually can create lumps or uneven shape; stuff a little at a time during shaping and add more as you go for smooth contours. βœ— Cutting the thread after the first leg without following instructions will prevent joining to the body correctly; follow the note to cut the first leg thread but leave the second leg attached and continue to the body. βœ— Forgetting to work in BLO where instructed will affect facial sculpting; work the BLO rows exactly as shown (rows 20-21) to sculpt the face properly.

Baby Cthulhu Amigurumi Pattern

Make an adorable Baby Cthulhu amigurumi with clear, photo-supported instructions and simple shaping techniques. This cute little creature features a sculpted face, soft body, and playful tentacles β€” ideal for gifting or decorating your space. Follow each round closely to create a tidy, professional finish. Perfect if you enjoy small amigurumi projects with charming details.

Intermediate 5-7 Hours

Materials Needed for Baby Cthulhu Amigurumi Pattern

β€” Main Fabric

  • 01
    Alize Cotton Gold 782 (yarn used in sample) - small quantity (one skein likely sufficient depending on size)
  • 02
    Alize Cotton Gold 60 (accent/alternative color used in sample) - small quantity
  • 03
    Any yarn of your preferred color and thickness will work; adjust hook size accordingly
  • 04
    Polyester Fiberfill for stuffing

β€” Tools Required

  • 01
    2,00 mm or a hook that fits your yarn
  • 02
    Polyester Fiberfill
  • 03
    6 mm safety eyes

Progress Tracker

0% Complete

β€” Head :

Round 1 :

Rnd 1) 6 sc in magic ring (6)

Round 2 :

Rnd 2) (inc) x6 (12)

Round 3 :

Rnd 3) (sc, inc) (18)

Round 4 :

Rnd 4) (inc, 2 sc) x6 (24)

Round 5 :

Rnd 5) (3 sc, inc) x6 (30)

Round 6 :

Rnd 6) 2 sc, inc, (4 sc, inc) x5, 2 sc (36)

Round 7 :

Rnd 7) (5 sc, inc) (42)

Round 8 :

Rnd 8) 3 sc, inc, (6 sc, inc) x5, 3 sc (48)

Round 9 :

Rnd 9) (7 sc, inc) x6 (54)

Round 10 :

Rnd 10) 4 sc, inc, (8 sc, inc) x5, 4 sc (60)

Round 11-19 :

Rnd 11-19 sc around (60) (9 rnds)

Round 20 :

Rnd 20) 29 sc, BLO 9 sc, 22 sc (60)

Round 21 :

Rnd 21) 29 sc, BLO 9 sc, 22 sc (60)

Round 22-23 :

Rnd 22-23 Sc around (60) (2 rnds)

Round 24 :

Rnd 24) (3 sc, dec) x12 (48)

Round 25 :

Rnd 25) (2 sc, dec) x12 (36)

Round 26 :

Rnd 26) 2 sc, dec, (4 sc, dec) x5, 2 sc (30)

Round 27 :

Rnd 27) (3 sc, dec) x6 (24)

Round 28 :

Rnd 28) sc around (24)

Infos :

*Attach the safety eyes between rounds 18 and 19 with 11 st in-between. *We'll work through the BLO row 20-21 to sculpt your face. Slst with 20 chains, 20 chains again. Do this in two rows for a total of 18 times. *Add 25 chains to the BLO row for tentacles. Do the same along the row.

β€” Leg :

Round 1 :

Rnd 1) 7 sc in magic ring (7)

Round 2 :

Rnd 2) (inc) x7 (14)

Round 3-5 :

Rnd 3-5 sc around (14) *make 2 pieces.

Info :

*After making the first leg, cut the thread. When making the second leg, do not cut the thread and continue to the body.

β€” Body :

Round 6 :

Rnd 6) ch4, join the first leg with the sc. Crochet on the first leg: 2 sc, (inc, 5 sc) x2, working on the chain: inc, 2 sc, inc, crochet on the second leg: (5 sc, inc) x2, 2 sc, working on the chain: 4 sc (42)

Round 7 :

Rnd 7) (13 sc, inc) x3 (45)

Round 8-12 :

Rnd 8-12 sc around (45) (5 rnds)

Round 13 :

Rnd 13) (13 sc, dec) x3 (42)

Round 14-16 :

Rnd 14-16 sc around (42) (3 rnds)

Round 17 :

Rnd 17) (5 sc, dec) x6 (36)

Round 18-20 :

Rnd 18-20 sc around (36) (3 rnds)

Round 21 :

Rnd 21) (4 sc, dec) x6 (30)

Round 22-24 :

Rnd 22-24 sc around (30)

Round 25 :

Rnd 25) (3 sc, dec) x6, slst (24)

Info :

*Fasten off and leaving a long tail for sewing. Stuff the body. Sew the Head with the Body.

β€” Arm :

Round 1 :

Rnd 1) 6 sc in magic ring (6)

Round 2 :

Rnd 2) (sc, inc) x3 (9)

Round 3-11 :

Rnd 3-11 sc around (9) (9 rnds)

Info :

*I don't fill arms.

Info :

*Add 25 chains to the BLO row for tentacles. Do the same along the row.

β€” Wing :

Round 1 :

Rnd 1) Ch 21, 20 sc

Round 2 :

Rnd 2) 4 slst, ch 6, 12 sc, ch 6 turn

Round 3 :

Rnd 3) 12 sc, ch 6 turn

Round 4 :

Rnd 4) 12 sc

Assembly Instructions

  • Attach the safety eyes between rounds 18 and 19 with 11 stitches in-between to ensure even eye placement on the head.
  • Work through the BLO row (rows 20-21) to sculpt the face; use slip stitches with 20 chains as instructed to add facial shaping before adding tentacles.
  • Add tentacles by attaching 25-chain pieces along the BLO row as described, evenly spacing them along the row to create the front tentacle cluster.
  • After making the first leg cut the thread; when making the second leg do not cut the thread and continue directly into joining the body at round 6.
  • Fasten off the body leaving a long tail for sewing, stuff the body firmly, then sew the head to the body using the long tail for a secure join.
  • Sew arms to the sides of the body and position the wing/collar around the neck area as shown in the photos, securing with small stitches.

Important Notes

  • πŸ’‘Attach safety eyes before heavy stuffing and before closing the head so their backs sit flush and secure against the fabric.
  • πŸ’‘Work BLO (back loop only) rows carefully where instructed to achieve the intended facial sculpting effect for the eyes and tentacle base.
  • πŸ’‘Stuff the head and body gradually and evenly to keep round shapes smooth and avoid lumps in the final amigurumi.
  • πŸ’‘When joining legs into the body, follow the chain-joining instructions exactly to keep leg spacing and body shape correct.

This Baby Cthulhu pattern brings a little bit of cosmic cuteness to your amigurumi collection. It's playful, unique, and surprisingly quick to make with the right yarn and hook choices. Whether you keep it or gift it, it will spark smiles and curious conversations. 🧢🧡

You ask,

we answer.

FAQs

What size will the finished piece be?

The finished amigurumi will be a small, palm-sized Baby Cthulhu; size depends on your yarn and hook but using the sample yarn and 2.00 mm hook will give a compact toy ideal for display.

Can I use different yarn weights for this pattern?

Yes, you can use different yarn weights, but switching yarn weight will change the final size; adjust your hook accordingly to maintain proper stitch tension.

Do I need prior crochet experience for this pattern?

This pattern is rated intermediate since it includes shaping with BLO rows, joining pieces and working in rounds; you should be familiar with increases, decreases and basic amigurumi techniques.

How long does this project typically take to complete?

Most crocheters complete this project in 5-7 hours, depending on experience level and how much time you spend on assembly and details like tentacles.

Where should I place the safety eyes?

Attach the safety eyes between rounds 18 and 19 with 11 stitches in-between to match the pattern photos and ensure symmetrical placement.