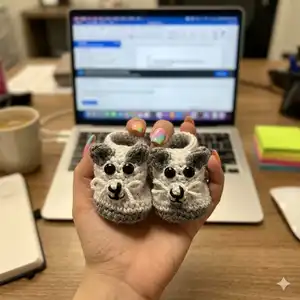
Make adorable barnyard animal baby booties with step-by-step instructions for multiple sizes. This pattern includes detailed soles, shaping rows, heads and simple animal appliques so you can create cows, ducks, pigs, bunnies and more. You will enjoy a clear layout and helpful notes for assembly and sizing. Perfect for handmade gifts and nursery keepsakes.
Progress Tracker
0% Complete
— Foot Measurements :
Info :
For the best fit, it is very important to measure the recipient's foot prior to beginning your project. Shoe sizes do not go by one's age but by how big one's foot is. To measure the foot, a sewing tape measure is always best. Measure the foot from the outer edge of the heel to the end of the longest toe. This measurement will determine which size you need to make and what hook size to use to achieve the desired outcome. If you do not have a sewing tape measure, you can do this same measurement with a piece of paper and a ruler or a piece of yarn and a ruler. Trace the foot on a piece of paper then measure from the heel to the longest toe with a ruler or tape measure.
Info :
The following chart is for reference only and does not replace actual foot measurements which will vary from baby to baby. Bootie Length and Bootie Width measurements are listed for Newborn, 3 Months, 6 Months, 12 Months, 18 Months, 24 Months.
— General Instructions :
Info :
Skill Level – Intermediate: These booties require shaping and sewing skills in order to assemble. Work enclosed instructions as many times as specified by the number immediately following or contains explanatory remarks. (#) – The number in between parentheses at the end of a line indicates how many stitches you should have at the end of that line of instruction. Stitch Markers are used to help distinguish the beginning of each round being worked. Place a stitch marker or a scrap piece of yarn before the first stitch of each round, moving after each round is complete. Remove marker when no longer needed.
Info :
Loop Stitch: Wrap yarn from front to back over index finger. Insert hook in next stitch and under the strands of yarn from behind index finger and draw through the stitch. With yarn loop still on your index finger, yarn over and draw through 2 loops on hook. Remove loop from finger. For a video tutorial on how to perform the loop stitch, see Annie's Attic Stitch Guide link.
— Materials :
Info :
Red Heart Super Saver (worsted weight #4) recommended. Each pair of baby booties in this book are made using Red Heart Super Saver Yarn. Each pair of booties takes less than 2 ounces of yarn total to make but 7oz skeins are referenced for ease of yarn shopping. You can purchase 3 ounce skeins if your color of choice is available in that skein size. You can use any worsted weight 4 ply yarn but ensure you pay attention to gauge as each yarn manufacturer is different with the thicknesses of their yarns. F, G, and H hooks (or size needed to obtain gauge). Yarn Needle. Fiber Fill. Stitch Markers. 4 – 9mm animal safety eyes (4 eyes for each pair of booties).
— Base Bootie :
Info :
Remember to measure baby's foot to ensure the correct size is being made. Age ranges indicated below are just estimates. For other sizes, proceed to the next size section as noted. Make 2 (two) booties per pair.
0-3 Month (3.5” use G hook) :
Sole (bottom of bootie) Rnd 1: Using Sole Color, CH 10, SC in 2nd CH from hook, SC in next 5 CH, HDC in next CH, 2 HDC in next CH, 5 HDC in next CH, working down opposite side of starting CH, 2 HDC in next CH, HDC in next CH, SC in next 5 CH, 2 SC in next CH. (24 Stitches)
Round 2 :
2 SC in first SC, SC in next 8 stitches, *2 SC in next stitch, SC in next stitch*, repeat from * to * 2 more times, SC in next 8 stitches, 2 SC in next stitch. (29 SC)
Round 3 :
2 SC in next stitch, SC in next 9 stitches, 2 SC in next stitch, *SC in next stitch, 2 SC in next stitch*, repeat from * to * 2 more times, SC in next 9 stitches, 2 SC in next stitch, SC in next stitch, SL ST in next stitch. (35 SC)
Info :
This piece is worked in continuous rounds so do not SL ST to join. Just continue on to next round. Use a stitch marker to mark the beginning stitch. Check gauge here. Sole should measure 3.5” with G hook or 4” with H hook. If gauge is off, adjust as needed.
Row 1 :
CH 1, working in back loops only, SC in same stitch as joining and in each SC around, SL ST in first SC to join. (35 SC)
Info :
At this point you can change colors if desired to have the sole one color and the bootie a contrasting color. If the decision is to change colors, fasten off, and attach new color in same stitch.
Row 2 :
CH 1, working in both loops, SC in each SC around, SL ST in first SC to join. (35 SC)
Row 3 :
CH 1, SC in same stitch as joining and in each SC around, SL ST in first SC to join. (35 SC)
Row 4 :
CH 1, SC in same stitch as joining and in next 11 stitches, skip next stitch, HDC in next stitch, skip next stitch, DC in next stitch, DC DEC next 2 stitches together, DC in next stitch, skip next stitch, HDC in next stitch, skip next stitch, SC in next 13 stitches, SL ST in first SC to join. (30 stitches)
Info :
It appears that you are skipping two stitches at the end of the next row and not just the last stitch. Use a stitch marker to mark the first stitch so there is no confusion what stitch to join at the end of the row.
Row 5 :
CH 1, skip joining stitch, SC in next 10 stitches, skip next stitch, SC in next stitch, skip next stitch, SC in next 2 stitches, skip next stitch, SC in next stitch, skip next stitch, SC in next 10 stitches, skip last stitch, SL ST in first SC to join. (24 SC)
Row 6 :
CH 1, SC in same stitch as joining and in next 7 SC, *skip next SC, SC in next SC*, repeat from * to * 2 more times, skip next SC, SC in next 8 SC, skip last SC, SL ST in first SC to join. (19 SC)
Row 7 :
CH 1, using front loops only, SC in same stitch as joining and in next 7 SC, skip next SC, SC in each of the next 2 SC, skip next SC, SC in next 7 SC, SL ST in first SC to join. (17 SC)
Info :
The last 3 rows form the ankle cuff.
Row 8 - 10 :
CH 1, using front loops only, SC in same stitch as joining and in each SC around, SL ST in first SC to join, at end of row 10, fasten off and weave in ends. (17 SC)
3-6 Month (4” use H hook) :
Sole (bottom of bootie) Rnd 1: Using Sole Color, CH 14, SC in 2nd CH from hook, SC in next 9 CH, HDC in next CH, 2 HDC in next CH, 5 HDC in next CH, working down opposite side of starting CH, 2 HDC in next CH, HDC in next CH, SC in next 9 CH, 2 SC in next CH. (32 Stitches)
Round 2 :
2 SC in first SC, SC in next 12 stitches, *2 SC in next stitch, SC in next stitch*, repeat from * to * 2 more times, SC in next 12 stitches, 2 SC in next stitch. (37 SC)
Round 3 :
2 SC in next stitch, SC in next 13 stitches, 2 SC in next stitch, *SC in next stitch, 2 SC in next stitch*, repeat from * to * 2 more times, SC in next 13 stitches, 2 SC in next stitch, SC in next stitch, SL ST in next stitch. (43 SC)
Info :
This piece is worked in continuous rounds so do not SL ST to join. Just continue on to next round. Use a stitch marker to mark the beginning stitch. Check gauge here. Sole should measure 4.5” with G hook or 5” with H hook. If gauge is off, adjust as needed.
Row 1 :
CH 1, working in back loops only, SC in same stitch as joining and in each SC around, SL ST in first SC to join. (43 SC)
Info :
At this point you can change colors if desired to have the sole one color and the bootie a contrasting color. If the decision is to change colors, fasten off, and attach new color in same stitch.
Row 2 :
CH 1, working in both loops, SC in each SC around, SL ST in first SC to join. (43 SC)
Row 3 :
CH 1, SC in same stitch as joining and in each SC around, SL ST in first SC to join. (43 SC)
Row 4 :
CH 1, SC in same stitch as joining and in next 15 stitches, skip next stitch, HDC in next stitch, skip next stitch, DC in next stitch, DC DEC next 2 stitches together, DC in next stitch, skip next stitch, HDC in next stitch, skip next stitch, SC in next 17 stitches, SL ST in first SC to join. (38 stitches)
Row 5 :
CH 1, skip joining stitch, SC in next 14 stitches, skip next stitch, SC in next stitch, skip next stitch, SC in next 2 stitches, skip next stitch, SC in next stitch, skip next stitch, SC in next 14 stitches, skip last stitch, SL ST in first SC to join. (32 SC)
Row 6 :
CH 1, SC in same stitch as joining and in next 11 SC, *skip next SC, SC in next SC*, repeat from * to * 2 more times, skip next SC, SC in next 12 SC, skip last SC, SL ST in first SC to join. (27 SC)
Row 7 :
CH 1, using front loops only SC in same stitch as joining and in next 11 SC, skip next SC, SC in each of the next 2 SC, skip next SC, SC in next 11 SC, SL ST in first SC to join. (25 SC)
Info :
The last 4 rows form the ankle cuff.
Row 8 - 11 :
CH 1, using front loops only, SC in same stitch as joining and in each SC around, SL ST in first SC to join, at end of row 11, fasten off and weave in ends. (25 SC)
6-12 Month (4.5” use G hook) :
Sole (bottom of bootie) Rnd 1: Using Sole Color, CH 14, SC in 2nd CH from hook, SC in next 9 CH, HDC in next CH, 2 HDC in next CH, 5 HDC in next CH, working down opposite side of starting CH, 2 HDC in next CH, HDC in next CH, SC in next 9 CH, 2 SC in next CH. (32 Stitches)
Round 2 :
2 SC in first SC, SC in next 12 stitches, *2 SC in next stitch, SC in next stitch*, repeat from * to * 2 more times, SC in next 12 stitches, 2 SC in next stitch. (37 SC)
Round 3 :
2 SC in next stitch, SC in next 13 stitches, 2 SC in next stitch, *SC in next stitch, 2 SC in next stitch*, repeat from * to * 2 more times, SC in next 13 stitches, 2 SC in next stitch, SC in next stitch, SL ST in next stitch. (43 SC)
Info :
Check gauge here. Sole should measure 4.5” with G hook or 5” with H hook. If gauge is off, adjust as needed.
Row 1 :
CH 1, working in back loops only, SC in same stitch as joining and in each SC around, SL ST in first SC to join. (43 SC)
Info :
At this point you can change colors if desired to have the sole one color and the bootie a contrasting color. If the decision is to change colors, fasten off, and attach new color in same stitch.
Row 2 :
CH 1, working in both loops, SC in each SC around, SL ST in first SC to join. (43 SC)
Row 3 :
CH 1, SC in same stitch as joining and in each SC around, SL ST in first SC to join. (43 SC)
Row 4 :
CH 1, SC in same stitch as joining and in next 15 stitches, skip next stitch, HDC in next stitch, skip next stitch, DC in next stitch, DC DEC next 2 stitches together, DC in next stitch, skip next stitch, HDC in next stitch, skip next stitch, SC in next 17 stitches, SL ST in first SC to join. (38 stitches)
Row 5 :
CH 1, skip joining stitch, SC in next 14 stitches, skip next stitch, SC in next stitch, skip next stitch, SC in next 2 stitches, skip next stitch, SC in next stitch, skip next stitch, SC in next 14 stitches, skip last stitch, SL ST in first SC to join. (32 SC)
Row 6 :
CH 1, SC in same stitch as joining and in next 11 SC, *skip next SC, SC in next SC*, repeat from * to * 2 more times, skip next SC, SC in next 12 SC, skip last SC, SL ST in first SC to join. (27 SC)
Row 7 :
CH 1, CH 1, using front loops only SC in same stitch as joining and in next 11 SC, skip next SC, SC in each of the next 2 SC, skip next SC, SC in next 11 SC, SL ST in first SC to join. (25 SC)
Info :
The last 4 rows form the ankle cuff.
Row 8 - 11 :
CH 1, using front loops only, SC in same stitch as joining and in each SC around, SL ST in first SC to join, at end of row 11, fasten off and weave in ends. (25 SC)
12-18 Month (5” use H hook) :
For 5.5” slipper, proceed to next section. Sole (bottom of bootie) Rnd 1: Using Sole Color, CH 15, SC in 2nd CH from hook, SC in next 10 CH, HDC in next CH, 2 HDC in next CH, 5 HDC in next CH, working down opposite side of starting CH, 2 HDC in next CH, HDC in next CH, SC in next 10 CH, 2 SC in next CH. (34 Stitches)
Round 2 :
2 SC in first SC, SC in next 13 stitches, *2 SC in next stitch, SC in next stitch*, repeat from * to * 2 more times, SC in next 13 stitches, 2 SC in next stitch. (39 SC)
Round 3 :
2 SC in next stitch, SC in next 14 stitches, 2 SC in next stitch, *SC in next stitch, 2 SC in next stitch*, repeat from * to * 2 more times, SC in next 14 stitches, 2 SC in next stitch, SC in next stitch, SL ST in next stitch. (46 SC)
Round 4 :
1 SC in next stitch, 2 SC in next stitch, 1 SC in next 42 stitches, 2 SC in next stitch, SL ST in last stitch. (48 SC)
Info :
Check gauge here. Sole should measure 5.5” with H hook. If gauge is off, adjust as needed.
Row 1 :
CH 1, working in back loops only, SC in same stitch as joining and in each SC around, SL ST in first SC to join. (48 SC)
Info :
At this point you can change colors if desired to have the sole one color and the bootie a contrasting color. If the decision is to change colors, fasten off, and attach new color in same stitch.
Row 2 :
CH 1, working in both loops, SC in each SC around, SL ST in first SC to join. (48 SC)
Row 3 :
CH 1, SC in same stitch as joining and in each SC around, SL ST in first SC to join. (48 SC)
Row 4 :
CH 1, SC in same stitch as joining and in next 18 stitches, skip next stitch, HDC in next stitch, skip next stitch, DC in next stitch, DC DEC next 2 stitches together, DC in next stitch, skip next stitch, HDC in next stitch, skip next stitch, SC in next 19 stitches, SL ST in first SC to join. (43 stitches)
Row 5 :
CH 1, skip joining stitch, SC in next 17 stitches, skip next stitch, SC in next stitch, skip next stitch, SC in next 2 stitches, skip next stitch, SC in next stitch, skip next stitch, SC in next 17 stitches, SL ST in first SC to join. (38 SC)
Row 6 :
CH 1, CH 1, SC DEC next 2 SC, SC in next 12 SC, SC DEC next 2 SC, *skip next SC, SC in next SC*, repeat from * to * 2 more times, skip next SC, SC DEC last 2 SC, SL ST in first SC to join. (30 SC)
Row 7 :
CH 1, SC DEC next 2 SC, SC in next 11 SC, skip next SC, SC in each of the next 2 SC, skip next SC, SC in next 11 SC, SC DEC last 2 SC, SL ST in first SC to join. (26 SC)
Row 8 :
CH 1, SC in same stitch as joining and in next 10 SC, skip next SC, SC in next 3 SC, skip next SC, SC in next 10 SC, SL ST in first SC to join. (24 SC)
Info :
The last 4 rows form the ankle cuff.
Row 9 - 12 :
CH 1, using front loops only, SC in same stitch as joining and in each SC around, SL ST in first SC to join, at end of row 12, fasten off and weave in ends. (24 SC)
— Head :
Info :
This head will work for all bootie sizes and uses an "F" hook. This piece is made in continuous rounds. Use a stitch marker if needed. Make 2 heads (one for each bootie).
Round 1 :
Using color of choice and F hook, CH 2, 6 SC in 2nd CH from hook. Do not join. Use stitch marker if needed. (6 SC)
Round 2 :
2 SC in each SC around. (12 SC)
Round 3 :
*SC in next SC, 2 SC in next SC*, repeat from * to * around. (18 SC)
Round 4 - 7 :
SC in each SC around. (18 SC)
Round 8 :
*SC DEC in next 2 SC, SC in next SC*, repeat from * to * around. (12 SC)
Round 9 :
*SC DEC next 2 SC*, repeat from * to * around, fasten off leaving approximately a 12" tail to sew. (6 SC)
Info :
Do not stuff yet. Continue to your animal of choice for eyes, beaks, ears and assembly instructions.
— Duck / Chick :
Beak - Make 2 (all sizes) :
Rnd 1: With Orange and F hook, CH 2, SC in 2nd CH from hook, CH 1, turn. (1 SC)
Round 2 :
2 SC in next SC, CH 1, turn. (2 SC)
Round 3 :
Working in back loops only, SC in each of the next 2 SC, CH 1, turn. (2 SC)
Round 4 :
Working in both loops, SC DEC, CH 1, turn. (1 SC)
Round 5 :
Working around beak in each stitch and row ending, SL ST in each stitch around to form border, SL ST to join, fasten off leaving a tail for sewing.
Info :
You should now have two booties, two heads, and two beaks. We will now begin the assembly process.
Assembly Step 1 :
Stuff the head with fiberfill until it is round and to your desired firmness.
Assembly Step 2 :
Insert 9mm eyes between Rnd 4 and 5 with a 1 – 2 stitch gap between the eyes. Do not attach the backs yet.
Info :
At this point you are placing the eyes to ensure they are in the ideal position. If you fasten the backs now, you won't be able to move them later if you need to make an adjustment so I recommend not fastening them just yet.
Assembly Step 3 :
Pick up a beak. Weave in the starting tail if needed. Beak will fold in the middle. With the sewing tail, weave the tail back towards the fold so you can sew the fold to the face.
Assembly Step 4 :
Sew the beak at Rnd 6 & 7 centered with the eyes. If after the beak is sewn down you need to adjust your eyes, do so now.
These charming Barnyard Buddies booties are a delightful way to add personality to tiny toes and make perfect handmade gifts. Each design uses the same base bootie pattern so you can mix and match colors and animal features with ease. Create a whole little farm of sweet baby booties to treasure and share. 🧶🐣🧵