🧢 Beautiful ✨ Detailed πŸ’ Adorable

Hot Air Balloon Baby Mobile Amigurumi Pattern

Hot Air Balloon Baby Mobile Amigurumi Pattern
4.0β˜… Rating
12-15 Hours Time Needed
1.4K Made This
βœ‚οΈ

Intermediate Level

Ideal for those with basic crochet experience, featuring slightly more advanced stitches and techniques to expand your skills.

⏱️

Multi-Day Project

A rewarding 12+ hour journeyβ€”perfect for dedicated crafters who love detailed work.

🧸

Cute Companion

An adorable friend to cherish, handcrafted with love to bring comfort and joy for years to come.

About This Hot Air Balloon Baby Mobile Amigurumi Pattern

This pattern makes a hot air balloon baby mobile with four striped balloons, baskets and tiny amigurumi animals (elephant, giraffe, zebra, tiger and more). It uses tapestry crochet to create spiral stripes on the balloons and small 3D amigurumi techniques for the animals. Clear step-by-step instructions and photos guide you through every round and assembly step so you can finish a beautiful nursery mobile.

Hot Air Balloon Baby Mobile Amigurumi Pattern crochet pattern - detailed view of completed project

You will use a 3 mm (US 2) hook and cotton yarn suitable for that hook to get the sample size. The pattern includes balloon, basket, animal heads and bodies, assembly and finishing instructions.

Why You'll Love This Hot Air Balloon Baby Mobile Amigurumi Pattern

I absolutely love this pattern because it combines tapestry crochet and tiny amigurumi to create a delicate, cohesive mobile. The swirling stripes on the balloons are so satisfying to work and give a lovely optical effect when done in two colors. I enjoy making small toys, and these animals are simple but full of personality with just a few rounds of shaping. As the designer I love how the finished mobile feels handcrafted and unique β€” it makes a special gift for a new baby or a beautiful nursery decoration.

Hot Air Balloon Baby Mobile Amigurumi Pattern step 1 - construction progress Hot Air Balloon Baby Mobile Amigurumi Pattern step 2 - assembly progress Hot Air Balloon Baby Mobile Amigurumi Pattern step 3 - details and accessories Hot Air Balloon Baby Mobile Amigurumi Pattern step 4 - final assembly and finishing

Switch Things Up

I love customizing the color palette for different nursery styles; try soft pastels for a gentle look or bold brights for a modern nursery.

You can make the mobile larger or smaller by changing yarn weight and hook size; bulky yarn with a larger hook will give chunky balloons while thinner yarn produces mini charms.

I often mix yarn brands and textures for subtle contrast β€” a slightly shinier cotton for balloons and a matte cotton for animals looks great.

Swap the animals to create a themed set (jungle, safari, forest) by adjusting colors and adding small crocheted accessories like hats or scarves.

To make the mobile safer for very young infants, replace glass beads with embroidered eyes or small safety features and ensure all attachments are stitched securely.

I like to add tiny felt or crocheted stars between balloons to increase visual interest and make a mobile that feels whimsical.

For a travel-friendly version, crochet only two balloons and attach to a small ring to create a compact hanging charm or stroller toy.

If you want a more heirloom finish, fringe the basket edges or use a contrasting join on the frame for a refined look.

Consider adding removable hanging loops so you can change the arrangement of balloons for different displays β€” this helps refresh the nursery decor over time.

Finally, try embroidering small details like cheeks, noses or stripes with contrasting yarn to give each animal a unique expression and personality.

Common Mistakes & How to Fix Them

βœ— Skipping the tapestry carrying technique will create loose floats and messy color changes; carry the unused color along the top of the working stitch and catch it every few stitches. βœ— Forgetting to place safety eyes at the correct rounds may leave you unable to position them later; mark the placement between the recommended rounds and insert eyes before closing the head. βœ— Stuffing too late or too much will distort shaping and make decreases uneven; stuff gradually as you work and especially before severe decreases to keep shape smooth. βœ— Not counting increases and decreases will lead to mismatched stripes and asymmetry; count your stitches after each increase or decrease round to ensure the correct stitch total. βœ— Using the wrong hook size for the suggested yarn will change finished size and stitch definition; use a 3 mm (US 2) hook as recommended or adjust yarn and hook together to maintain gauge.

Hot Air Balloon Baby Mobile Amigurumi Pattern

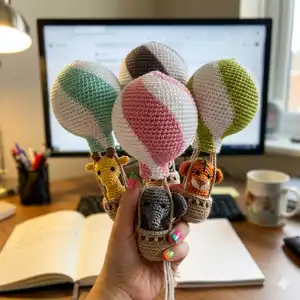
Make a whimsical hot air balloon baby mobile with tiny amigurumi animals and striped balloons. This pattern walks you through tapestry crochet, small toy construction, and assembling a wooden frame for a charming nursery mobile. You will create four striped balloons, baskets and five little animals using cotton yarn and simple shaping techniques.

Intermediate 12-15 Hours

Materials Needed for Hot Air Balloon Baby Mobile Amigurumi Pattern

β€” Main Fabric

  • 01
    Schachenmayr Catania (cotton) - used for balloons and some animals (various colors specified in notes)
  • 02
    Schoeller&Stahl Limone (cotton) - used for baskets and animals (various colors specified in notes)
  • 03
    Color A examples: Catania 106 White
  • 04
    Color B examples: Catania 385 Mint, 222 Orchid; Limone 168 Blaubeere, 145 Maigrun
  • 05
    Baskets: Limone 49 Sisal (small amount)
  • 06
    Elephant: Limone 91 Elefant (small amount)
  • 07
    Giraffe: Catania 208 Canary and Limone 79 Kokos (small amounts)
  • 08
    Zebra: Limone 06 White and Limone 24 Black (small amounts)
  • 09
    Tiger: Limone 157 Mandarin, Limone 24 Black, Limone 73 Natur and Limone 149 Blute for nose (small amounts)

β€” Tools Required

  • 01
    Crochet hook size 3 mm (US 2)
  • 02
    Tapestry needle
  • 03
    Yarn for 3 mm (US 2) hook (cotton recommended)
  • 04
    Fiberfill stuffing
  • 05
    4 polystyrene balls of 3.15 inches (8 cm) diameter
  • 06
    8 black glass beads (or plastic safety eyes) of 4 mm diameter
  • 07
    1 plastic (or wooden) ring of 1.2 inches (30 mm) diameter
  • 08
    1 wooden frame of 10 inches (25 cm) diameter
  • 09
    Scissors
  • 10
    Pins for assembly

Progress Tracker

0% Complete

β€” HOT AIR BALLOON :

Info :

Work with the Tapestry crochet method (Carrying the second color along top of single crochet being worked in (pic.1)

Begin with COLOR A - R1 :

Magic ring, 6 ch in ring (6)

Round 2 :

* 2sc with COLOR A, 2sc with COLOR B * 6 times (12)

Round 3 :

skip 1 st, *(sc, 2sc with COLOR A), (sc, 2sc with COLOR B) * 6 times (18)

Round 4 :

* (sc in next 2 st, 2sc) with COLOR A, (sc in next 2 st, 2sc) with COLOR B * 6 times (24)

Info :

As you can see, from R3 every increase will be made in the stitch AFTER the increase stitch of the previous row (NOT in the same st, as you usually do). (pic.2) This makes the balloon stripes more "swirly".

Rounds 5-11 :

continue increasing in the same way (6 increases for every row) (66) (pic.3-5)

Rounds 12-19 :

8 rows even (* 11 st with COLOR A, 11 st with COLOR B * 6 times) (66) (pic.7)

Info :

In rows from 12 to 19, every color change will be made in the stitch AFTER the last stitch of a color (pic.6)

Info :

Insert the polystyrene ball. (pic.8)

Round 20 :

* (sc in next 9 st, sc2tog with COLOR A), (sc in next 9 st, sc2tog with COLOR B) * 6 times (60 st)

Rounds 21-26 :

continue decreasing (6 decreases in every row) (24) (pic.9)

Info :

In rows from 20 to 26, every decrease will be made between the last COLOR A stitch and the first COLOR B stitch.

Rounds 27-31 :

5 rows even (* sc in next 4 st with COLOR A, sc in next 4 st with COLOR B * 6 times) (24)

Info :

Break the yarn and fasten off. (pic.10)

β€” BASKET :

Info :

with Limone 49 Sisal

R1 :

Magic ring, 6 ch in ring (6)

R2 :

2sc in each ch (12)

R3 :

* sc, 2sc * 6 times (18)

R4 :

* sc in next 2 st, 2sc * 6 times (24)

R5 :

* sc in next 3 st, 2sc * 6 times, sl st in first st (30)

R6 :

Ch1, (back loop only) sc in same st, sc in next 29 st, sl st in first st (30) (pic.11)

R7 :

Ch1, sc in same st, sc in next 29 st, sl st in first st (30)

R8-R9 :

same as R7 (30)

R10 :

Ch4, skip 1 st, * hdc in next st, ch2, skip 1 st * 14 times, sl st in 3Β° ch (44) (pic.12)

R11 :

2 sc in spaces between every hdc, sl st in first st (30) (pic.13)

R12 :

Ch15 (pic.14)

Info :

Break the yarn and leave a long strand.

Info :

- Join yarn in 8Β° st from the previous string (skipping 7 st), ch15. Break the yarn and leave a long strand.

Info :

- Join yarn in 8Β° st from the previous string (skipping 7 st), ch15. Break the yarn and leave a long strand.

Info :

- Join yarn in 7Β° st from the previous string (skipping 6 st), ch15. Break the yarn and leave a long strand. (pic.15)

β€” ELEPHANT :

HEAD R1 :

with Limone 91 Elefant - Magic ring, 6 ch in ring (6)

R2 :

(Back loop only) even (6)

R3-R4 :

2 rows even (6)

R5 :

* sc, 2sc * 3 times (9)

R6 :

even (9) (pic.16)

R7 :

* sc in next 2 st, 2sc * 3 times (12)

R8 :

even (12)

R9 :

* sc, 2sc * 6 times (18)

R10 :

* sc in next 2 st, 2sc * 6 times (24) (pic.17)

R11-R14 :

4 rows even (24)

R15 :

* sc in next 2 st, sc2tog * 6 times (18)

R16 :

* sc, sc2tog * 6 times (12)

Info :

Insert stuffing.

R17 :

* sc, sc2tog * 4 times (8) (pic.18)

Info :

Break the yarn and fasten off.

EARS (x2) R1 :

with Limone 91 Elefant - Magic ring, 3 ch in ring, turn (3)

R2 :

Ch1, 2sc in each ch, turn (6)

R3 :

Ch1, * sc, 2sc * 3 times, turn (9) (pic.19)

R4 :

Ch1, even, turn (9)

R5 :

Ch1, even (9)

Info :

Break the yarn and leave a long strand. (pic.20)

BODY R1 :

with Limone 91 Elefant - Magic ring, 6 ch in ring (6)

R2 :

2sc in each ch (12)

R3 :

* sc, 2sc * 6 times (18)

R4 :

* sc in next 2 st, 2sc * 6 times (24)

R5-R11 :

7 rows even (24)

R12 :

* sc in next 2 st, sc2tog * 6 times (18)

R13 :

* sc, sc2tog * 6 times (12)

R14 :

even (12)

Info :

Break the yarn and leave a long strand. Insert stuffing. (pic.21)

β€” ASSEMBLY :

Info :

1 - Sew the ears on the head: Insert the long strand of the ear in the needle, insert the needle in the ear in order to make a little fold (do the same with the second ear, but in reverse). (pic.22-23) Sew each ear on the head (between R14 and R15 of HEAD), leaving a space of 6 st between each ear. (pic.24-26)

Info :

2 - Sew the head on the body. (pic.27)

Info :

3 - If you use glass beads instead of safety eyes, sew them on the head in the same place as previously explained for the safety eyes. (pic.28)

Info :

4 - Sew the elephant in the basket (it's easier if you do this turning the basket inside out) (pic.29-30)

Info :

5 - Attach the basket to the balloon: Attach the 4 strings of the basket to the balloon, leaving a space of 5 st between each one. Break the yarn and weave in ends. (pic.31)

β€” GIRAFFE :

EARS (x2) R1 :

with Catania 208 Canary - Ch4, sc in 2Β° ch from hook, sc in next 2 st. (3) Break the yarn and leave a long strand. (pic.32)

HORNS (x2) R1 :

with Limone 79 Kokos - Magic ring, 3 ch in ring (3)

R2 :

Back loops only, even (3)

R3 :

even (3) Break the yarn and leave a long strand.

HEAD R1 :

with Catania 208 Canary - Magic ring, 6 ch in ring (6)

R2-R3 :

2 rows even (6)

R4 :

* sc, 2sc * 3 times (9)

R5 :

even (9)

R6 :

* sc in next 2 st, 2sc * 3 times (12)

R7 :

even (12)

R8 :

* sc, 2sc * 6 times (18)

R9-R11 :

3 rows even (18) (pic.33)

R12 :

* sc, sc2tog * 6 times (12)

R13 :

* sc, sc2tog * 4 times (8) Break the yarn and fasten off. (pic.34)

Info :

Attach the horns to the head. (pic.35) Attach the ears to the head. (pic.36)

BODY R1 :

with Catania 208 Canary - Magic ring, 6 ch in ring (6)

R2 :

2sc in each ch (12)

R3 :

* sc, 2sc * 6 times (18)

R4 :

* sc in next 2 st, 2sc * 6 times (24)

R5-R6 :

2 rows even (24)

R7 :

* sc in next 2 st, sc2tog * 6 times (18)

R8 :

even (18)

R9 :

* sc, sc2tog * 6 times (12) (pic.37)

R10 :

even (12)

R11 :

* sc, sc2tog * 4 times (8)

R12-R15 :

4 rows even (8) (pic.38)

Info :

Break the yarn and leave a long strand. Insert stuffing. Attach the head to the body. (pic.39) Sew the eyes on the head. (pic.40)

β€” ZEBRA :

EARS (x2) R1 :

with Limone 06 White - Ch4, sc in 2Β° ch from hook, sc in next st, * sc, hdc, sc * in last ch. On opposite side, sc in next 2 st, sl st in first st (7) Break the yarn and leave a long strand. (pic.41)

MANE R1 :

with Limone 06 White - Ch16, sc in 2Β° ch from hook, sc in next 14 ch, turn (15). Change color (Limone 24 Black)

R2 :

Ch1, even (15) Break the yarn and leave a long strand. (pic.42)

HEAD R1 :

with Limone 24 Black - Magic ring, 6 ch in ring (6)

R2 :

* sc, 2sc * 3 times (9)

R3 :

even (9) Change color (Limone 06 White)

R4-R5 :

2 rows even (9)

R6 :

* sc in next 2 st, 2sc * 3 times (12)

R7-R8 :

2 rows even (12) (pic.43)

R9 :

* sc, 2sc * 6 times (18)

R10-R14 :

5 rows even (18)

R15 :

* sc, sc2tog * 6 times (12) Insert stuffing.

R16 :

* sc, sc2tog * 4 times (8) Break the yarn and fasten off. (pic.44)

BODY R1 :

with Limone 06 White - Magic ring, 6 ch in ring (6)

R2 :

2sc in each ch (12)

R3 :

* sc, 2sc * 6 times (18)

R4 :

* sc in next 2 st, 2sc * 6 times (24)

R5-R7 :

3 rows even (24)

R8 :

* sc in next 2 st, sc2tog * 6 times (18)

R9-R11 :

3 rows even (18)

Info :

R12-R14 and colorwork instructions vary by pattern section; follow photos and color notes to embroider stripes. Break the yarn and leave a long strand. Insert stuffing. Attach the head to the body. Sew the eyes to the head. With a long strand of Limone 24 Black, embroider the zebra stripes on the head and the body. (pic.47-58)

β€” TIGER :

EARS (x2) R1 :

with Limone 157 Mandarin - Magic ring, 3 ch in ring, turn (3). R2: Ch1, 2sc in each ch, turn (6). R3: Ch1, even (6). Break the yarn and leave a long strand. (pic.59)

HEAD :

with Limone 73 Natur and color changes as specified in pattern pages (see pics 60-69 for nose embroidery). R12: * sc in next 2 st, sc2tog * 6 times (18). R13: * sc, sc2tog * 6 times (12). Insert stuffing. R16: * sc, sc2tog * 4 times (8). Break the yarn and fasten off. (pic.67) Attach the ears to the head. (pic.68-69)

Info :

Attach head to body, sew the eyes and embroider tiger stripes with Limone 24 Black on head and body. (pic.70-81)

β€” MOBILE FRAME :

PLASTIC RING :

with Limone 06 White - R1: Ch1, sc around the ring until it's all covered. (pic.82) Break the yarn and fasten off. (pic.83)

WOODEN FRAME :

with Limone 06 White: R1: Ch210, sl st in first ch to form a ring (make sure that the chain isn't twisted when you close the ring) (210) (pic.84)

R2-R10 :

Ch1, sc in same st, sc in next 209 st, sl st in first st (210) (pic.85-87)

R11 :

Ch1, sl st in both sides (the foundation chains and the last row of sc together) to close, with the wooden frame inside. (pic.88-90) Break the yarn and fasten off.

Info :

Join white yarn in a random point of the frame (on the side opposite to the closing sts) (pic.91). Ch48, pass the hook through the little ring, skip 8 ch, sl st in next 40 ch (pic.92-93). Break the yarn and fasten off. Do the same thing other 2 times, leaving a space of 8.7 inches (22 cm) between each thread. (pic.94)

Info :

Join yarn in a random point on the opposite side of the frame (pic.95), Ch20, pass the hook through the top of a hot air balloon (pic.96), sl st in every ch (pic.97), break the yarn and fasten off.

Info :

Do the same thing other 3 times, spacing out the balloons evenly on the frame. If you like the balloons to be at different heights, you can hang 2 of them at a 20ch height and the other 2 at a 10ch height.

Assembly Instructions

  • Sew each animal's ears to its head using the long yarn tail, making a little fold in the ear before securing; place elephant ears between R14 and R15 with 6 stitches between ears.
  • Sew the head to the body securely using a tapestry needle and the long tail left from the body; make sure head is centered and firmly stitched.
  • If using glass beads instead of safety eyes, sew the beads in place before closing the head, matching recommended placement between the specified rounds.
  • Sew each animal into its basket (turn the basket inside out to make sewing easier) and close seams neatly before pulling basket right-side out.
  • Attach each basket to its balloon by stitching the four basket strings to the balloon, leaving a space of 5 stitches between each attachment point; weave in ends to finish.

Important Notes

  • πŸ’‘Use the tapestry crochet method for the balloons, carrying the unused color along the top of the working stitch to create neat stripes.
  • πŸ’‘Place safety eyes or beads before closing the head; recommended placement is between specified rounds for each animal to achieve the pictured look.
  • πŸ’‘Insert the polystyrene balls before finishing the balloon decreases so the shape forms correctly and stuffing/ball sit smooth.
  • πŸ’‘Work with consistent tension and stuff gradually to avoid lumps and maintain the spherical balloon shape during decreases.
  • πŸ’‘When covering the wooden frame, make sure the foundation chain is not twisted before joining to create an even edge around the frame.

This hot air balloon mobile brings a soft, handmade touch to any nursery β€” tiny balloons and sweet animals float above in gentle colorways. The pattern uses tapestry crochet and small amigurumi techniques for charming detail and durability. Perfect as a thoughtful gift or a special nursery decor piece. πŸ§Άβœ¨πŸŒ™

You ask,

we answer.

FAQs

What size will the finished mobile be?

The completed mobile measures approximately 25 cm (10 inches) across the wooden frame with each balloon about 8 cm (3.15 inches) in diameter using the recommended materials.

Can I use different yarn weights for this pattern?

Yes, you can change yarn weight but the finished size will vary. Use an appropriately sized hook for your yarn and expect the balloons and animals to be larger or smaller accordingly.

Do I need prior crochet experience for this pattern?

This pattern is rated intermediate; you should be comfortable with single crochet, increases, decreases, and working in the round. Tapestry crochet color carries are required for the balloon stripes.

How long does this project typically take to complete?

Most crafters complete this multi-piece mobile in about 12-15 hours, depending on experience level and how many animals/balloons you make.