🧢 Beautiful ✨ Detailed πŸ’ Adorable

Drooping Leaves Amigurumi Pattern

Drooping Leaves Amigurumi Pattern
4.3β˜… Rating
5-7 Hours Time Needed
1.7K Made This
βœ‚οΈ

Intermediate Level

Ideal for those with basic crochet experience, featuring slightly more advanced stitches and techniques to expand your skills.

⏱️

Weekend Treat

Takes 5-7 hours, making it an enjoyable project to finish over a couple of days.

🏑

Cozy Accent

A warm touch for your space that transforms ordinary corners into inviting nooks filled with handmade charm.

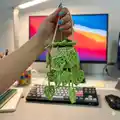
About This Drooping Leaves Amigurumi Pattern

This pattern teaches you to crochet a tiny hanging planter with drooping Monstera-style leaves. You will make the pot, a stuffed soil ball, and many small leaves, then assemble them into a cascading hanging plant. The techniques include rounds of single crochet, increases, decreases, and small leaf motifs.

Drooping Leaves Amigurumi Pattern crochet pattern - detailed view of completed project

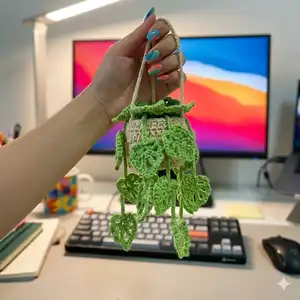
Perfect for gifting or adding a handmade accent to your home, this pattern includes clear row-by-row instructions and step notes. Photos guide leaf construction and final assembly to help you place each drooping leaf with confidence.

Why You'll Love This Drooping Leaves Amigurumi Pattern

I absolutely love this pattern because it turns simple stitches into a delightful hanging plant that feels alive. I enjoy how the tiny leaves cascade naturally and how easily you can customize colors and sizes. It is rewarding to see the pot, soil, and leaves come together into one charming piece. The pattern balances clear instructions with room for creative variations, which makes it both relaxing and inspiring to crochet.

Drooping Leaves Amigurumi Pattern step 1 - construction progress Drooping Leaves Amigurumi Pattern step 2 - assembly progress Drooping Leaves Amigurumi Pattern step 3 - details and accessories Drooping Leaves Amigurumi Pattern step 4 - final assembly and finishing

Switch Things Up

I love experimenting with color when I make this pattern; try two shades of green for a more natural look or bright colors for a playful twist.

I often change the number and length of leaves to make fuller or more minimalist versions depending on where I plan to hang it.

I sometimes use a slightly thicker yarn and a larger hook to create a chunkier, more sculptural planter that looks great on a shelf.

I also enjoy making mini versions with finer yarn and a smaller hook to turn these into keychains or tiny car charms.

I recommend adding felt or embroidered details on a few leaves to create realistic variegation or unique patterns.

I will sometimes add a small wire inside a few leaf stems to give them poseable movement for a custom drape.

I like to swap the soil color to match seasonal decorβ€”try warm browns for autumn or soft neutrals for a modern look.

I also make sets of three in graduated sizes and hang them together for a dramatic display that feels cohesive and handmade.

I encourage you to experiment with leaf shapes and stitch counts to design your own Monstera-inspired varieties.

I often change the rope material for hangingβ€”twine, cord, or a crocheted chain all give different visual effects and strength.

Common Mistakes & How to Fix Them

βœ— Skipping the slip stitch at the end of rows will shift your stitch placement; always slip stitch into the first stitch when the row ends to keep the edges tidy. βœ— Forgetting to begin new rows with the correct chain height will distort your stitch height; start single crochet rows with ch 1 and double crochet rows with ch 2 as indicated. βœ— Stuffing too early or too much can make the soil ball hard to shape; stuff gradually and add stuffing at Row 10 of the soil to get a smooth finish. βœ— Not marking the positions for the hanging ropes can make them uneven around the rim; count 12-13 stitches between rope attachment points and mark them before tying. βœ— Ignoring tension consistency causes mismatched leaf sizes and loose edges; maintain the same tension throughout leaves and pot to ensure a cohesive look.

Drooping Leaves Amigurumi Pattern

Make a charming hanging drooping-leaf planter that brings handmade greenery to any space. This pattern guides you through crocheting a small pot, soil ball, and many delicate Monstera-style leaves to create a cascading planter. You will love the texture and movement these leaves give as they drape over the pot.

Intermediate 5-7 Hours

Materials Needed for Drooping Leaves Amigurumi Pattern

β€” Main Fabric

  • 01
    Super fine yarn, approximately 1.8 oz (50 g) per skein (use small amounts of each color)
  • 02
    Color A: Green - main color for leaves (approx 20-40 g depending on number of leaves)
  • 03
    Color B: Beige - for pot (approx 50 g)
  • 04
    Color C: Brown - for soil ball (approx 20-30 g)
  • 05
    Small amounts of contrasting greens for leaf variation (10-20 g total)

β€” Tools Required

  • 01
    Crochet hook size 2.5-3.0 mm
  • 02
    Stitch marker
  • 03
    Sewing needle / yarn needle
  • 04
    Scissors
  • 05
    Cotton filling / polyester stuffing

Progress Tracker

0% Complete

β€” Pots :

Info :

Note : for newbie. Slip stitch in the first stitch in every time a row ends and begin a chain in every time a new row starts example : single crochet begin 1 chain 1, double crochet begin chain 2

Round 1 :

MR, chain 1, 8SC (8 sts)

Round 2 :

chain 1, 8SC inc (16 sts)

Round 3 :

chain 1, (1SC, 1 inc) 8 time (24 sts)

Round 4 :

chain 1, (2SC, 1inc) 8 time (32 sts)

Round 5 :

(3 SC, 1 inc) 8 time (40 sts)

Round 6 :

(BLO) 40 SC (40 sts)

Round 7 :

40 DC (40 sts)

Round 8 :

40 SC (40 sts)

Round 9 :

40 DC (40 sts)

Round 10 :

40 SC (40 sts)

Round 11 :

40 SC (40 sts)

Info :

For the hanging pot, continue crocheting chain 30 (make 3) and tie it to the rim of the pot plant. The distance of each hanging rope is 12-13 sts

β€” The Soil :

Round 1 :

mr 8SC (8sts)

Round 2 :

8 SC inc (16sts)

Round 3 :

(1 SC + 1 inc ) 8 tomes (24sts)

Round 4 :

(2SC + 1inc) 8 times (32sts)

Round 5-8 :

SC in each st to end

Round 9 :

(2 SC + 1 dec) 8 times (24sts)

Round 10 :

(1 SC + 1 dec) 8 times (16sts) (stuffing)

Round 11 :

8 dec (8sts)

Info :

cut yarn and leave a long tail for sew, close off the hole.

β€” Leaves (1) :

Info :

ROW 1 : Chain 4, slip stitch in the first chain from the hook to make an MR.

Round 1 :

All st crochet of row 1 into the MR

Round 1a :

Chain 3, 1DC + 3 Chain, 1HDC + 3 Chain, 1DC + 3 Chain

Round 1b :

1DC + 3 Chain, 1HDC + 3 Chain, 1DC + 3 Chain

β€” Leaves (2) :

Round 2 :

Now we have total 7 spaces

Round 2a :

1st - 3rd space : 3SC, 1 slip st

Round 2b :

4th space : 1SC, 1picot, 1SC, 1 slip st

Round 2c :

5-7th space : 3SC, 1 slip st

Info :

When you're done with the leaf, chain 10 and again slip st in the 4th chain from the hook to make an MR, and begin making the next leaf.

β€” Assembly :

Item Name (P1) :

Now we have toal of this

Info :

Sew every drooping leaves into the soil

Info :

Put the soil inside the pot.

Assembly Instructions

  • Attach each crocheted leaf to the soil ball by sewing the leaf tails into the soil surface so leaves drape outward; secure each leaf with hidden stitches.
  • Place the completed soil ball inside the pot and adjust leaf placement so the drooping leaves hang over the rim of the pot naturally.
  • Make three chains of 30 for the hanging ropes and tie each chain to the pot rim, spacing them approximately 12-13 stitches apart for even hanging.
  • After completing the soil decreases, cut yarn and leave a long tail; use that tail to sew the final opening closed securely before placing the soil in the pot.
  • Arrange and sew any additional leaves or stems to the soil or pot rim for fullness, tucking and securing ends to hide tails.

Important Notes

  • πŸ’‘Slip stitch in the first stitch at the end of every row and begin a chain at the start of a new row; single crochet rows begin with ch 1, double crochet with ch 2.
  • πŸ’‘Measure and mark three equally spaced attachment points on the pot rim before tying the hanging chains; the distance for each hanging rope is 12-13 stitches.
  • πŸ’‘Stuff the soil ball at Row 10 and add stuffing gradually to shape it smoothly; overstuffing can distort the pot fit and leaf placement.
  • πŸ’‘Cut yarn and leave a long tail when finishing the soil ball so you can sew the hole closed securely and attach the soil inside the pot.

Thank you for making this little hanging plant with me β€” your Monstera-style drooping leaves bring instant charm to any shelf or dashboard. This pattern is perfect for cozy home accents and thoughtful handmade gifts. Enjoy customizing colors and sizes to make it uniquely yours! 🧢🌿

You ask,

we answer.

FAQs

What size will the finished piece be?

The finished hanging planter measures approximately 8-12 cm tall (not including hanging chains) when using super fine yarn and a 2.5-3.0 mm hook; size will vary by yarn and tension.

Can I use different yarn weights for this pattern?

Yes, you can use different yarn weights but the final size and leaf drape will change; use a larger hook with bulkier yarn for a chunkier planter and a smaller hook with finer yarn for mini versions.

Do I need prior crochet experience for this pattern?

This pattern is rated intermediate and assumes familiarity with basic stitches like single crochet, double crochet, increases, decreases, and working in the magic ring.

How long does this project typically take to complete?

Most crocheters complete this project in 5-7 hours, though time may vary depending on experience, number of leaves made, and assembly complexity.