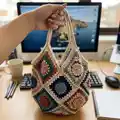
About This Granny Shoulder Bag Pattern
This pattern creates a slouchy granny-square shoulder bag made from 13 decorative granny squares joined in a diagonal layout. It features popcorn rounds for a textured center, classic granny rounds to form the square, and a cream outer edge for a cohesive finish. Techniques include popcorn (5-dc), reverse single crochet (crab stitch), slip stitch joining, and simple handle construction.
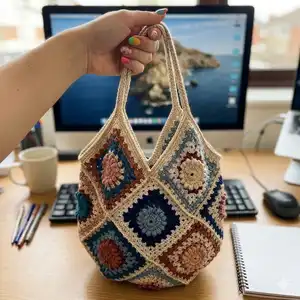
You will make 13 granny squares and join them together following the diagram provided. The finished bag measures approximately 22" high by 16" wide and uses Rainbow cotton 8/4 yarn.
Why You'll Love This Granny Shoulder Bag Pattern
I absolutely love this pattern because it turns simple granny squares into a stylish, wearable accessory that feels handmade and special. I enjoy the texture created by the 5dc popcorn rounds — they add a lovely floral center that makes each square pop. The diagonal assembly gives the bag an unexpected, fashionable silhouette that stands out from ordinary square bags. Sewing and finishing are satisfying steps where you can see the bag come together, and I appreciate that the design is flexible for color swaps and customizations.
Switch Things Up
I love experimenting with colorways in this design; you can change the palette to pastels for a soft look or jewel tones for a bold statement.
I often make mini versions by using a finer yarn and smaller hook — this creates cute coin-pouch sized versions suitable for keyrings.
You can skip the popcorn center and replace it with a simple flower motif or a flat circle to change the texture while keeping the same rounds.
Try alternating two colors for every round to create a striped granny square effect that adds visual rhythm across the bag.
For a sturdier bag, use a sport or DK weight cotton and a slightly smaller hook than recommended, then add an inner lining for extra support.
I sometimes add embroidered initials on one square before joining to personalize the bag as a gift.
Make longer or shorter handles by increasing or decreasing the ch60 measurement; test for comfort and body drop before finishing.
Change the joining method to mattress stitch or whipstitch with a yarn needle for a different seam look — I use slip-stitch joins for a decorative ridge, but other joins work beautifully.
I recommend blocking each square lightly before joining; it makes alignment and joining much easier and more professional looking.
Consider adding a zipper or magnetic snap closure at the bag opening if you want additional security; sew or stitch it into the SC rows you make along the inner edges.
Common Mistakes & How to Fix Them
✗ Not counting stitches after completing each round; recount your stitches to ensure the correct number of popcorns and groups before moving on.
✗ Skipping the slip stitch join in the starting chain can change your round height; always slst into the third starting ch where instructed to keep consistent round height.
✗ Working popcorns inconsistently will create lopsided centers; make each 5-dc popcorn the same size and close them using the drop-and-pick-up method described.
✗ Joining squares without checking sides can flip your design; place squares with reverse sides matching as recommended and pin before joining.