🧢 Beautiful ✨ Detailed πŸ’ Adorable

Floral tea set Amigurumi Pattern

Floral tea set Amigurumi Pattern
4.5β˜… Rating
8-10 Hours Time Needed
1.2K Made This
βœ‚οΈ

Intermediate Level

Ideal for those with basic crochet experience, featuring slightly more advanced stitches and techniques to expand your skills.

⏱️

All-Day Adventure

Requires 8-10 hours, ideal for a full day of immersive crocheting.

🧸

Cute Companion

An adorable friend to cherish, handcrafted with love to bring comfort and joy for years to come.

About This Floral tea set Amigurumi Pattern

This pattern creates a floral-themed teapot with matching teacups, saucers, petals and decorative sepals. You will crochet around a bottle or foam ball to achieve the teapot body, then add shaped petals and leafy details for a finished floral look. The design uses simple amigurumi techniques and shaping to create realistic petals and a neat teapot silhouette.

Floral tea set Amigurumi Pattern crochet pattern - detailed view of completed project

Clear step-by-step photos and instructions are included to guide you through shaping, colour changes and assembly. The finished set makes a lovely gift or display piece and can be customized by changing yarn colours.

Why You'll Love This Floral tea set Amigurumi Pattern

I absolutely love this pattern because it transforms basic crochet stitches into a delicate floral tea set full of charm. I enjoy the mix of shaping techniques and color changes that keep each section interesting to make. The petals and sepals give so much personality and allow for playful customization with colours. As the maker I find the assembly and final shaping very rewarding β€” the piece looks more intricate than the techniques used. This pattern is a delightful project to showcase small skills and create a keepsake.

Floral tea set Amigurumi Pattern step 1 - construction progress Floral tea set Amigurumi Pattern step 2 - assembly progress Floral tea set Amigurumi Pattern step 3 - details and accessories Floral tea set Amigurumi Pattern step 4 - final assembly and finishing

Switch Things Up

I love customizing this set by swapping the colour palette; try pastels for a soft vintage look or bold brights for a modern twist.

If you want a sturdier teapot, use slightly thicker yarn and a larger hook to make a chunkier, more tactile version.

To make a tiny keychain version, use finer yarn and a smaller hook, and omit the internal bottle or replace it with a tightly stuffed foam core.

I often embellish the petals with embroidery or beads along the petal edge to add shimmer and detail; it makes every set unique.

For a poseable handle, insert a thicker gauge wire or two pipe cleaners twisted together before closing the handle to hold shapes.

Try different petal counts and sizes to change the silhouette β€” more petals give a fuller floral bloom, fewer petals look more minimalist.

Make matching saucers in contrasting colours to highlight the cups, or add a crocheted doily under the saucer for a vintage display.

I sometimes add tiny crocheted roses or leaves around the base for a romantic finish β€” small extras make wonderful gifts.

Swap the fishing line in the saucer for thin beading wire if you want extra stiffness and a crisper rim.

Finally, personalize by embroidering initials on the cap or by attaching a tiny tag β€” these small touches make each set special.

Common Mistakes & How to Fix Them

βœ— Skipping stitch markers when working rounds on the bottle will make it hard to find the beginning; place a marker at the start of each round to keep track of counts. βœ— Stuffing the spout or handle too firmly can distort the shape and make joining difficult; stuff lightly and shape gradually before gluing or sewing in place. βœ— Not changing colours at the right loop can create visible jogs; change the yarn at the last loop of the stitch as instructed to get a neater colour transition. βœ— Glueing petals without pinning can lead to uneven placement; pin or temporarily tack petals in place first and check symmetry before applying hot glue. βœ— Ignoring the advice to add fishing line to saucer edges may cause floppy rims; insert the fishing line where directed to keep the saucer shape firm and stable.

Floral tea set Amigurumi Pattern

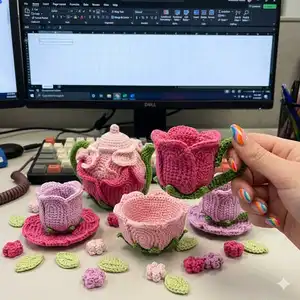
Create a charming miniature floral tea set with detailed crochet instructions for a teapot, teacups, saucers and decorative petals. This pattern guides you step-by-step through shaping, assembly and finishing so you can craft a sweet display or gift. Suitable for crocheters who enjoy a mix of shaping, color changes and hand-finishing.

Intermediate 8-10 Hours

Materials Needed for Floral tea set Amigurumi Pattern

β€” Main Fabric

  • 01
    YarnArt Jeans (sport/fingering weight) shades: 18 (or 74) light pink, 20, 36 pink, 42 raspberry, 69 green, 07, 11, 35 and other small accent colours (use small amounts of each shade as needed)
  • 02
    Raspberry yarn (shade 42) approximately 20-50g for teapot lower part
  • 03
    Pink yarn (shade 36) approximately 30-60g for mid section and petals
  • 04
    Light pink yarn (shade 18 or 74) approximately 20-40g for top and cap
  • 05
    Green yarn (shade 69) approximately 20-40g for handle, spout and sepals
  • 06
    Yellow and lilac pink for teacup interior and trim, small amounts
  • 07
    If using yarn substitutes, choose similar weight yarns in small skeins (20-100g depending on piece)
  • 08
    Ball-shaped bottle (350 ml, diameter 9 cm) OR 9 cm styrofoam ball as internal form

β€” Tools Required

  • 01
    Crochet hook size 2.25mm (B) as shown
  • 02
    Scissors
  • 03
    Yarn needle for sewing parts
  • 04
    Stitch markers
  • 05
    Hot glue gun
  • 06
    Tapestry needle
  • 07
    Fishing line (1 mm diameter) for saucer reinforcement
  • 08
    30 cm pipe cleaner (chenille wire) for handle reinforcement
  • 09
    Polyester stuffing / fiberfill
  • 10
    Milk bottle cap (for gluing to top if using foam ball)

Progress Tracker

0% Complete

β€” Materials :

Info :

Ball shaped bottle (350 ml, diameter 9 cm) or 9 cm styrofoam ball. Fishing line (1 mm diameter), 30 cm pipe cleaner, fiberfill, tapestry needle, hot glue gun.

β€” Stitch key :

Infos :

AR - Adjustable Ring. ch - chain. sc - single crochet. htc - half treble crochet. sl st - slip stitch. dec - decrease / skip 1 st. inc - increase / work 2 st in 1 st. dc - double crochet. 3 dc cluster - 3 double crochet together from 1 stitch. ( )*n - repeat combination in ( ) n times.

β€” Teapot :

Info :

Begin from bottom with raspberry yarn (42).

Round 1 :

6 sc in AR (6)

Round 2 :

Inc every st =12 sc (12)

Round 3 :

Inc every 2d =18 sc (18)

Round 4 :

Inc every 3d =24 sc (24)

Round 5 :

Inc every 4th = 30 sc (30)

Round 6 :

Inc every 5th = 36 sc (36)

Round 7 :

Inc every 6th = 42 sc (42)

Round 8 :

Inc every 7th = 48 sc (48)

Round 9 :

Inc every 8th = 54 sc (54)

Round 10 :

Inc every 9th = 60 sc (60)

Round 11 :

Inc every 10th = 66 sc (66)

Round 12 :

Inc every 11th = 72 sc (72)

Round 13-14 :

Work 2 rounds straight (no increases) (72)

Round 15-24 :

Change yarn to pink color (36), work 10 rounds straight (72)

Info :

When crocheting around a bottle, guide your work into three approximately equal sections; if your tension differs, adjust rounds to fit the bottle shape.

Round 25 :

Change yarn to light pink (18 or 74). (10 sc, dec) * 6 times

Round 26 :

(9 sc, dec) * 6 times

Round 27 :

(8 sc, dec) * 6 times

Info :

Keep decreasing symmetrically to increasing. When you come close to the bottleneck, work straight without decreases until the neck is reached.

β€” Teapot spout :

Info :

Work with green yarn (69). Chain 20.

Round 1 :

3 sc in 2d ch, 17 sc, 4 sc in last ch, 17 sc on another side of chain.

Round 2 :

3 inc, 17 sc, 4 inc, 17 sc.

Round 3 :

(1 sc, inc) *3, 17 sc, (1 sc, inc) *4, 17 sc.

Round 4 :

(2 sc, inc) *3, 17 sc, (2 sc, inc) *4, 17 sc.

Round 5 :

(3 sc, inc) *3, 17 sc, 16 inc, 16 sc, sl st.

Info :

Join the straight sides and sew with a needle. Stuff the bottom 2/3 with synthetic fiberfill and glue it to the base of the teapot as in the photo. The upper part corresponds to the area where 4 inc were worked.

β€” Handle :

Info :

For handle ch 8 and work spiral rounds without inc, 15 cm up.

Info :

Pipe cleaner (chenille wire) fold in half, insert into handle and sew up the hole.

Info :

Glue the handle to the pot and additionally sew for reliability.

β€” Cap :

Info :

Work with light pink. Crochet a circle of such size to close the neck. The author got 6 rows; follow the teapot bottom increase scheme to make the circle size. Work 1 round through back loops only and one more round through both loops.

Round (cap handle) :

For cap handle work 8 sc in AR.

Info :

Work 2 rounds straight, stuff and sew the hole with the end of yarn. Sew a small ball to the center of the cap and attach the cap to the pot, adding fiberfill under it and sewing on the base.

β€” Big petal :

Info :

Raspberry yarn, make 4 pieces. Ch 9.

Round 1 :

3 sc in 2d ch, 6 sc, 4 sc in last ch, 6 sc on another side of chain.

Round 2 :

Inc *3, 6 sc, inc *4, 6 sc.

Round 3 :

(1 sc, inc) *3, 6 sc, (1 sc, inc) *4, 6 sc.

Round 4 :

(2 sc, inc) *3, 6 sc, (2 sc, inc) *4, 6 sc.

Round 5 :

(3 sc, inc) *3, 6 sc, (3 sc, inc) *4, 6 sc.

Round 6 :

(4 sc, inc) *3, 6 sc, (4 sc, inc) *4, 6 sc.

Round 7 :

(5 sc, inc) *3, 6 sc, 24 inc, 5 sc, sl st.

β€” Middle petal :

Info :

Pink yarn, make 6 pieces. Ch 10. Work back-and-forth rows, make turning chain at beginning of every row.

Round 1 :

8 sc, 4 sc in last ch, 8 sc on another side of chain.

Round 2 :

8 sc, 4 inc, 8 sc.

Round 3 :

8 sc, (1 sc, inc) *4, 8 sc.

Round 4 :

8 sc, (2 sc, inc) *4, 8 sc.

Round 5 :

8 sc, (3 sc, inc) *4, 8 sc.

Round 6 :

8 sc, 20 inc, 8 sc.

β€” Small petal :

Info :

Light pink yarn, make 6 pieces. Ch 8. Work back-and-forth rows, make turning chain at beginning of every row.

Round 1 :

6 sc, 4 sc in last ch, 6 sc on another side of chain.

Round 2 :

6 sc, 4 inc, 6 sc.

Round 3 :

6 sc, (1 sc, inc) *4, 6 inc.

Round 4 :

6 sc, (2 sc, inc) *4, 6 inc.

Round 5 :

6 sc, 16 inc, 6 sc.

β€” Sepal :

Info :

Green yarn (69). Crochet 7 rounds circle following the scheme of teapot bottom.

Round (sepal edge) :

Ch 10, 1 sl st, 1 sc, 1 htc, 6 dc. Skip 2 st, sl st in 3d st of the circle. Repeat around the circle.

Info :

Glue the sepal on pot's bottom, but leave the tips unglued.

β€” Floral teacup (saucer & cup) :

Info :

Yellow, lilac pink, green yarn. Choose main color as desired. Begin with yellow yarn for the cup base.

Round 1 :

6 sc in AR (6)

Round 2 :

Inc every 2d = 12 sc. Add a fishing line. Find more information about using fishing line in saucer description.

Round 3 :

(1 sc, inc) *6 = 18 sc

Round 4 :

(2 sc, inc) *6 = 24 sc

Round 5 :

Join lilac pink yarn and alternate 1 yellow and 1 pink st. Follow the inc scheme: (3 sc, inc) * 6 = 30 sc. Change the yarn colour at the time of working the last loop of the sc.

Round 6 :

Fasten off yellow yarn, continue with lilac pink only. (4 sc, inc) * 6 = 36 sc

Round 7-17 :

Work 11 rounds straight. Crochet on the inside (front side inside, purl outside).

β€” Saucer (notes) :

Info :

The saucer uses fishing line for structural support; insert and crochet around it as instructed in saucer steps. Details are shown with photos in the pattern.

β€” Assembly :

Info :

Attach all the petals with a hot glue gun, applying glue on the bottom 2/3 of the petals. Make symmetrical placement on both sides of the pot. Small petals are fixed at the level of the light pink part of the base. First fix one in the center, then two on the sides with an overlap, right next to the handle and spout.

Info :

Middle petals are glued first on the sides, then one in the middle. The side petal comes under the handle of the pot. Large petals are stretched wide with your hands so that they fit well on the bottom of the pot, two on each side.

Info :

Now turn down the unglued edges of the petals to give them beautiful waves. Fasten all areas adjacent to the base with hot glue. Glue sepals to the pot bottom leaving tips free for a natural look.

Assembly Instructions

  • Attach all petals with a hot glue gun, apply glue to the bottom two-thirds of each petal and arrange symmetrically on both sides of the teapot.
  • Position middle petals first on the sides, then glue one in the center and overlap side petals so they sit next to the handle and spout.
  • Glue the sepal round to the pot base leaving petal tips unglued so they flare naturally, then shape petal edges into waves and secure adjacent base areas.
  • Glue and sew the handle and spout: insert a folded pipe cleaner inside the handle for support, sew to the pot opening, then glue for additional strength.
  • Place the cap on the neck, add a small amount of fiberfill under it for shape, sew the cap to the neck and attach the small decorative ball to the center of the cap.

Important Notes

  • πŸ’‘Work around the bottle in approximately three equal sections so the crochet fits the bottle curvature accurately.
  • πŸ’‘If you cannot find a ball-shaped bottle, use a 9 cm styrofoam ball and glue a milk bottle cap to the top to create a neck.
  • πŸ’‘Use fishing line in the saucer rim to keep the saucer shape firm and stable; crochet around the line where indicated.
  • πŸ’‘When changing colors, change the yarn at the last loop of the stitch to create a neat, less visible transition.
  • πŸ’‘Pin all pieces in place before applying hot glue to ensure symmetry and correct placement.

This Floral Tea Set pattern turns simple yarn into a delicate miniature tea party that you'll be proud to display. The teapot, petals and matching cups are filled with crafty detail and charming colorwork. Make one as a gift or a sweet home accent β€” it brings handmade warmth to any shelf. 🧢🌸🧡

You ask,

we answer.

FAQs

What size will the finished teapot be?

The teapot is sized to fit a 350 ml ball-shaped bottle (approximately 9 cm diameter). The final dimensions depend on yarn and tension.

Can I substitute other yarn weights?

Yes, but changing yarn weight will affect final size; use an appropriate hook size and adjust stitch counts if necessary to maintain shape.

Do I need special tools for the saucer?

You will need fishing line (1 mm diameter) for saucer reinforcement to keep its rim firm; this is explained in the saucer steps.

Is this suitable for beginners?

This pattern is rated intermediate due to shaping, color changes and assembly; beginners with basic crochet skills can attempt it but should allow more time.

How long does this project typically take?

Most crocheters complete the set in 8-10 hours, though time varies by experience and how many pieces you make.