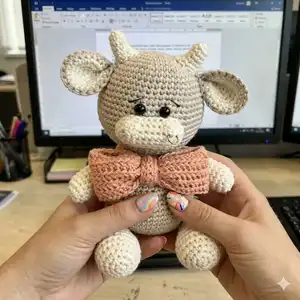
Make your own adorable Asher the Ox with this beginner-friendly amigurumi pattern. You will enjoy the clear, photo-backed instructions and gentle shaping that creates a lovable little companion. The pattern includes complete rounds, materials list and assembly steps so you can finish a charming handmade gift.
Progress Tracker
0% Complete
— Head :
Rnd 1 :
Start 8 sc in a magic ring [8]
Rnd 2 :
Inc in all 8 st [16]
Rnd 3 :
(Sc in next st, inc in next st) x 8 [24]
Rnd 4 :
(Sc in each of next 2 st, inc in next st) x 8 [32]
Rnd 5 :
(Sc in each of next 3 st, inc in next st) x 8 [40]
Rnd 6 :
(Sc in each of next 4 st, inc in next st) x 8 [48]
Rnd 7-10 :
Sc in all 48 st [48]
Rnd 11 :
(Sc in each of next 5 st, inc in next st) x 8 [56]
Rnd 12-14 :
Sc in all 56 st [56]
Rnd 15 :
(Sc in each of next 13 st, inc in next st) x 4 [60]
Rnd 16-19 :
Sc in all 60 st [60]
Rnd 20 :
(Sc in each of next 8 st, dec) x 6 [54]
Rnd 21 :
(Sc in each of next 7 st, dec) x 6 [48]
Rnd 22 :
(Sc in each of next 6 st, dec) x 6 [42]
Rnd 23 :
(Sc in each of next 5 st, dec) x 6 [36]
Rnd 24 :
(Sc in each of next 4 st, dec) x 6 [30]
Info :
Insert 6 mm safety eyes between rounds 13 and 14, 4 st apart. Use a single strand of black embroidery thread to sew eyebrows over round 12, with each approximately 2 stitches wide.
Info :
Start stuffing the head firmly with fibrefill and continue stuffing as you crochet the rest of the head.
Rnd 25 :
(Sc in each of next 3 st, dec) x 6 [24]
Rnd 26 :
(Sc in each of next 2 st, dec) x 6 [18]
Rnd 27 :
(Sc in next st, dec) x 6 [12]
Info :
Finish stuffing the head firmly with fibrefill.
Info :
Sl st and fasten off leaving a long yarn tail.
Info :
After Rnd 28, thread the tail through a needle. Weave the needle through the front loop of each of the 6 st, always going in the direction from the centre and under the front loop. Pull the yarn tail and the hole should close. Insert the needle through the middle of the hole and pull through the head. Fasten off and weave the yarn end in.
— Muzzle :
Info :
(IN COLOUR 01, WHITE) Starting from the centre of the muzzle. Ch 10. Stitches are worked around both sides of the foundation chain.
Rnd 1 :
Into 2nd ch from hook, sc in each of next 8 ch, 3 sc in next ch. Continue on the other side of the foundation chain, sc in each of next 7 ch, inc in next ch [20]
Rnd 2 :
Inc in next st, sc in each of next 7 st, inc in each of next 3 st, 3-dc-bobble in next st, sc in each of next 5 st, 3-dc-bobble in next st, inc in each of next 2 st [26]
Info :
Push each 3-dc-bobble stitch outwards to create the nostrils.
Rnd 3 :
Sc in all 26 st [26]
Info :
Sl st in next st and fasten off. Leave a long tail for sewing.
Info :
Stuff the muzzle with fibrefill.
— Body :
Info :
(IN COLOUR 18, BROWN) Starting from the base of the body.
Rnd 1 :
Start 6 sc in a magic ring [6]
Rnd 2 :
Inc in all 6 st [12]
Rnd 3 :
(Sc in next st, inc in next st) x 6 [18]
Rnd 4 :
(Sc in each of next 2 st, inc in next st) x 6 [24]
Rnd 5 :
(Sc in each of next 3 st, inc in next st) x 6 [30]
Rnd 6 :
(Sc in each of next 4 st, inc in next st) x 6 [36]
Rnd 7 :
(Sc in each of next 5 st, inc in next st) x 6 [42]
Rnd 8 :
(Sc in each of next 6 st, inc in next st) x 6 [48]
Rnd 9 :
(Sc in each of next 7 st, inc in next st) x 6 [54]
Rnd 10-14 :
Sc in all 54 st [54]
Rnd 15 :
(Sc in each of next 7 st, dec) x 6 [48]
Rnd 16 :
Sc in all 48 st [48]
Rnd 17 :
(Sc in each of next 6 st, dec) x 6 [42]
Rnd 18 :
Sc in all 42 st [42]
Rnd 19 :
(Sc in each of next 5 st, dec) x 6 [36]
Rnd 20 :
Sc in all 36 st [36]
Rnd 21 :
(Sc in each of next 10 st, dec) x 3 [33]
Rnd 22 :
Sc in each of next 5 st, dec, (sc in each of next 9 st, dec) x 2, sc in each of next 4 st [30]
Rnd 23 :
Sc in each of next 6 st, dec, (sc in each of next 8 st, dec) x 2, sc in each of next 2 st [27]
Rnd 24 :
Sc in each of next 2 st, dec, (sc in each of next 7 st, dec) x 2, sc in each of next 5 st [24]
Info :
Sl st in next st and fasten off. Leave a long tail for sewing.
Info :
Stuff the body firmly with fibrefill.
— Arm X 2 :
Info :
(START IN COLOUR 01, WHITE) Starting from the tip of the arm.
Rnd 1 :
Start 6 sc in a magic ring [6]
Rnd 2 :
Inc in all 6 st [12]
Rnd 3 :
(Sc in each of next 3 st, inc in next st) x 3 [15]
Rnd 4 :
Sc in all 15 st [15]
Rnd 5 :
Dec x 2, sc in each of next 9 st, dec [12]
Rnd 6 :
Sc in next st, dec, sc in each of next 7 st, dec [10]
Info :
Change to Colour 18, Brown yarn.
Rnd 7-14 :
Sc in all 10 st [10]
Rnd 15 :
Sc in each of next 6 st [6]. Leave the remaining stitches unworked
Info :
Stuff the hand (rounds 1 to 6) firmly with fibrefill and with gradually less further up the arm.
Info :
Flatten the opening of the arm and sc in each of next 5 stitches through both layers to close the opening.
Info :
Fasten off, leaving a long tail for sewing.
— Leg X 2 :
Info :
(START IN COLOUR 01, WHITE) Starting from the base of the leg.
Rnd 1 :
Start 6 sc in a magic ring [6]
Rnd 2 :
Inc in all 6 st [12]
Rnd 3 :
(Sc in next st, inc in next st) x 6 [18]
Rnd 4 :
(Sc in next 2 st, inc in next st) x 6 [24]
Rnd 5 :
Sc in each of next 9 st, (inc in next st, sc in next st) x 4, sc in each of next 7 st [28]
Rnd 6-7 :
Sc in all 28 st [28]
Rnd 8 :
Sc in each of next 7 st, (dec, sc in next st) x 6, sc in each of next 3 st [22]
Rnd 9 :
Sc in each of next 4 st, (dec, sc in next st) x 6 [16]
Rnd 10 :
Sc in each of next 5 st, (dec, sc in next st) x 3, sc in each of next 2 st [13]
Rnd 11 :
Sc in next st, change to Colour 18, Brown yarn, sc in each of next 12 st [13]
Rnd 12-20 :
Sc in all 13 st [13]
Info :
Stuff the foot (rounds 1 to 11) firmly with fibrefill and with gradually less further up the leg.
Item Name (LEFT LEG) :
Rnd 21: Sc in each of next 4 st [4]. Leave the remaining stitches unworked. Flatten the opening of the left leg and sc in each of next 6 stitches through both layers to close the opening. Fasten off and leave a long tail for sewing.
Item Name (RIGHT LEG) :
Rnd 21: Sc in each of next 11 st [11]. Leave the remaining stitches unworked. Flatten the opening of the right leg and sc in each of next 6 stitches through both layers to close the opening. Fasten off and leave a long tail for sewing.
— Inner Ear X 2 :
Info :
(IN COLOUR 01, WHITE) Starting from the centre of the inner ear.
Rnd 1 :
Start 6 sc in a magic ring [6]
Rnd 2 :
Inc in all 6 st [12]
Rnd 3 :
(Sc in next st, inc in next st) x 6 [18]
Rnd 4 :
(Sc in next 2 st, inc in next st) x 6 [24]
Info :
Sl st in next st and fasten off. Weave all yarn tails in.
— Outer Ear X 2 :
Info :
(IN COLOUR 18, BROWN) Starting from the centre of the outer ear.
Rnd 1-4 :
Repeat instructions as for inner ear.
Info :
Do not fasten off. We will join the inner and outer ears together.
Info :
Place the backs of the inner ear and the outer ear together. With the outer ear facing you, sc in each of next 24 st through both pieces [24].
Info :
Fold the joined ear in half, ch 1, and work through both sides of the ears, sc in each of next 2 st, sl st in next st.
Info :
Fasten off and leave a long tail for sewing.
— Tail :
Info :
(IN COLOUR 18, BROWN) Starting from the tip of the tail.
Rnd 1 :
Start 6 sc in a magic ring [6]
Rnd 2 :
(Sc in next st, inc in next st) x 3 [9]
Rnd 3 :
(Sc in each of next 2 st, inc in next st) x 3 [12]
Rnd 4 :
(Sc in each of next 3 st, inc in next st) x 3 [15]
Rnd 5-6 :
Sc in all 15 st [15]
Rnd 7 :
(Sc in next st, dec) x 5 [10]
Rnd 8 :
(Sc in each of next 3 st, dec) x 2 [8]
Rnd 9-13 :
Sc in all 8 st [8]
Info :
Stuff the end of the tail (rounds 1 to 8) firmly with fibrefill and with gradually less further along the rest of the tail.
Info :
Flatten the opening of the tail and sc in each of next 4 stitches through both layers to close the opening.
Info :
Fasten off and leave a long tail for sewing.
— Horn X 2 :
Info :
(IN COLOUR 01, WHITE) Starting from the tip of the horn.
Rnd 1 :
Start 6 sc in a magic ring [6]
Rnd 2 :
Sc in all 6 st [6]
Rnd 3 :
Inc in next st, sc in each of next 5 st [7]
Rnd 4 :
Sc in all 7 st [7]
Rnd 5 :
Inc in next st, sc in each of next 5 st, inc in next st [9]
Rnd 6 :
Inc in next st, sc in each of next 7 st, inc in next st [11]
Info :
Sl st in next st and fasten off. Leave a long tail for sewing.
Info :
Stuff the horn firmly with fibrefill.
— Bow :
Info :
(IN COLOUR 10, PINK) Starting from one long edge of the bow. With a long starting yarn tail, ch 50.
Rnd 1 :
Sl st in first ch to close the circle, be careful that the chain is not twisted. Ch 2, starting in the same stitch into which the sl st was made, hdc in each of next 50 ch [50]
Rnd 2-5 :
Into BLO, hdc in each of next 50 st [50]
Rnd 6 :
Into BLO, hdc in next st [1]. Leave the remaining stitches unworked
Info :
Sl st in next st and fasten off.
Info :
Wind the yarn tail a few times around the middle of the bow to squeeze it together. Secure the ends and weave in the yarn tails at the back of the bow.
Info :
Wrap the centre of bow around the main bow over the wound yarn that squeezed the middle together.
Info :
Sew the ends together on the back of the bow. Pass a few stitches through the bow itself to prevent the centre of bow from sliding around.
Info :
Fasten off, leaving long yarn tails for sewing.
— Centre of Bow :
Info :
(IN COLOUR 10, PINK) Starting from one long edge of the centre of bow. We will crochet the centre of bow in rows. Ch 12.
Row 1 :
Into 2nd ch from hook, sc in each of next 11 ch [11]
Row 2-3 :
Ch 1, turn, into 2nd st from hook, sc in each of next 11 st [11]
Info :
Fasten off, leaving a long yarn tail.
— Neckband :
Info :
(IN COLOUR 10, PINK) Starting from one long edge of the neckband. With a long starting yarn tail, ch 32. We will work the neckband in rows.
Row 1 :
Starting in the 2nd ch from hook, sc in each of next 31 ch [31]
Row 2 :
Ch 1, turn, starting in the 2nd ch from hook, sc in each of next 31 st [31]
Info :
Fasten off and leave a long tail for sewing.
— Assembly :
Step 1 :
Sew the muzzle to the head over rounds 15 to 19 centred between the eyes, with the nostrils facing upwards. Stuff with fibrefill before sewing the muzzle fully to the head.
Step 2 :
Sew the body to the head. The opening of the body should fall over rounds 26 to 28 of the bottom of the head. Tilt the head slightly to give him a cuter look.
Step 3 :
Sew the arms to between rounds 23 and 24 of the body, with the front corners of the arms 7 stitches apart across the front.
Step 4 :
Sew the legs to the body. The flat edge of each leg should be sewn over rounds 7 to 12 of the body and fall behind the midline of the body. Sew a few extra stitches along the legs to hold them snug against the body and prevent them from splaying out.
Step 5 :
Sew the ears to the head. The flat edge of each ear should be sewn between rounds 7 to 8 of the head. The front corners should be 18 stitches apart.
Step 6 :
Sew the horns to the top of the head. The base of each horn should be sewn over rounds 4 to 6 of the head, on the inside of each ear. The increases made over rounds 5 and 6 of the horns should face inwards.
Step 7 :
Sew the tail to the back of the body between rounds 7 and 8, centred between the legs.
Step 8 :
Wrap the neckband around his neck and sew the short edges of the neckband together. Sew the bow to the front centre of the neckband, or in any position as you wish. Place a few stitches along the "wings" of the bow to hold the bow against the neckband. Optionally sew the bow to the centre of the neckband prior to wrapping.
Step 9 :
Place a jump ring through a stitch just under one of the nostrils.
This little Asher the Ox is designed to be a sweet keepsake you can cherish or gift to someone special. The pattern is compact and satisfying to make, with a cute bow and tiny jump ring detail that add personality. Have fun picking colours and sharing photos of your finished Asher! 🧶💗