🧢 Beautiful ✨ Detailed πŸ’ Adorable

Cute Plushies Ghost Amigurumi Pattern

Cute Plushies Ghost Amigurumi Pattern
4.1β˜… Rating
5-7 Hours Time Needed
1.9K Made This
βœ‚οΈ

Beginner Friendly Level

Perfect for those just starting their crochet journey, with clear instructions and simple techniques

⏱️

Weekend Treat

Takes 5-7 hours, making it an enjoyable project to finish over a couple of days.

🧸

Cute Companion

An adorable friend to cherish, handcrafted with love to bring comfort and joy for years to come.

About This Cute Plushies Ghost Amigurumi Pattern

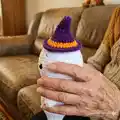
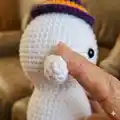
This pattern creates a soft plush ghost amigurumi with a removable witch hat for a whimsical touch. You will crochet separate arms, body and head, join them, and finish with embroidered facial features. The pattern is written in US terminology and uses plush yarn for a super soft texture.

Cute Plushies Ghost Amigurumi Pattern crochet pattern - detailed view of completed project

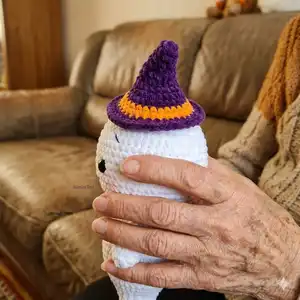
Designed for easy assembly and quick results, the finished toy measures about 25 cm tall without the hat. Perfect as a cozy gift or a festive Halloween decoration.

Why You'll Love This Cute Plushies Ghost Amigurumi Pattern

I absolutely love this pattern because it turns simple stitches into a sweet, expressive character that anyone can make. I enjoy how the plush yarn gives the ghost a cuddly, huggable texture while remaining easy to work with. The hat and embroidered face let me add personality with minimal extra work. I always find it rewarding to finish a complete toy in a weekend and share it with friends and family.

Cute Plushies Ghost Amigurumi Pattern step 1 - construction progress Cute Plushies Ghost Amigurumi Pattern step 2 - assembly progress Cute Plushies Ghost Amigurumi Pattern step 3 - details and accessories Cute Plushies Ghost Amigurumi Pattern step 4 - final assembly and finishing

Switch Things Up

I love personalizing this ghost by changing yarn colorsβ€”try pastel shades for a nursery-friendly version or bold hues for a Halloween set.

You can adjust the finished size by using a thicker plush yarn with a larger hook for a chunkier plush or a thinner yarn for a mini keychain version.

I often swap the safety eyes for embroidered eyes for a fully baby-safe toy; simply embroider two round eyes instead of using safety hardware.

To make the ghost more posable, insert thin craft wire into the arms before sewing them closed to allow gentle posing.

Embellish the hat with a tiny crocheted flower, star, or a contrasting band color to match seasonal themes or your recipient's favorite colors.

Try adding a loop at the top of the hat so the ghost can hang as an ornament or decorationβ€”use a small chain of ch stitches and secure it inside the hat before closing.

Change facial expressions by moving the embroidered mouth up or down and adjusting eyebrow angle for playful or shy looks.

I sometimes make a matching mini ghost by using the same pattern but thinner yarn and a smaller hook; it makes a perfect companion set.

For a weighted plush, add a small pouch of poly pellets at the base before fully stuffing to help the ghost sit upright more steadily.

If you want a softer silhouette, decrease less in the tail area for a rounder bottom; conversely, add extra decreases for a sleeker tail shape.

Common Mistakes & How to Fix Them

βœ— Skipping stitch markers during joining can cause arms to be unevenly placed; mark the position of each arm before sewing and count stitches carefully. βœ— Stuffing too much at once can create lumps and misshapen parts; stuff gradually, shaping as you crochet and adding small amounts at a time. βœ— Pulling the plush yarn too tightly makes the fabric stiff and hides the stitch definition; keep a relaxed, consistent tension for a soft finish. βœ— Not checking safety eye placement can make the face look unbalanced; insert the eyes between the recommended rounds and count stitches to ensure symmetry.

Cute Plushies Ghost Amigurumi Pattern

Make an adorable plush ghost with this easy-to-follow crochet pattern. You will create a soft, cuddly amigurumi using plush yarn and simple single crochet stitches. The pattern includes step-by-step rounds for arms, body, head and a cute witch hat so you can finish a charming 25 cm ghost. Perfect for handmade gifts, nursery decor, or seasonal crafts.

Beginner Friendly 5-7 Hours

Materials Needed for Cute Plushies Ghost Amigurumi Pattern

β€” Main Fabric

  • 01
    Plush yarn (100g/120m) White - Himalaya Dolphin Baby 80301 (sufficient for body, head, arms)
  • 02
    Plush yarn (100g/120m) Purple - Himalaya Dolphin Baby 80340 (hat and trim)
  • 03
    Plush yarn (100g/120m) Orange - Himalaya Dolphin Baby 80316 (hat band accent)
  • 04
    Black embroidery thread - YarnArt Jeans 53 (for eyebrows and mouth)
  • 05
    Safety eyes 14 mm (2 pieces)
  • 06
    Polyester fiber fill stuffing (amount to fill body, head and arms)

β€” Tools Required

  • 01
    Crochet hook size 4.00 mm
  • 02
    Safety eyes 14 mm (2 pieces)
  • 03
    Scissors
  • 04
    Yarn needle for sewing and embroidering
  • 05
    Stitch markers
  • 06
    Polyester stuffing (fiber fill)
  • 07
    Pins for assembly (optional)

Progress Tracker

0% Complete

β€” Arms :

Round 1 :

6 sc into a magic ring (6)

Round 2 :

6 inc (12)

Round 3-4 :

12 sc (2 rounds)

Round 5 :

(4 sc, dec)*2 (10)

Round 6 :

10 sc

Round 7 :

(3 sc, dec)*2 (8)

Round 8 :

8 sc

Round 9 :

Flatten the arm and crochet 4 sc through both sides.

Info :

Fasten off and cut the yarn. Crochet with the white yarn. Stuff only lower half of the arm.

β€” Body :

Round 1 :

6 sc into a magic ring (6)

Round 2 :

6 sc (6)

Round 3 :

(sc, inc)*3 (9)

Round 4 :

(2 sc, inc)*3 (12)

Round 5 :

4 inc, 4 dec (12)

Round 6 :

(sc, inc)*6 (18)

Round 7 :

3 sc, 4 inc, 3 sc, 4 dec (18)

Round 8 :

(2 sc, inc)*6 (24)

Round 9 :

6 sc, 4 inc, 6 sc, 4 dec (24)

Round 10 :

(3 sc, inc)*6 (30)

Round 11 :

9 sc, 4 inc, 9 sc, 4 dec (30)

Round 12 :

(4 sc, inc)*6 (36)

Round 13 :

12 sc, 4 inc, 12 sc, 4 dec (36)

Round 14 :

(11 sc, inc)*3 (39)

Round 15-18 :

39 sc (4 rounds)

Round 19 :

(11 sc, dec)*3 (36)

Round 20 :

36 sc

Round 21 :

(4 sc, dec)*6 (30)

Info :

Now we will join the arms:

Round 22 :

7 sc, 4 sc through the first arm and the body, 10 sc, 4 sc through the second arm and the body, 5 sc (30)

Round 23 :

(3 sc, dec)*6 (24)

Round 24 :

24 sc

Info :

Don't cut the white yarn, we will continue with the head. Crochet with the white yarn. Stuff as you go.

β€” Head :

Round 1 :

(sc, inc)*12 (36)

Round 2 :

(2 sc, inc)*12 (48)

Round 3 :

(7 sc, inc)*6 (54)

Round 4 :

4 sc, inc, (8 sc, inc)*5, 4 sc (60)

Round 5-7 :

60 sc (3 rounds)

Round 8 :

4 sc, dec, (8 sc, dec)*5, 4 sc (54)

Round 9-11 :

54 sc (3 rounds)

Info :

Insert the safety eyes between rounds 6 and 7 with 8 stitches between them (6 stitches visible). The marker is in the back of the head.

Round 12 :

(7 sc, dec)*6 (48)

Round 13 :

3 sc, dec, (6 sc, dec)*5, 3 sc (42)

Round 14 :

(5 sc, dec)*6 (36)

Round 15 :

2 sc, dec, (4 sc, dec)*5, 2 sc (30)

Round 16 :

(3 sc, dec)*6 (24)

Round 17 :

sc, dec, (2 sc, dec)*5, sc (18)

Round 18 :

(sc, dec)*6 (12)

Round 19 :

6 dec (6)

Info :

Make sure that the head is stuffed firmly. Close the opening and hide the yarn inside.

β€” Embroidering :

Info :

With a black thread embroider the eyebrows in round 10. They are 2 st wide and with 8 st between them. Embroider the mouth in round 4. It's 3 st wide. Color the cheeks with pink blush.

β€” Hat :

Round 1 :

6 sc into a magic ring (6)

Round 2-3 :

6 sc (2 rounds)

Round 4 :

(sc, inc)*3 (9)

Round 5-6 :

9 sc (2 rounds)

Round 7 :

6 sc, 3 inc (12)

Round 8 :

6 sc, (sc, inc)*3 (15)

Round 9 :

9 sc, (sc, inc)*3 (18)

Round 10 :

(2 sc, inc)*6 (24)

Info :

Change the yarn to orange color.

Round 11 :

(3 sc, inc)*6 (30)

Round 12 :

30 sc

Info :

Change the yarn to purple color.

Round 13 :

Front loops only: (sc, inc)*15 (45)

Round 14 :

45 sc

Info :

Make a sl st, fasten off and cut the yarn, leaving a tail for sewing. Sew the hat to the top of the head in the back loops of round 13. I sew it tilted to one side.

Assembly Instructions

  • Join the arms to the body at round 22 by crocheting 4 sc through the first arm and the body, and 4 sc through the second arm and the body as described in round 22; sew securely and weave in ends.
  • Insert the safety eyes between rounds 6 and 7 of the head with 8 stitches between them (6 stitches visible), then firmly attach the safety backs from the inside.
  • Sew the hat to the top of the head in the back loops of round 13, tilting it slightly to one side if desired and securing with small whipstitches around the brim.
  • Embroider the eyebrows with black thread on round 10 (each eyebrow 2 stitches wide with 8 stitches between) and embroider the mouth on round 4 (3 stitches wide).
  • Stuff the head and body firmly as you go, close the final opening after round 19 of the head, and hide the yarn tail inside for a neat finish.

Important Notes

  • πŸ’‘Use stitch markers to mark the beginning of each round and the back of the head so placement of eyes and decreases remain accurate.
  • πŸ’‘Stuff gradually and shape while stuffing; overstuffing can distort the plush shape, especially in plush yarn.
  • πŸ’‘Keep consistent tension with plush yarn for even rounds and to achieve the stated finished size of around 25 cm tall without the hat.
  • πŸ’‘Do not cut the white yarn after finishing the body assembly; continue seamlessly to crochet the head as instructed for a joined construction.

This charming plush ghost is a joyful weekend project you can finish and gift right away. It combines soft plush yarn and simple stitches to make a cuddly friend that melts hearts. Sew on the cute hat and embroider a sweet face to bring it to life. πŸ§ΆπŸ‘»

You ask,

we answer.

FAQs

What size will the finished piece be?

The finished toy is approximately 25 cm (10") tall without the hat when using the recommended plush yarn and 4.00 mm hook.

Can I use a different yarn weight?

Yes, you can use different yarn weights but the final size will change; adjust your hook size accordingly and expect differences in texture and firmness.

Do I need experience to make this ghost?

This pattern is rated beginner friendly and assumes familiarity with basic crochet stitches like single crochet, increases and decreases.

How should I attach the hat?

Sew the hat to the top of the head using the back loops of round 13 and secure it with small stitches around the brim; I sew mine tilted to one side for character.