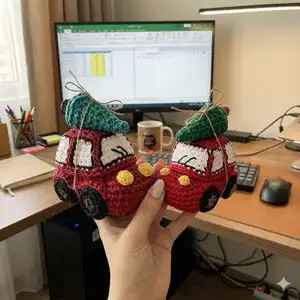
Create a charming Christmas basket car amigurumi that doubles as festive decor or a unique holiday gift. This pattern guides you step-by-step through crocheting the basket body, car details, wheels, headlights and roof with clear photos and helpful notes. Youll enjoy working with cord yarn and a 5mm hook to produce a sturdy, adorable result that holds a tiny Christmas tree on top. Perfect for makers who love detailed, hands-on projects with a holiday twist.
Progress Tracker
0% Complete
— Bottom (rectangle) :
Info :
Take the brown cord. Leave the end of the thread 27 inches (70 cm) long. Crochet the chain of 10 CH with two threads. For that: crochet CH, make the yarn over with the end of the thread, crochet two loops together. Make the yarn over again with the end of the thread, crochet two loops together and continue so on.
Row 1 :
Crochet 8 SC from the 2nd loop of the hook. Place the marker in the down of the 1st SC. 3 SC in 1, 7 SC, 1 SC to the place where the marker is. Crochet this SC with the end of the thread. Pull out the end. Insert the hook under the 1st loop of the row, pull out the end, tighten the end back to the wrong side (=20). With the end of the thread we close this one, and all subsequent rows.
Row 2 :
Insert the hook under the last loop of the previous row. Pull the loop. Crochet CH, {1 SC, 2 CH, 1 SC} in the 2nd loop, 7 SC, {1 SC, 2 CH, 1 SC} in the 10th loop, 1 SC, {1 SC, 2 CH, 1 SC} in the 12th loop, 7 SC, {1 SC, 2 CH, 1 SC} in the 20th. Crochet the last SC and close this row with the end of the thread (=32).
Row 3 :
Insert the hook under the last loop of the previous row. Pull the loop. Crochet CH, 1 SC, {1 SC, 2 CH, 1 SC} under 2 CH, 9 SC, {1 SC, 2 CH, 1 SC} under 2CH, 3 SC, {1 SC, 2CH, 1 SC} under 2 CH, 9 SC, {1 SC, 2CH, 1 SC} under 2 CH, 1 SC. Crochet the last SC and close this row with the end of the thread (=40).
Row 4 :
Insert the hook under the last loop of the previous row. Pull the loop. Crochet CH, 2 SC, {1 SC, 2 CH, 1 SC} under 2 CH, 11 SC, {1 SC, 2 CH, 1 SC} under 2 CH, 5 SC, {1 SC, 2 CH, 1 SC} under 2 CH, 11 SC, {1 SC, 2 CH, 1 SC} under 2 CH, 2 SC. Crochet the last SC and close this row with the end of the thread (=48).
Info :
Tie the knot on the wrong side. Hide both ends. Process with fire. Shape the bottom with your hands.
— Car body :
Info :
Take the red cord. Leave the end of the thread 27 inches (70 cm) long.
Row 1 :
Insert the hook in the middle loop on the back loop and jumper only. Pull the loop. Crochet CH, 47 SC on the back loop and jumper only. The CH of the previous row crochet on the back loop only. Crochet the last SC and close this row with the end of the thread (=48).
Row 2 :
Insert the hook under the last loop of the previous row. Pull the loop. Crochet CH, 47 SC. Crochet the last SC and close this row with the end of the thread (=48).
Rows 3-5 :
Insert the hook under the last loop of the previous row. Pull the loop. Crochet CH, 47 SC. Crochet the last SC and close this row with the end of the thread (=48).
Row 6 :
Place markers in 6th, 18th, 33rd and 45th loops. Insert the hook under the last loop of the previous row. Pull the loop. Crochet CH, 3 SC, 1 Dec, rearrange the 1st marker, 11 SC. Next, crochet (2 DC together (cluster))*8 from the 2nd to the 3rd marker. Rearrange the 3rd and the 4th markers in the 1st and the 8th clusters, respectively. Next, 11 SC, 1 Dec, rearrange the 4th marker, 2 SC. Crochet the last SC and close this row with the end of the thread (=38).
Row 7 :
Insert the hook under the last loop of the previous row. Pull the loop. Crochet CH, 2 SC, 1 Dec, rearrange the 1st marker, 11 SC. Next, crochet (2 DC together (cluster))*4 from the 2nd to the 3rd marker. Rearrange the 3rd and the 4th markers in the 1st and the 4th clusters, respectively. Next, 11 SC, 1 Dec, rearrange the 4th marker, 1 SC. Crochet the last SC and close this row with the end of the thread (=32).
Row 8 :
Insert the hook under the last loop of the previous row. Pull the loop. Crochet CH, 31 SC, remove markers. Crochet the last SC and close this row with the end of the thread (=32).
Rows 9-10 :
Insert the hook under the last loop of the previous row. Pull the loop. Crochet CH, 31 SC. Crochet the last SC and close this row with the end of the thread (=32).
Info :
Crochet the base trim. Pull the loop, crochet SlSt in each loop of the previous row. Cut the thread, pull out the end. Insert the hook under the 1st SlSt of the row, pull out the end, tighten the end back to the wrong side. Cut the thread. Hide both ends. Process with fire. Shape the car body with your hands.
— Wheel (*4) :
Info :
Take the brown cord. Crochet 2 CH.
Row 1 :
Crochet 7 SC in the 2nd loop from the hook. Cut the thread, pull out the end. Close this row with the end of the thread (=8). Pull the end through all the stitches of the row from the wrong side. Tighten the hole. Tie the knot. Cut both ends. Process with fire.
Row 2 :
Take the black cord. Insert the hook under any loop of the previous row. Pull the loop. Crochet CH, 7 Inc, 1 SC in the 1st loop of previous row. Crochet the last SC and close this row with the end of the thread (=16).
Info :
Crochet the base trim. Pull the loop, crochet SlSt in each loop of the previous row. Cut the thread, pull out the end. Insert the hook under the 1st SlSt of the row, pull out the end, tighten the end back to the wrong side. Cut the thread. Hide both ends. Process with fire. Crochet three more wheels.
— Headlight (*2) :
Info :
Take the yellow cord. I used the raffia Fibranatura with three threads added together. Crochet 2 CH.
Row 1 :
Crochet 7 SC in the 2nd loop from the hook. Next, crochet a spiral.
Row 2 :
7 SC, cut the thread, pull out the end. Close this row with the end of the thread. Tie the knot. Cut and hide both ends. Shape the headlight with your hands. Crochet one more headlight.
— Assembly (glue parts) :
Info :
Glue all parts to the car. Heat up the glue gun. Glue all wheels at the bottom level. The front wheel after 2 SC, the rear wheel after 1 SC. Glue the 1st headlight between 2nd and 3rd clusters of the 6th row of the car body. Glue the 2nd headlight between 6th and 7th clusters of the 6th row of the car body.
— Fender (*2) :
Info :
Take the red cord. Insert the hook near the rear wheel after 3 rows from the bottom.
Instruction :
Pull the loop and crochet SlSt around wheels. Cut the thread, leave the end of the thread 67 inches (1.7 m). Pull out the thread on the front side. Then, tighten the thread to the wrong side to fix the last loop. Pull out the thread on the front side again. Insert the hook under the last SlSt. Crochet SC in each SlSt. Pull out the end and tighten on the wrong side. Cut and hide both ends. Process with fire. Similarly crochet the 2nd fender on the other side of car body. Shape the basket with your hands.
— Roof :
Info :
Take the red cord. Crochet 8 CH.
Row 1 :
Crochet 7 SC from the 2nd loop of the hook, CH. Insert the hook through the last SC, pull out the end of the thread. Crochet in the end of the thread in the next row. Next, turn the canvas after each row.
Rows 2-7 :
7 SC, CH, turn after each row (repeat until row 7).
Base trim :
1 SC in the last SC of the row, 5 SC in the each row, 2 SC in 1, 5 SC, 2 SC in 1, 4 SC in the each row. Cut the thread, pull out the end. Close this row with the end of the thread (=28). Cut and hide the end. Process with fire.
— Glass :
Info :
Take the white cord. Leave the end of the thread 16 inches (40 cm) long.
Row 1 :
Insert the hook on the back loop and jumper only in the middle of the back side of the roof. Pull the loop. Crochet CH, 27 SC on the back loop and jumper only. Crochet the last SC and close this row with the end of the thread (=28).
Row 2 :
Place markers in the 4th, 11th, 17th and 25th loops. Crochet CH, 2 SC, 1 Inc, rearrange the 1st marker in the 1st loop of the increase, 7 SC, 1 Inc, rearrange the 2nd marker in the 2nd loop of the increase, 5 SC, 1 Inc, rearrange the 3rd marker in the 1st loop of the increase, 7 SC, 1 Inc, rearrange the 4th marker in the 2nd loop of the increase, 2 SC. Crochet the last SC and close this row with the end of the thread (=32).
Row 3 :
Pull the loop. Crochet CH, 11 SC, rearrange the 1st marker in the 3rd SC, 1 Inc, rearrange the 2nd marker in the 2nd loop of the increase, 5 SC, 1 Inc, rearrange the 3rd marker in the 1st loop of the increase, 11 SC, rearrange the 4th marker in the 31st SC. Crochet the last SC and close this row with the end of the thread (=34).
Row 4 :
Pull the loop. Crochet CH, 2 SC, 1 Inc, 10 SC, 1 Inc, 5 SC, 1 Inc, 10 SC, 1 Inc, 2 SC. Crochet the last SC and close this row with the end of the thread (=38).
Row 5 :
Pull the loop. Crochet CH, 37 SC. Cut the thread. Close this row with the end of the thread (=38). Hide both ends. Process with fire.
Row 6 :
Take the red cord. Pull the loop. Crochet CH, 37 SC. Cut the thread. Close this row with the end of the thread (=38). Hide both ends. Process with fire.
— Tuning the glass (strips) :
Step 1 :
Place two pairs of the markers on the back side. Top between markers 5 stitches, down between markers 7 stitches. Insert the hook over the marker like the foto. Pull the loop and crochet SlSt in each row towards the 2nd marker. Cut the thread. Thread the end through legs of the SC, where the marker is. Tighten the end on the wrong side. Similarly crochet the 2nd strip.
Step 2 :
Place two pairs of the markers on the front side. Top between markers 5 stitches, down between markers 9 stitches. Similarly crochet two more strips. Similarly crochet two more strip. Shape the glass with your hands.
— Final assembly and finishing :
Info :
Glue all parts as shown in photos: wheels at bottom level, headlights on front clusters, fenders around wheels and trim glass and roof into position. Hide all ends, process with fire, shape the basket and car body with hands. Attach jute piece as rope for small tree if desired and add small crocheted tree on the roof.
This Christmas basket car is a delightful handmade decoration that brings holiday cheer to any shelf or table. It combines simple cord crochet techniques with thoughtful shaping to create a sturdy, charming piece you can be proud of. Make one as a gift or create a whole fleet for festive displays and enjoy the cozy making process. 🧶🎄