🧢 Beautiful ✨ Detailed πŸ’ Adorable

Cactus frog with removeable pot Amigurumi Pattern

Cactus frog with removeable pot Amigurumi Pattern
4.8β˜… Rating
2-3 Hours Time Needed
2.7K Made This
βœ‚οΈ

Intermediate Level

Ideal for those with basic crochet experience, featuring slightly more advanced stitches and techniques to expand your skills.

⏱️

Bite-Sized Project

Finishes in 2-4 hoursβ€”perfect for an afternoon of creative relaxation.

🧸

Cute Companion

An adorable friend to cherish, handcrafted with love to bring comfort and joy for years to come.

About This Cactus frog with removeable pot Amigurumi Pattern

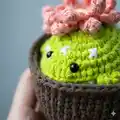
This pattern creates a tiny cactus-inspired frog with a removable flower pot and a pretty layered flower on its head. Youll crochet the frog body, front and back legs, tiny toes, a decorative flower, and a separate pot that the frog fits into. The pattern uses common amigurumi techniques and works in continuous spiral rounds.

Cactus frog with removeable pot Amigurumi Pattern crochet pattern - detailed view of completed project

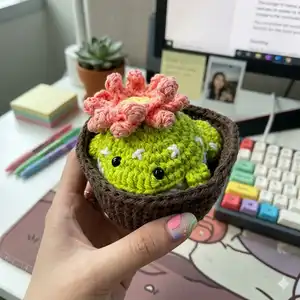
Perfect for gifting or decorating a desk, the frog measures approximately 2 1/2 inches tall and wide when made as shown. The project combines shaping, small parts, and a fun petal stitch for the flower.

Why You'll Love This Cactus frog with removeable pot Amigurumi Pattern

I absolutely love this pattern because it combines a playful animal shape with a clever removable pot concept that adds personality and function. I enjoy the tiny details like the embroidered white "X" cactus marks and the layered petals on the flower. It is compact enough to finish in an afternoon but still gives satisfying shaping and finishing practice. The separate pot makes display and gifting easy, and the finished frog always draws smiles wherever it goes.

Cactus frog with removeable pot Amigurumi Pattern step 1 - construction progress Cactus frog with removeable pot Amigurumi Pattern step 2 - assembly progress Cactus frog with removeable pot Amigurumi Pattern step 3 - details and accessories Cactus frog with removeable pot Amigurumi Pattern step 4 - final assembly and finishing

Switch Things Up

I love how easy it is to customize this design by changing colors; try pastel greens and creams for a soft nursery look.

I often switch yarn weight and hook size to make a chunky version for a larger desk buddy or a finer yarn for a tiny keychain-sized frog.

I like to replace safety eyes with French knots or embroidered eyes for a fully washable toy for little ones.

Try different flower colors and sizesβ€”use two thin yarn strands held together for a thicker, fluffier bloom.

Embroider different patterns instead of the white Xs: tiny dots, short dashes, or little hearts all change the character.

Make the pot taller by adding extra rounds to the pot body, or reduce rounds to make a shallow bowl effect.

I sometimes add a loop at the back of the pot so the whole set can hang as an ornament or bag charm.

For posability, consider inserting a short piece of floral wire into the legs before closing and shaping them gently.

Mix textures by using a boucle or textured cotton for the pot to create contrast with the smooth frog body.

If you want a set, make several frogs in coordinating colors and arrange them in a small tray of pots for a cute display.

Common Mistakes & How to Fix Them

βœ— Skipping the safety eye placement step can make the face look unbalanced; insert the safety eyes between round 5 and 6, spaced 4 stitches apart to keep the nose centered. βœ— Forgetting to stuff as you go leads to hard-to-fill gaps and uneven shape; stuff gradually and firmly before closing each section for a smooth finish. βœ— Not counting stitches during increases and decreases will cause shaping issues; count after every round and mark the start with a stitch marker to stay on track. βœ— Working too tightly when making tiny pieces like toes will make joining harder; keep moderate, consistent tension and leave long tails for sewing. βœ— Neglecting to secure and hide yarn ends can cause the pot or frog to come apart; leave a long end and sew around the pot to secure and hide the end before cutting. βœ— Closing pieces without checking orientation can misplace limbs or the flower; pin parts in position and check placement visually before sewing permanently.

Cactus frog with removeable pot Amigurumi Pattern

Make a charming cactus frog that sits inside a removable crochet pot β€” perfect as a small handmade gift or desk companion. This pattern guides you through the frog body, legs, tiny toes, a textured flower, and a snug pot so the frog can pop in and out. Youll work in continuous spiral rounds and add sweet embroidered cactus "spines" for character. Enjoy a compact, playful project that brightens any shelf or gift box.

Intermediate 2-3 Hours

Materials Needed for Cactus frog with removeable pot Amigurumi Pattern

β€” Main Fabric

  • 01
    Any type of yarn (I use Sugar and Cream cotton yarn for this cutie)
  • 02
    Red (for trim or accents as desired)
  • 03
    Green - hot green (main frog color)
  • 04
    Light red - tea rose (flower petals)
  • 05
    Yellow (flower center)
  • 06
    White (belly and embroidered cactus marks)
  • 07
    Brown - warm brown (flower pot)

β€” Tools Required

  • 01
    Crochet hook size 3.5mm
  • 02
    Poly-fil fiber for stuffing
  • 03
    Yarn needle
  • 04
    Safety eyes 6mm (Not for children under 3)
  • 05
    Stitch marker or a piece of scrap yarn to mark rounds

Progress Tracker

0% Complete

β€” Head and body :

Round 1 :

8sc in a MR (8)

Round 2 :

8inc (16)

Round 3 :

(sc, inc) x8 (24)

Round 4 :

(2sc, inc) x8 (32)

Round 5 :

(3sc, inc) x8 (40)

Round 6 :

16sc, inc, 5hdc-inc, inc, 17x (47)

Info :

Change to white yarn.

Round 7 :

BLO: 21sc, 3dec, 20sc (44)

Round 8 :

(3sc, inc) x2, 12sc, 2dec, 12sc, (3sc, inc) x2 (46)

Round 9-10 :

46sc (46)

Round 11 :

(3sc, dec) x2, 10sc, dec, 2sc, dec, 10sc, (3sc, dec) x2 (40)

Round 12 :

(2sc, dec) x10 (30)

Round 13 :

30sc (30)

Info :

Now it's time to insert the safety eyes between round 5 and 6, 4 stitches apart. Make sure the nose is in the middle of the eyes.

Info :

Stuff the piece.

Round 14 :

(sc, dec) x10 (20)

Round 15 :

10dec (10)

Round 16 :

3 dec. F.O You don't have to finish this round.

Info :

Close the body by using needle and cut the yarn. Hide the end inside the body.

β€” Back legs :

Round 1 :

6sc in a MR (6)

Round 2 :

6inc (12)

Round 3 :

(sc, inc) x6 (18)

Round 4 :

18sc (18) F.O

Info :

Leave long end to connect with the body.

β€” Toes :

Round 1 :

8sc in a MR (8)

Round 2 :

do not break the working yarn, continue to work the toes with it: chain 3, turn work, start from the second chain from the hook, hdc, 1 slst in the chain, 1 slst on the MR)x3, 4sc, slst on the last stitch. (8) F.O

Info :

Leave long end to connect with the back legs.

β€” Front legs :

Round 1 :

5sc in a MR (5)

Round 2 :

inc, 2sc, inc, sc (7)

Round 3-10 :

7sc (7) F.O

Info :

Do not close the piece.

Info :

Do not stuff the piece.

Info :

Leave long end to connect with the body.

β€” Flower :

Round 1 :

BLO: 6sc in a MR (6)

Round 2 :

BLO: 6inc (12)

Round 3 :

BLO: (sc, inc) x6 (18)

Info :

Change to light red yarn.

Round 4 :

BLO: slst, (chain 5, start from the 2nd chain from the hook, 4hdc along the chain, skip 1 stitch, slst on the next stitch of the base) x 8.

Info :

After you finished all the petals in the back loop (8 petals ), change to the front loop and do the same step (8 petals ) . F.O the last stitch.

Info :

At the end you should have 16 petals.

Info :

Leave long end to sew into the frog's body.

β€” Flower Pot :

Round 1 :

8sc in a MR (8)

Round 2 :

8inc (16)

Round 3 :

(sc, inc) x8 (24)

Round 4 :

(2sc, inc) x8 (32)

Round 5 :

(3sc, inc) x8 (40)

Round 6 :

(4sc, inc) x8 (48)

Round 7 :

(5sc, inc) x8 (56)

Round 8 :

BLO: 56sc (56)

Round 9-14 :

56sc (56)

Round 15 :

FLO: 56hdc (56), slst to the first stitch.

Info :

F.O

Info :

Leave long end and sew around the pot to secure and hide the end.

Info :

Cut off the yarn.

β€” Assembly :

Back legs and toes :

Start sewing the back legs on two side of the thighs and make sure to stuff it before closing it all the way. Sew the toes to the bottom of the legs. Make sure 3 toes pointed out.

Front legs :

Sew the front leg two stitches away from the back leg, 3 stitches long. Then sew the tip of the leg into the belly. Repeat the same steps on the other side.

Embroider :

Using white yarn, embroider "X" around the frog body.

Sew the flower :

Sew the flower to one side of the frog. You can also sew it on the top of the frog. It's completely up to you.

Final :

Now you have a cactus frog. Please take care of it by handwashing when dirty. Hope you enjoy making this pattern.

Assembly Instructions

  • Attach the back legs to each side of the thighs, stuffing the leg before closing, and sew securely so the shape is even on both sides.
  • Sew the toes to the bottom of each back leg so three toes point outward, stitching through the base to secure them tightly.
  • Place the front legs two stitches away from the back legs, sew each front leg three stitches long, and anchor the tip of the leg into the belly for a natural pose.
  • Embroider small white "X" marks around the frog body using white yarn to mimic cactus spines, distributing them evenly across the back and head.
  • Sew the layered flower onto one side of the frog (or on top), using the long tail left from the flower to anchor it firmly into the body.
  • Place the finished frog into the pot and, if needed, sew a few small tacking stitches from the frog to the pot interior to keep it seated when displayed.

Important Notes

  • πŸ’‘Work in continuous spiral rounds as noted; use a stitch marker or scrap yarn to mark the beginning of each round.
  • πŸ’‘Insert safety eyes between rounds 5 and 6 and space them 4 stitches apart to keep the face balanced.
  • πŸ’‘Stuff pieces gradually and firmly but avoid overstuffing which can distort the shape of the frog and pot.
  • πŸ’‘Leave long yarn ends on small parts to make sewing and secure attachment to the body easier.
  • πŸ’‘Handwash the finished toy when dirty to preserve the shape and colors of the cotton yarn.

This little cactus frog is a joyful, pocket-sized project that doubles as a tiny plant-pal and handmade gift. 🐸🌡 Its removable pot and layered flower make it playful to display and fun to personalize. 🧢 Have fun stitching, customizing, and sharing this happy amigurumi with someone special! ✨

You ask,

we answer.

FAQs

What size will the finished piece be?

The finished amigurumi measures about 2 1/2 inches in height and 2 1/2 inches wide when made with the recommended cotton yarn and 3.5mm hook.

Can I use different yarn weights for this pattern?

Yes, you can use different yarn weights, but the final size will change; choose an appropriate hook for your yarn and expect the frog and pot to be larger or smaller.

Do I need prior crochet experience for this pattern?

This pattern is rated intermediate, so basic knowledge of single crochet, increases, decreases, BLO/FLO and reading rounds is recommended for best results.

How long does this project typically take to complete?

Most crocheters complete this compact project in 2-3 hours, depending on experience and how many pieces you assemble at once.

Where should I place the safety eyes?

Insert the safety eyes between rounds 5 and 6, spacing them 4 stitches apart; ensure the nose sits centered between them.