🧢 Beautiful ✨ Detailed πŸ’ Adorable

Plush snuggler BUNNY Amigurumi Pattern

Plush snuggler BUNNY Amigurumi Pattern
4.1β˜… Rating
5-7 Hours Time Needed
3.1K Made This
βœ‚οΈ

Intermediate Level

Ideal for those with basic crochet experience, featuring slightly more advanced stitches and techniques to expand your skills.

⏱️

Weekend Treat

Takes 5-7 hours, making it an enjoyable project to finish over a couple of days.

🧸

Cute Companion

An adorable friend to cherish, handcrafted with love to bring comfort and joy for years to come.

About This Plush snuggler BUNNY Amigurumi Pattern

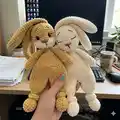
This pattern creates a plush snuggler bunny approximately 41 cm (16") tall using plush chenille-style yarn. The design features separate pieces for legs, body, arms, head, ears and a small pompom tail for a classic bunny look. It uses simple single crochet shaping worked in a spiral and includes directions for embroidery or safety eyes. Photos and step notes help guide assembly and facial detailing for a finished, expressive toy.

Plush snuggler BUNNY Amigurumi Pattern crochet pattern - detailed view of completed project

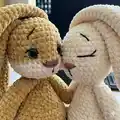
The pattern works with two-color or single-color versions and lists yarn analogues for easy substitution. Detailed finishing steps explain positioning of ears, arms and facial embroidery to achieve the pictured look. Clear round-by-round instructions make it easy to follow while you stitch and assemble.

Why You'll Love This Plush snuggler BUNNY Amigurumi Pattern

I absolutely love this pattern because it transforms plush chenille yarn into an irresistibly soft toy that is perfect for cuddling. I enjoy how the simple shaping creates a charming silhouette without complicated techniques, so the focus stays on texture and expression. The embroidery steps let me personalize each bunny's face, making every finished piece unique and full of personality. Seeing the finished bunny in a child's arms or on a nursery shelf always makes me smile and confirms this pattern was worth creating.

Plush snuggler BUNNY Amigurumi Pattern step 1 - construction progress Plush snuggler BUNNY Amigurumi Pattern step 2 - assembly progress Plush snuggler BUNNY Amigurumi Pattern step 3 - details and accessories Plush snuggler BUNNY Amigurumi Pattern step 4 - final assembly and finishing

Switch Things Up

I love experimenting with color placement on this pattern; try a contrasting color for just the muzzle or ears to create a unique look.

I sometimes make a mini version by switching to a DK weight yarn and a smaller hook to create keychain-sized bunnies.

I often add felt accents or tiny crocheted bows to dress the bunny up, which makes lovely personalized gifts.

For a more rustic feel I use natural-colored yarns and embroider a simple smile rather than using safety eyes.

I like to change the ear length to make different personalities β€” shorter ears make a perky bunny, longer ears make it more snuggly.

I recommend trying safety eyes of different colors or using embroidered eyes with glossy thread for a softer, child-safe finish.

I sometimes stuff a little lavender sachet inside for a scented sleepy buddy β€” just add the sachet near the final stuffing stage.

I enjoy stitching small details like paw pads with a contrasting yarn to add extra charm and definition to the limbs.

I also experiment with adding a removable scarf or tiny outfit to turn the bunny into a collectible character series.

I always test small changes on a single piece first so I can refine placement of facial embroidery and attachments before finishing the whole toy.

Common Mistakes & How to Fix Them

βœ— Skipping stitch counting during increases will distort the leg or body shaping; count stitches at the end of every round to keep the correct stitch total. βœ— Not stuffing gradually makes lumps or misshapen sections; add fiberfill in small amounts while shaping and check the silhouette frequently. βœ— Forgetting to change yarn at the correct round on the head will shift the facial color line; switch colors exactly at the round indicated and weave in ends neatly. βœ— Using unsafe or too-large safety eyes for a toy intended for small children can be hazardous; choose embroidery or securely attach safety eyes rated for the recipient's age. βœ— Pulling your stitches too tight with plush yarn can flatten the texture and make sewing seams difficult; use even, moderate tension for a soft, even fabric.

Plush snuggler BUNNY Amigurumi Pattern

Make a soft, cuddly plush snuggler bunny designed for hugging and gentle play. This amigurumi pattern uses plush chenille-style yarn to create an ultra-soft texture and simple shaping. You'll enjoy step-by-step rounds for legs, body, arms, head, ears and tail, plus clear finishing and embroidery instructions to bring the face to life. Perfect for gifting or keeping as a cozy companion.

Intermediate 5-7 Hours

Materials Needed for Plush snuggler BUNNY Amigurumi Pattern

β€” Main Fabric

  • 01
    Wolans Yarns BUNNY BABY plush yarn 100g / 120m (131 yds) - main color (shade 100-18) - 2 skeins recommended if using two colors (2 x 100g)
  • 02
    Wolans Yarns BUNNY BABY plush yarn 100g / 120m (131 yds) - secondary head color (shade 100-02) - small amount for head contrast (100g skein recommended)
  • 03
    If making the toy with one color yarn: 2 skeins of the same Wolans BUNNY BABY yarn (2 x 100g)
  • 04
    Yarn analogue: Yarn Art DOLCE 100g / 120m (use same weight as listed)
  • 05
    Yarn analogue: Premier Yarns PARFAIT CHUNKY 100g / 120m
  • 06
    Yarn analogue: Katia BAMBI 100g / 120m
  • 07
    Yarn analogue: King Cole YUMMY 100g / 120m
  • 08
    Yarn analogue: Universal Yarn BELLA CHENILLE 100g / 120m
  • 09
    Yarn analogue: Cygnet JELLY CHUNKY CHENILLE 100g / 120m

β€” Tools Required

  • 01
    Crochet hook 4 mm (G6)
  • 02
    Toy filling (polyester stuffing) or scraps of fabric or yarn for stuffing
  • 03
    Stitch markers
  • 04
    Tapestry/yarn needle for sewing and weaving ends
  • 05
    Scissors
  • 06
    Thread for sewing details
  • 07
    Rose (pink) thread or yarn for embroidery nose
  • 08
    Dark thread for embroidery eyes/eyelashes/brows (if not using safety eyes)
  • 09
    16 mm toy safety eyes (2) OR dark thread for embroidering eyes

Progress Tracker

0% Complete

β€” Legs :

Info :

Use the main color yarn. Magic ring.

Round 1 :

6sc inside MR (6)

Round 2 :

6inc (12)

Round 3 :

(1sc, inc) x6 (18)

Round 4-6 :

18sc (18)

Round 7 :

(4sc, dec) x3 (15)

Round 8 :

(3sc, dec) x3 (12)

Info :

Add some filler.

Round 9 :

(2sc, dec) x3 (9)

Round 10 :

(1sc, dec) x3 (6)

Round 11-25 :

6sc (6)

Round 26 :

(1sc, inc) x3 (9)

Round 27 :

(2sc, inc) x3 (12)

Round 28 :

(3sc, inc) x3 (15)

Round 29 :

(4sc, inc) x3 (18)

Round 30 :

(5sc, inc) x3 (21)

Round 31 :

(6sc, inc) x3 (24)

Round 32-36 :

24sc (24)

Info :

Cut the yarn. Make the second leg in the same way, but don't cut the thread at the end.

β€” Body :

Assembling round 1 :

join the 2nd leg with 1st leg (insert hook and make sc in the point where stitch 24 of the last round ended), 23sc of 1st leg, join with the leg 2 (insert hook and make sc in the point where stitch 24 of last round ended), 23sc of 2nd leg (48)

Rounds 2-5 :

48sc (48)

Round 6 :

(6sc, dec) x6 (42)

Rounds 7-8 :

42sc (42)

Round 9 :

(5sc, dec) x6 (36)

Rounds 10-11 :

36sc (36)

Round 12 :

(4sc, dec) x6 (30)

Rounds 13-14 :

30sc (30)

Round 15 :

(3sc, dec) x6 (24)

Rounds 16-17 :

24sc (24)

Round 18 :

(2sc, dec) x6 (18)

Rounds 19-20 :

18sc (18)

Round 21 :

(1sc, dec) x6 (12), sl st.

Info :

Cut the yarn. Make knots on the legs.

β€” Arms :

Info :

Use the main color yarn. Magic ring.

Round 1 :

6sc inside MR (6)

Round 2 :

(1sc, inc) x3 (9)

Round 3 :

(2sc, inc) x3 (12)

Rounds 4-6 :

12sc (12)

Round 7 :

10sc, dec (11)

Round 8 :

9sc, dec (10)

Rounds 9-16 :

10sc (10)

Info :

Fold and crochet the edges together 5sc. Cut the yarn.

Info :

Make the second arm in the same way in rounds 1-6. Round 7: dec, 10sc (11). Round 8: dec, 9sc (10)

β€” Head :

Info :

Start with secondary color yarn. Magic ring.

Round 1 :

6sc inside MR (6)

Round 2 :

6inc (12)

Round 3 :

(1sc, inc) x6 (18)

Round 4 :

(2sc, inc) x6 (24)

Round 5 :

(3sc, inc) x6 (30)

Round 6 :

(4sc, inc) x6 (36)

Round 7-8 :

36sc (36)

Info :

Change yarn to the main color.

Rounds 9-15 :

36sc (36)

Info :

If you use the safety eyes, attach them between rounds 10 and 11 (leave 8 stitches between the eyes).

Round 16 :

(4sc, dec) x6 (30)

Round 17 :

(3sc, dec) x6 (24)

Info :

Fill the head with filler.

Round 18 :

(2sc, dec) x6 (18)

Round 19 :

(1sc, dec) x6 (12)

Info :

Add more filler to the head.

Round 20 :

6dec (6)

Info :

Cut the yarn, pull the hole. Hide the end of the thread inside the head.

β€” Ears :

Info :

Use the main color yarn. Magic ring.

Round 1 :

6sc inside MR (6)

Round 2 :

(1sc, inc) x3 (9)

Round 3 :

(2sc, inc) x3 (12)

Round 4 :

(3sc, inc) x3 (15)

Round 5 :

(4sc, inc) x3 (18)

Round 6 :

(5sc, inc) x3 (21)

Round 7 :

(6sc, inc) x3 (24)

Rounds 8-14 :

24sc (24)

Round 15 :

(6sc, dec) x3 (21)

Rounds 16-17 :

21sc (21)

Round 18 :

(5sc, dec) x3 (18)

Rounds 19-20 :

18sc (18)

Round 21 :

(4sc, dec) x3 (15)

Rounds 22-23 :

15sc (15)

Round 24 :

(3sc, dec) x3 (12)

Rounds 25-26 :

12sc (12)

Info :

Fold and crochet the edges together 6sc. Cut the yarn.

β€” Tail :

Info :

Use the main color yarn. Magic ring.

Round 1 :

6sc inside MR (6)

Round 2 :

6inc (12)

Round 3 :

12sc (12)

Round 4 :

(2sc, dec) x3 (9)

Info :

Cut the yarn.

β€” Finishing the toy :

Step 1 :

Sew the head to the body. Sew the arms to the body, leave 4 stitches between the arms. Sew the tail to the back.

Step 2 :

Sew the ears to the head between rounds 17 and 18.

Step 3 :

Embroider the nose with pink thread between rounds 8 and 9. I got a nose 5 stitches wide. You can use any yarn you have (plush or cotton or acrylic). Hide the end of the thread inside the head.

Step 4 :

Embroider the nose, the eyelashes and the brows with dark thread.

Step 5 :

Tighten the muzzle with the thread of the main color. 1 -> 2 -> 3 -> 4 -> 5 -> 6 -> 7 -> 8

Info :

If you don't use the safety eyes, embroider the eyes, the nose and the brows with dark thread as shown in the photos.

Assembly Instructions

  • Join the two legs by inserting your hook into the indicated point of the second leg then continue 23sc across the first leg, join into the second leg with 23sc to total 48 stitches for the assembling round.
  • Sew the head to the top opening of the body securely using the long tail and a yarn needle, making sure the color change aligns with the face line as shown in photos.
  • Sew the arms to each side of the body leaving 4 stitches between the arms for a balanced placement; angle the arms slightly forward if desired.
  • Sew the ears to the head between rounds 17 and 18, matching both sides so the facial expression is symmetrical.
  • Attach the tail to the center back of the body near the top of the leg join, sewing it firmly so it does not come loose during play.
  • Embroider the nose between rounds 8 and 9 using pink thread, then embroider the eyelashes and brows with dark thread; hide all thread ends inside the head for a neat finish.

Important Notes

  • πŸ’‘Work all pieces in continuous spiral rounds (SPIRAL WAY) without joining rounds with a slip stitch unless instructed otherwise.
  • πŸ’‘Use stitch markers to mark the start of rounds, especially important for increases/decreases and when placing safety eyes for correct spacing.
  • πŸ’‘Stuff gradually and evenlyβ€”add small amounts of filler while shaping to avoid lumps and to keep the plush texture soft.
  • πŸ’‘Fold and crochet ear and arm edges together as instructed for neat seams before cutting yarn, and weave in ends securely to prevent unraveling.

This plush snuggler bunny is a cozy handmade companion designed to be loved and cuddled.🧢 The soft chenille yarn creates a gentle texture perfect for nurseries and gift-giving.πŸ’› Enjoy stitching, embroidering and personalizing your bunny β€” every detail adds charm and warmth.✨

You ask,

we answer.

FAQs

What size will the finished piece be?

The finished plush snuggler bunny measures approximately 41 cm / 16 inches tall using the recommended plush yarn and a 4 mm hook.

Can I use a different yarn weight for this pattern?

Yes, you can substitute other plush chenille or chunky yarns listed in the yarn analogues, but the finished size will change; adjust hook size accordingly.

Do I need prior crochet experience for this pattern?

This pattern is rated intermediate; you should know single crochet, increases and decreases, and working in the round (spiral). Basic assembly and embroidery skills are also helpful.

How long does this project typically take to complete?

Most crocheters complete this project in about 5-7 hours, depending on experience, yarn choices, and how much time you spend on embroidery and finishing.

Where should I place the safety eyes?

If using safety eyes, attach them between rounds 10 and 11 of the head, leaving 8 stitches between the eyes as instructed in the pattern.