🧢 Beautiful ✨ Detailed πŸ’ Adorable

Basic Crochet Basket Pattern

Basic Crochet Basket Pattern
4.5β˜… Rating
5-7 Hours Time Needed
2.2K Made This
βœ‚οΈ

Beginner Friendly Level

Perfect for those just starting their crochet journey, with clear instructions and simple techniques

⏱️

Weekend Treat

Takes 5-7 hours, making it an enjoyable project to finish over a couple of days.

🏑

Cozy Accent

A warm touch for your space that transforms ordinary corners into inviting nooks filled with handmade charm.

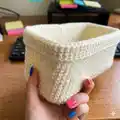
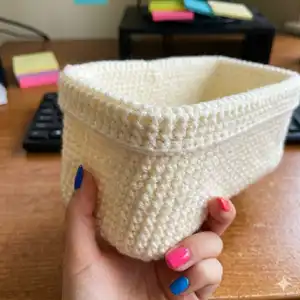
About This Basic Crochet Basket Pattern

This pattern creates a basic rectangular crochet basket using Paintbox Simply Aran yarn and a 10mm hook. The design uses half treble rows for the base and double crochet rounds for the sides to build sturdy structure. It is easy to adjust size by changing the number of base rows or side rounds. Perfect for storage, gifts, or home organization with a handmade touch.

Basic Crochet Basket Pattern crochet pattern - detailed view of completed project

Clear step-by-step written instructions guide you from the base to the finished folded basket. No advanced stitches requiredβ€”great for confident beginners looking for a practical project.

Why You'll Love This Basic Crochet Basket Pattern

I absolutely love this pattern because it turns simple stitches into a functional, beautiful basket that you can use every day. I enjoy how quickly the shape appears when you switch from the flat base to worked-in-round sides. The choice of aran yarn and a large hook gives lovely structure without complicated techniques. I also love that it is easy to customize size and color to match any room or gift recipient.

Basic Crochet Basket Pattern step 1 - construction progress Basic Crochet Basket Pattern step 2 - assembly progress Basic Crochet Basket Pattern step 3 - details and accessories Basic Crochet Basket Pattern step 4 - final assembly and finishing

Switch Things Up

I love customizing this basket by changing colors and stitch textures to create a unique look for any room.

You can make a color-blocked version by switching yarn colors at the join between base and sides.

If you want a smaller basket, reduce the initial chain and corresponding side stitch counts proportionally.

For a taller basket, simply work additional rounds of dc until you reach the desired height rather than changing the base size.

Try using a tighter or looser tension to subtly change the firmness of the basket; a tighter tension gives more structure.

Swap aran yarn for bulky yarn and a larger hook to create a chunkier, sturdier basket perfect for heavier items.

I often add handles by leaving a gap in the sides and reinforcing the opening with a row of htr or an additional sewn strip.

Embellish with braided trims or pom-poms sewn to the outer edges for a playful, decorative touch.

Consider lining the basket with fabric glued or sewn in place if you plan to store small items that could slip through the stitches.

Experiment with mixing stitches like alternating htr and dc rounds for a ribbed or textured side panel effect that enhances visual interest.

Common Mistakes & How to Fix Them

βœ— Not checking gauge before starting can lead to a basket that is too small or too large; make a 10cm x 10cm swatch first and adjust hook or yarn until gauge matches. βœ— Skipping the instruction to turn rows on the base can make edges uneven; always turn your work at the end of each row to maintain straight edges. βœ— Working increases or decreases accidentally when placing dc along the edge will distort the rectangle shape; count your stitches carefully and keep them even along each edge. βœ— Failing to leave a long tail when fastening off for sewing will make assembly fiddly; leave a generous length of yarn to sew the sides securely to the base.

Basic Crochet Basket Pattern

Make a sturdy, rectangular crochet basket perfect for storage and organization. This pattern uses simple stitches and a chunky hook to create a durable, attractive basket you can customize. You will follow clear steps for the base and sides and finish by folding and sewing the edges for a neat shape. Great for gift-making or tidying up your home with handmade style.

Beginner Friendly 5-7 Hours

Materials Needed for Basic Crochet Basket Pattern

β€” Main Fabric

  • 01
    Paintbox Simply Aran, cream - 3 x 100g (total 300g)

β€” Tools Required

  • 01
    10mm crochet hook
  • 02
    Tapestry needle

Progress Tracker

0% Complete

β€” Materials :

Info :

3 x 100g Paintbox simply aran in cream. 10mm hook. Tapestry needle. Dc 63 6 double crochet. Htr 63 6 half treble.

Info :

Size: 30cm x 25cm x 14cm. Gauge: 10cm x 10cm = 10 htr and 7 rows.

β€” Base :

Round 1 :

Chain 31, htr in 2nd chain from hook. Htr to end (30 sts). Turn.

Round 2 :

Htr in each stitch to the end. Turn.

Round 3 :

Repeat the previous row until the base measures 25cm.

β€” Sides (working in rounds) :

Round 1 :

Working along 1st short side, dc 18 sts evenly along the edge, dc 30 along long edge, dc 18 sts evenly along 2nd short side, 30 dc along long edge (96 dc).

Round 2 :

Join and continue working in rounds in dc around the edge without turning, maintaining 96 dc each round.

Round 3 :

Continue working in rounds until sides measure 28cm or double the required height for your desired depth.

Info :

Fasten off leaving a long thread to sew.

Item Name (P1) :

Fold sides in half and secure along the base where the htr row and dc row meet by sewing through both layers with the tapestry needle using the long tail.

Info :

Shape and enjoy!

Info :

Copyright 63 6 Sam Pratt @EmmieGeorge and EmmieGeorgeDesigns.

Assembly Instructions

  • Fasten off the final round of the sides leaving a long tail for sewing and shaping the basket.
  • Fold each short side in half to create the rectangular shape and align the htr row of the base with the dc row of the sides.
  • Using the long tail and a tapestry needle, sew the folded side edges securely to the base where the htr and dc rows meet, making neat whipstitches.
  • Ensure the corners are shaped symmetrically by adjusting the fold and tightening stitches as you go, then weave in any remaining ends.
  • Block or shape the basket by hand to square the corners and flatten the base before final tightening of the sewing stitches.

Important Notes

  • πŸ’‘Make a gauge swatch (10cm x 10cm) to match the stated gauge for correct final dimensions.
  • πŸ’‘Leave a long tail when fastening off so you have enough yarn to sew the sides neatly to the base.
  • πŸ’‘Count stitches when joining dc along edges to maintain the rectangular shape and correct stitch total.

This Basic Crochet Basket Pattern is a practical, beginner-friendly project that makes a lovely storage solution for any room. It uses chunky aran yarn and a large hook to create structure and texture in every stitch. Make one in cream or customize the color for a perfect handmade gift or home accent. 🧢🏑

You ask,

we answer.

FAQs

What size will the finished piece be?

The finished basket measures approximately 30cm x 25cm x 14cm when using Paintbox Simply Aran yarn and a 10mm hook, following the given gauge.

Can I use a different yarn weight or hook?

Yes, you can change yarn weight or hook size, but the final size will change; make a gauge swatch and adjust chain and rows to achieve desired dimensions.

Do I need to sew the sides to the base?

Yes, after working the sides to the required height, fold and sew the side seams to the base where the htr row and dc row meet to secure the shape.

Is this pattern suitable for beginners?

Yes, this pattern is rated beginner friendly and uses basic stitches like half treble and double crochet with straightforward construction.