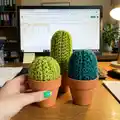
About This Cactus Amigurumi Pattern
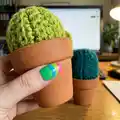
This pattern teaches you how to crochet three sizes of simple potted cacti using worsted weight yarn and a small hook. Each cactus is worked flat in rows through the back loop to create ribbed texture and then sewn together and stuffed. The finished cacti tuck neatly into small terracotta pots for instant charm.

Designed to be quick and satisfying, these cacti are ideal for making multiples as gifts or decor. No advanced stitches required—perfect for beginners looking for a fun, small project.
Why You'll Love This Cactus Amigurumi Pattern
I absolutely love this pattern because it transforms a few basic crochet steps into an instantly charming potted cactus. I enjoy how quickly you can make a complete cactus that looks stylish on a shelf or desk. The back-loop-only rows create a subtle ribbed texture I find very satisfying to work. I also love that you can make a set in different sizes with the same technique, giving you variety without learning new stitches.
Switch Things Up
I love how easy it is to customize these little cacti by changing yarn colors or weights.
I often switch to bolder greens or speckled yarn for a more textured look.
For a fuzzy cactus, I try a boucle or mohair blend to give a soft surface that feels playful.
If you want a larger plant, I use bulky yarn and a larger hook to scale up the pattern without changing the stitch sequence.
I sometimes embroider tiny spines with contrasting yarn to add personality and detail to each cactus.
Adding a small crocheted flower or a felt blossom on top makes each cactus feel special and unique to the recipient.
I also experiment with different pots—teal, painted, or metallic—to change the overall aesthetic of the finished piece.
For gift sets, I create matching succulents by altering the size and color palette for a cohesive look.
I occasionally add a bit of wire inside for a slightly posable tall cactus, but keep it optional for safety if gifting to children.
I recommend trying combinations of yarn textures and stitch tension to see how they affect the final shape and weight; it keeps the pattern fresh each time I make it.
Common Mistakes & How to Fix Them
✗ Skipping the chain count at the start causes the foundation row to be too narrow or too wide; always chain the exact number listed and double-check your stitch count after the first row.
✗ Working through both loops instead of the back loop only removes the ribbed texture; be sure to work R1-2 through the back loops only to get the correct appearance.
✗ Leaving gaps by making loose stitches can reveal stuffing through the fabric; tighten your tension slightly or use a smaller hook to keep stitches dense.
✗ Forgetting to sew up the correct rows will change the final shape; sew the chain row to the 20th row and include the back loops on the 18th row exactly as instructed.