🧢 Beautiful ✨ Detailed πŸ’ Adorable

By Your Side Basket Bag Pattern

By Your Side Basket Bag Pattern
4.7β˜… Rating
5-7 Hours Time Needed
1.2K Made This
βœ‚οΈ

Intermediate Level

Ideal for those with basic crochet experience, featuring slightly more advanced stitches and techniques to expand your skills.

⏱️

Weekend Treat

Takes 5-7 hours, making it an enjoyable project to finish over a couple of days.

✨

Stylish Touch

An elegant detail to elevate any look, combining traditional techniques with contemporary design sensibilities.

About This By Your Side Basket Bag Pattern

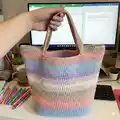
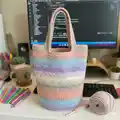
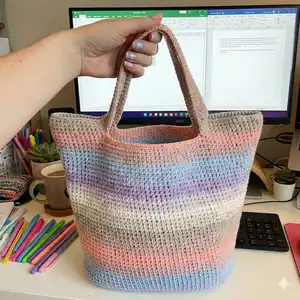
This pattern creates a soft, striped basket bag worked in rounds from a small oval base up to the bag body, finishing with comfortable crocheted handles. The design uses Paintbox Yarns Recycled Crafty Pots to achieve a lovely ombre/striped effect. You will work increases, even rounds and a simple handle shaping to complete the tote.

By Your Side Basket Bag Pattern crochet pattern - detailed view of completed project

The pattern uses US terminology with UK terms noted, and is written for intermediate crocheters. It includes a materials list, gauge note and step-by-step round instructions for accurate shaping.

Why You'll Love This By Your Side Basket Bag Pattern

I absolutely love this pattern because it turns recycled, responsibly sourced yarn into a functional and fashionable tote you can use every day. I enjoy the rhythmic repetition of the single (double) crochet rounds β€” they are meditative yet productive. The colour transitions in the Recycled Crafty Pots yarn give such a beautiful gradient effect without complicated colourwork. I also love how the simple handle shaping creates sturdy, wearable straps without extra hardware.

By Your Side Basket Bag Pattern step 1 - construction progress By Your Side Basket Bag Pattern step 2 - assembly progress By Your Side Basket Bag Pattern step 3 - details and accessories By Your Side Basket Bag Pattern step 4 - final assembly and finishing

Switch Things Up

I love customizing this bag by switching the yarn colours to create bold stripe combinations or a tonal ombre β€” it changes the whole look instantly.

If you want a bigger or smaller bag I change yarn weight and hook size: bulky yarn with a larger hook makes a chunkier tote, while finer yarn trims it down.

I often lengthen the handle chains (add more than ch 50) for a crossbody or shorten them for a shorter shoulder strap depending on how I plan to use the bag.

I sometimes add a fabric lining and sew it in place to give a neater interior and prevent small items falling through the stitches.

I like to add pockets inside the lining for phone and keys; use lightweight cotton to keep the bag flexible and comfortable.

Try decorative finishes like tassels, pompoms or a contrast-colour edging to personalize the style β€” these are quick additions that make a big impact.

For extra structure I occasionally slip a piece of interfacing into the base of the lining or make a crochet base with tighter tension and insert it before finishing.

I recommend testing a small swatch with your yarn to confirm the fabric drape; drapier yarns produce a softer slouchy tote, while stiffer yarns keep it upright.

If you prefer faster makes, I sometimes work the body in fewer colour changes (longer stripes) or carry two strands together for a chunkier, quicker fabric.

When gifting, I change colours to match the recipient and add a handmade tag or sewn-in label to make each bag feel extra special.

Common Mistakes & How to Fix Them

βœ— Not placing markers in the second stitch of the three-st increase can throw off your shaping; place markers exactly as instructed and move them up each round to maintain correct seam placement. βœ— Skipping the instruction to work back along the foundation chain will leave the base uneven; after working the first side, turn and work into the other side of the chain to form the full oval base. βœ— Failing to count stitches after increase rounds may result in an incorrect stitch count later; count your stitches at the end of each increase round to confirm you have the correct total. βœ— Pulling stitches too tight when making the handle chains and joining can distort the handle opening; keep a relaxed consistent tension for the chain and when slip-stitching to join the handle to the bag.

By Your Side Basket Bag Pattern

Make a stylish, striped basket tote using recycled Paintbox Yarns β€” a roomy, everyday bag that works as a beach tote or market carryall. You will enjoy the simple repetitive stitch pattern and the satisfying shaping for handles and base. This pattern uses easy single (double) crochet rounds, clearly marked increases and handle shaping so you can follow along with confidence.

Intermediate 5-7 Hours

Materials Needed for By Your Side Basket Bag Pattern

β€” Main Fabric

  • 01
    Paintbox Yarns Recycled Crafty Pots - 8 3/4oz/250g balls - 2 balls in Neapolitan (main colour/striping)
  • 02
    Assorted shades within the Recycled Crafty Pots ball produce stripes as shown (use yarn as supplied for gradient effect)
  • 03
    3 buttons size 1/2in/1.5cm (optional trim or closure, listed in materials)

β€” Tools Required

  • 01
    Crochet hook size H-8 (5mm)
  • 02
    Darning needle
  • 03
    2 lockable stitch markers
  • 04
    Scissors
  • 05
    Blocking pins or surface for blocking (optional)

Progress Tracker

0% Complete

β€” Sizes :

Info :

Height 12 1/2in/32cm. Width at widest point 17 3/4in/45cm.

β€” You Will Need :

Infos :

Paintbox Yarns is exclusively available at lovecrafts.com. 8 3/4oz/250g balls of Paintbox Yarns Recycled Crafty Pots: 2 balls in Neapolitan. 3 buttons size 1/2in/1.5cm. H-8 (5mm) crochet hook. Darning needle. 2 lockable stitch markers.

β€” Gauge (Tension) :

Info :

14 sts and 15 rows to 4in/10cm in single (double) crochet stitch using H-8 (5mm) crochet hook.

β€” Good to Know :

Infos :

Paintbox Yarns cannot accept responsibility for the finished item if any yarn other than the recommended yarn is used. Yarn quantities are based on average requirements and are therefore approximate. Instructions are written using US terminology with UK terminology given in italics in round brackets ( ) afterwards. Where the figure 0 appears, no stitches, times or rows are worked for this size. Stripes may vary from those shown.

β€” Abbreviations :

Infos :

cm centimetres. ch chain. flo front loop only. g grams. in inches. mm millimeters. oz ounces. PM place marker. rep repeat. sc(dc) single (double) crochet. sl st slip stitch. st/s stitch/es.

β€” Base :

Round 1 :

Using H-8 (5mm) hook ch 13. 1st round 1 sc(dc) in second ch from hook, and in each ch to last ch, 3 sc(dc) in last ch (PM in second of these 3 sts), turn, work back along other side of foundation chain, working 11 sc(dc), 3 sc(dc) in last ch (PM in second of these 3 sts), sl st to join. | 26 sts.

Round 2 :

Ch 1 (does not count as a st), *1 sc(dc) in every st to 1 st before marker, 2 sc(dc) in next st, 3 sc(dc) in marked st, 2 sc(dc) in next st, PM in centre st of three-st increase; rep from * to complete the increases, 1 sc(dc) in each st to end of round seam, sl st to join. | 34 sts.

Round 3-9 :

Rep 2nd round a further 7 times, increasing 8 sts per round. | 90 sts.

Round 10 :

Ch 1, 1 sc(dc) flo in each st around, keeping markers in place, sl st to join.

Round 11-18 :

Ch 1, sc(dc) around, move markers up in place each round, sl st to join.

Round 19 :

Ch 1, *sc(dc) to 1 st before marker, 2 sc(dc) in this st, 1 sc(dc) in marked st, PM in new st, 2 sc(dc) in st after marker; rep from * once more, sc(dc) to end of round seam, sl st to join. | 94 sts.

Round 20-22 :

Ch 1, sc(dc) around, move markers up in place each round, sl st to join.

Round Rep 23-? :

Rep 19th - 22nd rounds 7 more times, increasing 4 sts in every repeat. | 122 sts.

Round Next :

Next round Ch 1, *sc(dc) to 1 st before marker, 2 sc(dc) in this st, 1 sc(dc) in marked st, PM in this new st, 2 sc(dc) in st after marker; rep from * once more, sc(dc) to end of round seam, sl st to join. | 126 sts.

Round Next :

Next round Ch 1, sc(dc) around, move markers up in place each round, sl st to join.

Info :

'Seam' should now be 26 sts away from closest marker.

Round Next :

Next round Turn, sl st in next 10 sts, turn, ch 50, skip next 29 sts, 1 sc(dc) in following st and all sts to marker, remove marker, 18 sc(dc), ch 50, skip next 29 sts, 1 sc(dc) in following st and next 34 sts, removing markers as you go, sl st at bottom of original handle to join. | 168 sts.

Round Next 4 :

Next 4 rounds Ch 1, sc(dc) around, sl st to join at seam.

Info :

Break yarn and secure.

β€” To Finish :

Info :

Weave in all loose ends and block bag to shape to finish.

Assembly Instructions

  • When forming the handles follow the instruction: turn, sl st in next 10 sts, turn, ch 50, skip next 29 sts and join the chain to the bottom of the original handle with a slip stitch β€” secure the join and fasten off.
  • Place the stitch markers in the second stitch of each three-st increase at the base as instructed and move them up each round to keep track of the seam and shaping.
  • Remove markers as you work the handle joining sequence and reinstate any markers needed to maintain the seam placement while you complete the handle rounds.
  • Weave in all loose ends using a darning needle and block the bag to shape on a flat surface to finish; allow the bag to dry fully after blocking.

Important Notes

  • πŸ’‘Use stitch markers to mark the second stitch of each three-st increase and move them up every round for accurate shaping and seam alignment.
  • πŸ’‘Keep a consistent, relaxed tension while making the long handle chains and when joining to avoid distorted or tight handles.
  • πŸ’‘Weave in ends as you go where possible, and break and secure yarn only after completing the final rounds to reduce bulk and tidy finishing.

This cheerful By Your Side Basket Bag pattern turns recycled Paintbox yarn into a practical, everyday tote you will love using. The striped gradient effect looks stunning with minimal effort and the roomy shape fits everything you need. Make one for yourself or as a thoughtful handmade gift β€” happy crocheting! πŸ§ΆπŸ‘œ

You ask,

we answer.

FAQs

What size will the finished piece be?

The finished bag measures approximately 12 1/2in (32cm) high and 17 3/4in (45cm) wide at the widest point when made with the recommended yarn and hook.

Can I use different yarn weights for this pattern?

Yes, you can substitute yarn weights, but this will change the final size; choose an appropriate hook for your yarn and check your gauge before continuing.

Do I need prior crochet experience for this pattern?

This pattern is rated intermediate, so familiarity with single (double) crochet, increases, working in the round, and basic stitch counting is recommended.

How long does this project typically take to complete?

Most crocheters complete this basket bag in approximately 5-7 hours, depending on experience and whether you take time to block and finish carefully.