🧢 Beautiful ✨ Detailed πŸ’ Adorable

Blue the Dumbo Octopus Amigurumi Pattern

Blue the Dumbo Octopus Amigurumi Pattern
4.3β˜… Rating
5-7 Hours Time Needed
2.6K Made This
βœ‚οΈ

Intermediate Level

Ideal for those with basic crochet experience, featuring slightly more advanced stitches and techniques to expand your skills.

⏱️

Weekend Treat

Takes 5-7 hours, making it an enjoyable project to finish over a couple of days.

🧸

Cute Companion

An adorable friend to cherish, handcrafted with love to bring comfort and joy for years to come.

About This Blue the Dumbo Octopus Amigurumi Pattern

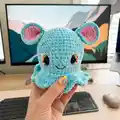
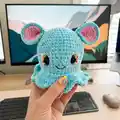
This pattern creates a plush Blue Dumbo Octopus amigurumi worked from the top of the head down to the body. You will crochet the head, body, frilled tentacles, and cute Dumbo-style ears using bulky weight yarn. The pattern includes eye placement tips, optional felt backing for eyes, and assembly instructions.
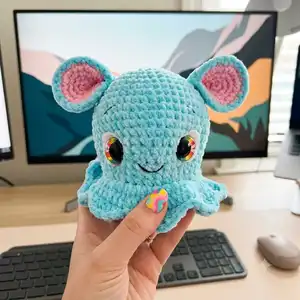
Blue the Dumbo Octopus Amigurumi Pattern crochet pattern - detailed view of completed project

Ideal for intermediate crocheters, it uses basic increases/decreases and some surface sewing for facial details. Photographic step-by-step guidance and helpful tips are included to guide you through finishing and personalization.

Why You'll Love This Blue the Dumbo Octopus Amigurumi Pattern

I absolutely love this pattern because it turns simple stitches into a whimsical, expressive octopus with personality. I enjoy how the ruffled frill gives the body a playful movement and how the Dumbo-style ears add charm. I also love that the pattern offers clear eye placement guidance and photos to help you achieve the perfect look. It feels rewarding to assemble and embroider the final facial details β€” that finishing step always brings the character to life.

Blue the Dumbo Octopus Amigurumi Pattern step 1 - construction progress Blue the Dumbo Octopus Amigurumi Pattern step 2 - assembly progress Blue the Dumbo Octopus Amigurumi Pattern step 3 - details and accessories Blue the Dumbo Octopus Amigurumi Pattern step 4 - final assembly and finishing

Switch Things Up

I love customizing this pattern by swapping yarn colors β€” try soft pastels for a baby-themed octopus or deep ocean hues for a more realistic feel.

I sometimes change the yarn weight and hook to make a tiny keychain version or a large cuddle-sized octopus; adjust eye size and placement accordingly.

I like to replace safety eyes with embroidered eyes for a baby-safe toy; it changes the expression and is perfect for little ones.

For a different frill look, experiment with alternate stitch sequences like shells or picots instead of the pattern ruffle to create a new edge texture.

I often add tiny crocheted props β€” a mini hat or bow β€” to personalize each octopus and give it character.

Try adding wire to two tentacles if you want a posable display piece that can hold small objects or pose creatively.

Switch out the ear inner color or add a little embroidered detail on the ear to make each ear uniquely expressive.

I sometimes use a neutral yarn for the body and bright contrasting yarn for the frill to make the ruffle pop visually.

For a whimsical collection, make a family of octopuses in graduated sizes by changing yarn weight and hook size for each one.

I recommend testing blush placement and intensity on a scrap first; gentle powder or pastel crayons can create a sweet cheek effect without damaging the yarn.

Common Mistakes & How to Fix Them

βœ— Skipping stitch markers when working in continuous rounds causes lost round counts and uneven shaping; use a marker at the start of every round and move it each round to keep track. βœ— Placing safety eyes too early or too close together can distort the face shape; test placement with pins or felt circles and ensure 11 holes between eyes as noted, then secure carefully. βœ— Overstuffing the head or body leads to bulging or uneven shaping; stuff gradually, shaping as you go and stop when you reach the desired firmness. βœ— Not sewing ears securely creates floppy attachments that shift; pinch and sew about three stitches at the base, pin ears into position and use a tight whipstitch to attach firmly. βœ— Pulling yarn too tight when creating the sunken eye effect can warp the head; gently pull the yarn through eye holes a few times until you get the desired subtle sunken look, and adjust gradually.
Blue the Dumbo Octopus Amigurumi Pattern

Make an adorable Dumbo octopus plush using bulky yarn and simple amigurumi techniques. This pattern walks you through head, body, ears, and a ruffled frill with clear step-by-step rounds and helpful photos. You will learn eye placement tips, assembly, and finishing touches for a cuddly, display-ready octopus. Perfect for gifting or adding a cute handmade friend to your collection.

Intermediate 5-7 Hours

Materials Needed for Blue the Dumbo Octopus Amigurumi Pattern

β€” Main Fabric

  • 01
    Bulky yarn Weight #6, approximately 100g of main color (Color A: Blue)
  • 02
    Accent yarn approximately 25g (Color B: Pink) for ear inner color and small details
  • 03
    Color A: Blue - Premier Parfait Chunky Turquoise (approx 100g)
  • 04
    Color B: Pink - Premier Parfait Chunky Bubblegum (approx 25g)
  • 05
    30 mm safety eyes (2 pieces)

β€” Tools Required

  • 01
    Crochet hook size J / 6.00 mm
  • 02
    Scissors
  • 03
    Sewing needle for assembly and embroidery
  • 04
    Stitch marker
  • 05
    Polyester stuffing (fiberfill)
  • 06
    30 mm safety eyes (2 pieces)
  • 07
    Pins for positioning pieces (optional)

Progress Tracker

0% Complete

β€” Head and Body :

Round 1 :

Make 6 sc into a magic ring= 6

Round 2 :

Increase in each st around= 12

Round 3 :

(sc, inc) x 6= 18

Round 4 :

(2 sc, inc) x 6= 24

Round 5 :

(3 sc, inc) x 6= 30

Round 6 :

(4 sc, inc) x 6= 36

Round 7 :

(5 sc, inc) x 6= 42

Round 8 :

sc in each st around

Round 9 :

(6 sc, inc) x 6= 48

Round 10-14 :

sc in each st around

Round 15 :

(6 sc, dec) x 6= 42

Round 16 :

sc in each st around

Round 17 :

(5 sc, dec) x 6= 36

Info :

If you want, cut a circle larger than the eye in white felt, approximately 4 cm in diameter. Cut a hole on the outer edge of the circle to put the eye inside. Place eyes between rounds 15 and 16, leaving 11 holes between them. If you want the sunken eye look, do not place the backs of the eyes on until round 20.

Info :

TIP! You may have to adjust the eye placement depending on yarn and hook size you use.

Round 18-20 :

sc in each st around

Info :

Start stuffing the head and body

Info :

Now for the eyes. Cut a long piece of yarn and remove the eyes. Place the needle in the hole where the first eye was and insert the needle into a hole next to the eye hole. Go back and forth between each eye hole repeating the process from the first eye. Pull slightly on the yarn after going through each hole. Do this about 3 times on each side until you reach the look you want. Follow the pictures for help. There is also a youtube video I have for extra help on this process. https://www.youtube.com/watch?v=9XoBnTY6k70&t=55s

Info :

To place the backs of the eyes you will need to remove most of the stuffing to place the washers on the eyes then re stuff it.

Round 21 :

BLO (4 sc, dec) x 6= 30

Round 22 :

(3 sc, dec) x 6= 24

Round 23 :

(2 sc, dec) x 6= 18

Round 24 :

(sc, dec) x 6= 12

Round 25 :

Dec x 6= 6

Info :

F/O and sew the hole closed

β€” Tentacles or Frill :

Info :

Turn the body upside down. Attach Color A yarn on round 21 with a sl st. Ch 2

Round 1 :

hdc-inc in each st around, join with a sl st to top of ch 2

Round 2 :

Ch 2, hdc in each st around, join with a sl st to top of ch 2

Round 3 :

Ch 2, (hdc, dc, tr, ch 1, tr, dc, hdc, 3 sl) x 8, sl st to top of ch 2 to fasten off

Info :

Weave in the tail ends.

β€” Ears (Make 2 Color A, 2 in Color B) :

Info :

Starting with Color B:

Round 1 :

Make 6 sc into a magic ring= 6

Round 2 :

Increase in each st around= 12

Round 3 :

(sc, inc) x 6= 18

Round 4 :

(2 sc, inc) x 6= 24

Info :

Do not F/O the Color A ears! Place the back sides of Color A and Color B ears together. sc around the ears with the Color A yarn. F/O and leave a long tail for sewing.

β€” Assembly :

Head and Body :

1. Thread your needle with a strand of black embroidery thread. Insert the needle into a hole on the head. Bring the needle above the eye. Embroider an eyebrow. Repeat for the 2nd eye. Weave in the tail ends.

Head and Body :

2. Thread your needle with a long strand of black embroidery thread. Insert the needle into a hole in the head. Bring the needle up to a spot between the eyes. Embroider a smile. Weave in the tail ends.

Head and Body :

3. If you want, you can glue down your white felt circle to make it flat against the body.

Info :

Pin and place ears before sewing to ensure correct positioning and symmetry.

Ears :

Pinch the ears at the bottom. Sew about 3 stitches together at the bottom to give the ear a pinched look. Pin the ears onto the top of the head. Sew the ears onto the head.

β€” Face :

Info :

If you want you can add some blush to the cheeks with actual blush or pink crayon.

Assembly Instructions

  • Thread a needle with black embroidery thread and embroider eyebrows by inserting the needle into a hole on the head, bringing it above the eye, then repeating for the second eye; weave in ends.
  • Embroider a smile by bringing a long strand of black embroidery thread up to a spot between the eyes and stitching a shallow curve, then weave in tail ends.
  • Pinch each ear at the bottom and sew about three stitches together to create a pinched shape, then pin ears to the top of the head and sew securely in place.
  • Attach the ruffled frill (tentacles) by working rounds onto round 21 of the body, then weave in tail ends and adjust frill placement so it sits evenly around the base.
  • If using felt backing for eyes, remove some stuffing, add felt circle and eye washer, then re-stuff and sew the hole closed for a neat finish.

Important Notes

  • πŸ’‘Do not join rounds unless stated, work in a continuous spiral.
  • πŸ’‘Use a stitch marker to mark the beginning of each round.
  • πŸ’‘All stitches are worked in both loops unless stated otherwise in the pattern.
  • πŸ’‘Place eyes between rounds 15 and 16, leaving 11 holes between them; adjust placement depending on yarn and hook size.

This Blue Dumbo Octopus was designed to bring sweet, whimsical charm to your handmade collection. I hope this pattern sparks joy as you stitch each ruffle and seam. Share your finished octopus with pride and enjoy every stitch of the process! πŸ§ΆπŸ™

You ask,

we answer.

FAQs

What size will the finished piece be?

The finished octopus measures approximately 12 inches from bottom to top of head when using bulky weight #6 yarn and a 6.00 mm hook.

Can I use different yarn weights for this pattern?

Yes, you can use different yarn weights but the size and stitch tension will change; adjust hook size and eye placement accordingly.

Do I need prior crochet experience for this pattern?

This pattern is rated intermediate, so basic knowledge of single crochet, increases, decreases, and working in the round is recommended.

How long does this project typically take to complete?

Most crocheters complete this project in about 5-7 hours, depending on experience and assembly time.