🧶 Beautiful ✨ Detailed 💝 Adorable

Folk Flower Socks Pattern

Folk Flower Socks Pattern
4.6★ Rating
5-7 Hours Time Needed
2.2K Made This
✂️

Intermediate Level

Ideal for those with basic crochet experience, featuring slightly more advanced stitches and techniques to expand your skills.

⏱️

Weekend Treat

Takes 5-7 hours, making it an enjoyable project to finish over a couple of days.

🧶

Effortless Style

Simple lines for everyday wear, focusing on quality stitchwork and timeless appeal that never goes out of fashion.

About This Folk Flower Socks Pattern

This pattern creates brightly striped ankle or calf-length socks with a folk-inspired flower colorwork band. The pattern includes instructions for shorty and calf-length versions, as well as a 9-round chart for the colorwork motif. It is written for knitting in the round using magic loop or short circulars.

Folk Flower Socks Pattern crochet pattern - detailed view of completed project

Youll find detailed yardages for multiple colorways and sizes (Kid through XL) and step-by-step shaping for heel flap, gusset, and toe. Helpful tips are provided for knitting stripes in the round and avoiding a jog when switching colors.

Why You'll Love This Folk Flower Socks Pattern

I absolutely love this pattern because it mixes playful stripes with a small colorwork band that adds personality without overwhelming the design. I enjoy how quick the shorty version is to knit, and how easily you can lengthen it for a calf version. The color suggestions make it fun to experiment with high-contrast or tonal palettes, and the technique notes help you manage the floats cleanly. I also appreciate that the pattern uses a modest yarn amount so you can use leftovers and play with combinations.

Folk Flower Socks Pattern step 1 - construction progress Folk Flower Socks Pattern step 2 - assembly progress Folk Flower Socks Pattern step 3 - details and accessories Folk Flower Socks Pattern step 4 - final assembly and finishing

Switch Things Up

I love swapping colors in this pattern to create totally different looks: try contrasting neon stripes for a playful pair or muted tonal hues for a classic set.

You can easily change the width of the stripes by doing more or fewer rounds per color; I often switch to 3- or 7-round stripes to vary the rhythm of the design.

If you want a chunkier sock, use a heavier yarn and larger needles — the pattern will grow proportionally and give a cozy, cushioned result.

I sometimes add a small embroidered heart or initial on the sole after knitting for a personalized touch that uses very little yarn.

To make slippers instead, adjust the foot length and skip the Kitchener graft, closing the toe with a seam and leaving a bit more ease for slipping on.

Try substituting one of the contrast colors with a speckled or hand-dyed yarn for an eye-catching band that looks complex but knits up easily.

Want a no-floats version? Duplicate the colorwork motif with duplicate stitch after knitting the sock in plain stripes.

I also experiment with turning the colorwork band into a cuff motif by moving the chart to the cuff area and knitting the leg plain.

For gifts, I make the kid size in extra-bright rainbow stripes and the adult sizes in more subtle palettes so everyone gets a unique pair.

If you like matching sets, use leftover yarn from other projects to coordinate cuff, heel, and toe colors across multiple pairs — it uses surprisingly little yarn and looks great.

Common Mistakes & How to Fix Them

✗ Not using stitch markers when joining in the round causes twisted socks and poor gauge; place a marker when you join and check for twists before continuing. ✗ Carrying floats too loosely during stranded colorwork makes the band sloppy and creates holes; maintain even tension and catch floats every 3-4 stitches to secure them. ✗ Forgetting to switch needle size for the cuff or band can change fabric elasticity; follow the note about using US size 1 (2.25 mm) and optionally US size 2 (2.75 mm) for the cuff band if you need more stretch. ✗ Skipping the Kitchener stitch on the toe can leave a bulky seam; use the Kitchener stitch to graft the remaining toe stitches for a smooth finish and improved comfort. ✗ Not measuring the foot length before toe decreases results in socks that are too short or long; measure from back of heel and subtract the recommended toe allowance to determine where to stop for decreases.

Folk Flower Socks Pattern

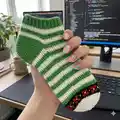
Make a pair of bright, striped Folk Flower Socks with an eye-catching colorwork band — perfect for brightening your sock drawer. This pattern contains full instructions for shorty and calf-length versions, color placement charts, and step-by-step heel and toe shaping. You can customize colors and sizes to fit kids through adult XL, and the pattern includes helpful tips for knitting stripes in the round.

Intermediate 5-7 Hours

Materials Needed for Folk Flower Socks Pattern

— Main Fabric

  • 01
    MC: Lang Jawoll (75% superwash wool, 25% nylon), 230 yards (210 m) / 50 g; yardage varies by size — see pattern for exact numbers (examples given: (56) 67 (80, 94, 108) yards). Color example: "118 Green" for Green Shorties.
  • 02
    CC1: Lang Jawoll (75% superwash wool, 25% nylon), 230 yards (210 m) / 50 g; yardage varies by size (examples given: (48) 59 (68, 77, 92) yards). Color examples: "373 Mint", "149 Pineapple", "129 Melon" depending on version.
  • 03
    CC2: Lang Jawoll (75% superwash wool, 25% nylon), 230 yards (210 m) / 50 g; small amounts (examples: (10) 12 (14, 16, 18) yards) used for contrast colors such as "390 Wine" or "4 Black".
  • 04
    CC3: Lang Jawoll (75% superwash wool, 25% nylon), 230 yards (210 m) / 50 g; used for small contrast sections (examples: (9) 11 (13, 15, 17) yards) in colors like "60 Crimson" or "94 Pearl".
  • 05
    CC4/CC5: Additional Lang Jawoll contrast colors (75% superwash wool, 25% nylon), 230 yards (210 m) / 50 g each; used in tiny amounts for multi-color motifs such as "149 Pineapple" and "220 Something Blue".
  • 06
    Pink calf-length example yarns: MC "184 Hot Pink" and CCs such as "129 Melon" with yardage adjusted for calf length (examples provided in pattern).

— Tools Required

  • 01
    US size 1 (2.25 mm) needles (magic loop or DPNs)
  • 02
    Short circular 9" (23 cm) US size 1 (2.25 mm) for knitting the colorwork bands (optional)
  • 03
    US size 2 (2.75 mm) needle (optional) for cuff colorwork band if you prefer a looser cuff
  • 04
    Tapestry needle for weaving in ends and grafting
  • 05
    Stitch markers
  • 06
    Snips or small scissors
  • 07
    Measuring tape
  • 08
    Magic-loop setup (optional)

Progress Tracker

0% Complete

— Cuff :

Info :

With MC, CO (48) 57 (63, 72, 81) sts and join for working in the rnd, being careful not to twist your sts. Est 2 x 1 ribbing: [k2, p1] to end.

Info :

Cont working the ribbing until your cuff measures 3/4" (2 cm), or your desired length. On the last rnd of the ribbing, some of you need to adjust your stitch count. If you are working the Kid size, or L, move on to the leg instructions. The rest of you, make the following increase or decrease according to your size:

Round S :

Work in rib pattern to the last 3 sts, k2tog, p1. 56 sts.

Round M :

Work in rib pattern to the last 3 sts, kfb, k1, p1. 64 sts.

Round XL :

Work in rib pattern to the last 3 sts, k2tog, p1. 80 sts.

— Leg (Shorty Version) :

Info :

*Note: If you are knitting the two-color stripes, or the multi-color stripes, don't cut your MC. Simply join in your CC and carry your MC on the inside of your work.

Round 1 :

Join in CC1 and work one stripe (5 rnds) even in stockinette.

— Leg (Calf-length Version) :

Info :

Cut MC and join in CC2. Work all 9 rnds of the chart once. Cut CC2, CC3, and CC4. Join in CC1. Begin working stripe pattern in stockinette, alternating between CC1 and MC, until your leg (including cuff!) measures 3" / 8 cm, or your desired length. I worked 5 stripes total before stopping for the heel! End after working a CC1 stripe.

— Heel Flap :

Info :

With MC, knit 1 rnd even. Next, K across the first (24) 28 (32, 36, 40) sts, then begin working the heel flap back and forth across the remaining (24) 28 (32, 36, 40) sts as follows:

Row 1 (RS) :

K2, [sl 1 wyib, k1] to end. Turn work.

Row 2 (WS) :

Sl 1 wyif, p to end. Turn work.

Row 3 :

[Sl 1 wyib, k1] to end. Turn work.

Info :

Repeat rows 2 and 3 until heel flap measures (1.75) 2 (2, 2.25, 2.5)" / (4.5) 5 (5, 5, 6) cm. End after you have worked row 3.

— Heel Turn :

Row 1 (WS) :

Sl 1 wyif, p (12) 14 (16, 18, 20), p2tog, p1, turn.

Row 2 (RS) :

Sl 1 wyib, k3, ssk, k1, turn.

Row 3 :

Sl 1 wyif, p4, p2tog, p1, turn.

Row 4 :

Sl 1 wyib, k5, ssk, k1, turn.

Info :

You have now established the following pattern for your heel turn: sl 1, knit or purl to 1 st before the gap created by turning on the previous row, ssk or p2tog, k1 or p1, turn. Cont in this pattern until all your heel sts have been worked, ending on a RS row. You should now have (14) 16 (18, 20, 22) heel sts.

— Gusset :

Info :

*Note: If you are working multi-color socks, you will cut MC, and join in your next color before picking up your stitches! For two-color striped socks, you will cont working the gusset in MC.

Info :

With the right side of your work facing, pick up and k (10) 12 (14, 16, 18) sts along the left side of the heel flap. Next, k across the (24) 28 (32, 36, 40) sts that we've left undisturbed on our needles while working the heel flap. Pm, and pick up (10) 12 (14, 16, 18) sts on the right side of the heel flap. K across the heel sts, then k down the first set of new sts you picked up on the left side. You've reached the end of the rnd, and all your sts have now been picked up. You should now have (58) 68 (78, 88, 98) sts on your needles. You will also have completed 2 rnds of a stripe (you knit the first rnd of the stripe before you worked the heel flap!).

— Gusset Decreases :

Rnd 1 :

K across (24) 28 (32, 36, 40) sts, sl marker, k1, ssk, k around to 3 sts before the end of rnd, k2tog, k1.

Rnd 2 :

Work even with no decreases.

Info :

Repeat these two rnds until you have (48) 56 (64, 72, 80) sts on your needles, while at the same time working the 5 rnd stripe pattern.

— Foot :

Info :

Cont working in stripe pattern until your foot measures 3/4" / 2 cm SHORT of where you need to stop for the toe decreases. To figure that out, measure from the back of the heel to the end of the toe and subtract the approximate toe length for your size (see next info block for length guidelines).

Info :

Length guidelines (all sizes are US): Kid: 6 - 7.5" / 11 - 15 cm. Women's shoe sizes 4 - 6.5: 8 - 9" / 20.5 - 23 cm. Women's shoe sizes 7 - 9.5: 9.25 - 10" / 23 - 25.5 cm. Women's shoe sizes 10 - 12.5: 10.25 - 11" / 26 - 28 cm. Men's shoe sizes 6 - 8.5: 9.25 - 10" / 23 - 25.5 cm. Men's shoe sizes 9 - 11.5: 10.25 - 11" / 26 - 28 cm. Men's shoe sizes 12 - 14: 11.25 - 12" / 28.5 - 30.5 cm.

Info :

Your approximate toe length (once you've eventually knit it) should be: Kid: 1" / 2.5 cm. S: 1.5" / 4 cm. M: 1.5" / 4 cm. L: 1.5" / 4 cm. XL: 1.75" / 4 cm.

Info :

Next, join in your first CC and work all 9 rnds of the chart once. Join in your toe color and k 1 rnd even in stockinette.

— Toe :

Rnd 1 :

K1, ssk, k (18) 22 (26, 30, 34) sts, k2tog, k1, pm, k1, ssk, k (18) 22 (26, 30, 34) sts, k2tog, k1. 4 sts decreased.

Rnd 2 :

K.

Rnd 3 :

K1, ssk, k to 3 sts before next marker, k2tog, k1, sl m, k1, ssk, k around to 3 sts before end of rnd, k2tog, k1. 4 sts decreased.

Info :

Repeat rnds 2 and 3 until (20) 24 (28, 32, 36) sts remain.

Info :

Use Kitchener Stitch to close the toe.

— Finishing :

Info :

Weave in all ends and block your socks!

Assembly Instructions

  • Weave in all loose ends neatly using a tapestry needle; hide any remaining floats inside the sock for a clean interior finish.
  • Use the Kitchener stitch to graft the toe stitches after completing decreases for a smooth, comfortable seam.
  • Block your socks to even out stitches and set the shape; stretch gently on a flat surface and dry fully before wearing.
  • When placing the colorwork band, ensure floats are caught or twisted every few stitches to keep the inside tidy and prevent long loose strands.

Important Notes

  • 💡If you are knitting two-color stripes, carry your unused yarn inside the work to avoid cutting between bands.
  • 💡Use stitch markers to mark the beginning of the round and gusset decreases to keep track of pattern repeats.
  • 💡Measure foot length from the back of the heel to the tip of the longest toe before starting the toe decreases to ensure correct fit.

These bright Folk Flower Socks bring playful colorwork and stripes to a classic sock pattern, perfect for gifting or treating yourself. Customize colors and lengths easily for ankle or calf versions, and enjoy simple shaping for a professional finish. Happy knitting — may every step be cozy and colorful! 🧦🧶

You ask,

we answer.

FAQs

What size will the finished socks be?

The pattern provides measurements for Kid through XL; finished circumference is determined by the ball of your foot measurement given in the sizes section — choose the size that matches your foot circumference.

Can I use different yarn weights for these socks?

You can substitute yarn, but this pattern is written for fingering weight (Lang Jawoll, 75% superwash wool/25% nylon). Changing weight will alter gauge and final size; adjust needles and stitch count accordingly.

Do I need special skills to knit the colorwork band?

Basic stranded colorwork and carrying floats is required for the band; the pattern includes a 9-round chart and tips for knitting stripes in the round to help you manage floats and avoid a jog.

How long does it typically take to knit a pair of these socks?

Most knitters complete the shorty version in a few hours and the calf-length version over a couple of days; the pattern estimates 5-7 hours depending on experience and colorwork complexity.