🧢 Beautiful ✨ Detailed πŸ’ Adorable

Any-Size Square Container Crochet Pattern

Any-Size Square Container Crochet Pattern
4.5β˜… Rating
2-4 Hours Time Needed
3.5K Made This
βœ‚οΈ

Beginner Friendly Level

Perfect for those just starting their crochet journey, with clear instructions and simple techniques

⏱️

Bite-Sized Project

Finishes in 2-4 hoursβ€”perfect for an afternoon of creative relaxation.

🏑

Cozy Accent

A warm touch for your space that transforms ordinary corners into inviting nooks filled with handmade charm.

About This Any-Size Square Container Crochet Pattern

This pattern makes an easy-to-make square container worked from the base up in rounds, with optional handles and colour changes. It is designed to be robust when made with thick, non-stretchy yarn or cord, and can be scaled to any width, height, or number of colours. The instructions use American terms first with British equivalents in brackets, making it accessible to many crocheters.

Any-Size Square Container Crochet Pattern crochet pattern - detailed view of completed project

Follow the simple base rounds to create a square foundation, then work the sides and add handles as required. The pattern includes tips for an alternative to a magic loop, joining, and finishing for a neat, sturdy container.

Why You'll Love This Any-Size Square Container Crochet Pattern

I absolutely love this pattern because it turns leftover yarn into a practical, beautiful storage solution that fits any room. I enjoy how quickly the base grows and how satisfying it is to see a square form up from a small loop. The flexibility to change width, height, and colours means I can customise each container to match my decor or use up scraps. It’s also forgiving β€” you can easily adjust hook size or yarn weight to create a chunkier or finer fabric to suit your needs.

Any-Size Square Container Crochet Pattern step 1 - construction progress Any-Size Square Container Crochet Pattern step 2 - assembly progress Any-Size Square Container Crochet Pattern step 3 - details and accessories Any-Size Square Container Crochet Pattern step 4 - final assembly and finishing

Switch Things Up

I love changing colours every few rounds to create bold stripes or subtle bands that match my room decor.

I often use a chunkier cord and a larger hook to make a sturdier, more sculptural basket for blankets and throws.

To make a mini version for desk storage, I swap to thin cotton yarn and a smaller hook to reduce the finished size and make it delicate.

I sometimes line my containers with fabric for a cleaner interior finish and extra stability; I sew the lining to the top edge for a neat look.

I experiment with handle sizes β€” shorter handles are more discreet while wider openings make the basket easier to grab items from.

I add decorative touches like pompoms, tassels, or a contrasting colour border to give each container personality.

For extra stiffness I paint the inside with fabric stiffener or diluted PVA; this helps the basket hold its shape over time.

I use different fibres like raffia or jute for a rustic look, or recycled cotton cord for a modern, clean finish.

If I want a rectangular container I simply change the base increases to make two longer sides and two shorter sides and follow the same side rounds.

I sometimes add a bottom insert of cardboard or plastic covered in fabric to make the base rigid for heavy storage needs.

Common Mistakes & How to Fix Them

βœ— Using a hook that is too large will make loose stitches and a floppy container; use the smallest comfortable hook for a dense, stiff fabric. βœ— Skipping stitch markers at corners can make sides uneven and misaligned; place and move markers on each round to mark where sides start and end. βœ— Changing colours mid-round without joining properly creates messy joins; change colours on the slip stitch join at the end of a round for a clean finish. βœ— Failing to count stitches before making handles can result in uneven openings; count stitches on each side and make sure handles are centered with equal stitches to left and right. βœ— Not fastening or securing thick cord ends neatly can cause unraveling; sew ends in when possible or glue thick cord ends neatly on the inside.

Any-Size Square Container Crochet Pattern

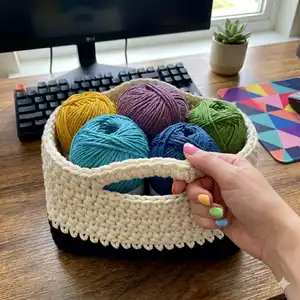
Make a sturdy, stylish square container you can customize to any size, height, or colour. This pattern is perfect for using up leftover yarn and creates a functional storage piece for your home. Clear, flexible instructions guide you from a magic-loop base up to handles and finishing touches. Ideal for makers who want a quick, useful project with room for creative variations.

Beginner Friendly 2-4 Hours

Materials Needed for Any-Size Square Container Crochet Pattern

β€” Main Fabric

  • 01
    Thick yarn (aran or thicker) in a non-stretchy fibre such as raffia, cotton or jute (amount depends on container size)
  • 02
    Bobbiny 5mm recycled cotton cord in Black (quantity depends on size) - used in cover photo
  • 03
    Bobbiny 5mm recycled cotton cord in Natural (quantity depends on size) - used in cover photo
  • 04
    Leftover yarn or cord for colour changes - quantities depend on number of colour rounds

β€” Tools Required

  • 01
    Crochet hook size 8mm (US L/11)
  • 02
    Stitch markers
  • 03
    Tapestry needle (if using yarn)
  • 04
    Glue (if using thick cord that cannot be sewn)

Progress Tracker

0% Complete

β€” General Info :

Info :

An easy-to-make container with a square base which can be made in any width, height or number of colours, making it a good project for beginners or for using up yarn left over from other projects.

Info :

The container is worked in rounds from the base up and can be made with or without the handles.

Info :

This pattern uses both American and British crochet terms. The American term is given first with the British term afterwards in brackets.

Info :

You will need: Although you can use any yarn, for a robust container I recommend using a thick yarn (aran or thicker) in a non-stretchy fibre such as raffia, cotton or jute. I used Bobbiny 5mm recycled cotton cord in Black and Natural. The smallest-sized crochet hook that you can comfortably use with your chosen yarn. The smaller your hook the denser your stitches will be and the better your container will hold its shape. I used an 8mm (US L/11) hook. Stitch markers. A tapestry needle if using yarn, or glue if using thick cord.

Info :

Abbreviations: ch = chain. ch-2 sp = chain space made using 2 ch. CR = Corner = sc (dc) in ch-2 sp, ch 2, sc (dc) in same ch-2 sp. dc = double crochet. sc = single crochet. ss = slip stitch. st(s) = stitch(es). [ ] Square brackets show two or more stitches to be repeated as a set.

Info :

Gauge: The container in the photo has a gauge of 9 sts x 10 rounds = 10 x 10cm, however the gauge is not critical. The important thing is that your stitches are dense enough to produce a relatively stiff container.

Info :

Colour changes: Colour changes are optional. If you wish to change colours do so on the ss join at the end of a round.

Info :

The container in the cover photo: The instructions below are to make any size of container, but at the end of some instructions there is an example given in brackets (e.g. 19 sts). Follow these (e.g....) if you want to replicate the container in the cover photo, which is 24cm wide and 15cm tall.

Info :

Alternative to magic loop: The base begins with a magic loop. If you don't know this technique ch 4, join with a ss into the 1st ch, ch 1, then work round 1 into this loop instead of into a magic loop.

Info :

Joining: At the end of every round join by working a ss into the 1st sc (dc) of the round.

β€” Base :

Round 1 :

[sc (dc), ch 2] 4 times into a magic loop. Join.

Round 2 :

ch 1 and turn, sc (dc) into every sc (dc) and CR into every ch-2 sp. Join.

Round 3 :

Repeat round 2 until the base is the size you want (e.g. total of 9 rounds).

β€” Sides :

Round A :

ch 1 and turn, sc (dc) in every sc (dc) and 2 sc (dc) in every ch-2 sp, placing a st marker between the 2 sc (dc) at each corner. Join.

Info :

Move the markers up on each round - they mark where each side starts/ends.

Round B :

ch 1 and turn, sc (dc) in every sc (dc). Join.

Round :

Repeat round B until the container is the height you want before the handles begin (e.g. repeat 9 times, changing colour after the 2nd repeat).

Info :

(If you are not making the handles, continue until the container is the full height you want then fasten off.)

Info :

The last round will be on the outside of the container, so if it’s currently on the inside turn the container inside out now.

β€” Handles :

Info :

Count how many sts you have on each side. Each handle should be about half the width of one side, and you need to have the same number of sts to the left and right of it (e.g. the container in the photo has 19 sts on each side. The handle is 9 sts wide, with 5 sts to the left and 5 sts to the right).

Step 1 :

Ch 1 and turn, sc (dc) in every sc (dc) until you reach the first marker.

Handle side :

sc (dc) the number of sts to the right of the handle, ch the number of sts for the handle and skip the same number of sc (dc), then sc (dc) the number of sts to the left of the handle (e.g. 5 sc (dc), ch 9, skip 9 sc (dc), 5 sc (dc)).

Step :

Sc (dc) in each sc (dc) along the next side.

Step :

Repeat the handle side.

Step :

Sc (dc) in every sc (dc) until the end of the round.

Step :

Join.

Next round :

Ch 1 and turn, sc (dc) in every sc (dc) and, in the space created by each handle, sc (dc) the same number of sts as there are ch in the handle (e.g. 9 sc (dc)). Join then fasten off.

β€” Finishing :

Info :

If you have used yarn sew in the ends on the inside, or if you have used a thick cord which can't be sewn glue the ends neatly on the inside.

Info :

If your fabric isn't as stiff as you had hoped, try painting the inside and/or the outside with fabric stiffener.

Assembly Instructions

  • Move stitch markers up each round to keep track of where each side starts and ends so handles and corners are positioned accurately.
  • When adding handles, count stitches on each side and create the handle opening by ch the number of sts for the handle and skipping the same number of sc (dc), then continue as instructed to keep symmetry.
  • If you used yarn, sew in all loose ends on the inside of the container to hide them and secure the work neatly.
  • If you used a thick cord that cannot be sewn, glue the ends neatly on the inside so they are secure and invisible from the outside.
  • If the last round is on the inside, turn the container inside out so the final round sits on the outside before finishing and adding handles.

Important Notes

  • πŸ’‘Use stitch markers to mark corners and move them up each round so your sides remain even and handles align correctly.
  • πŸ’‘Work with a small enough hook for your yarn to create a dense fabric; this helps the container keep its shape without additional support.
  • πŸ’‘Change colours on the slip stitch join at the end of a round for neat, consistent colour changes and minimal ends to weave in.

This versatile square container pattern is perfect for making custom storage for any room, crafted from thick yarn or cord for structure and style. Make it any size, any colour, with or without handles β€” the possibilities are endless. Happy crafting and enjoy creating handmade storage that’s both beautiful and useful! 🧢🏑

You ask,

we answer.

FAQs

What size will the finished piece be?

The final size depends on the number of base rounds and side repeats you make; the cover photo container is 24cm wide and 15cm tall as an example.

Can I use different yarn weights for this pattern?

Yes, you can, but a thicker yarn or cord gives a stiffer container; changing yarn weight and hook size will change the finished dimensions and fabric density.

Do I need to know how to make a magic loop?

No, an alternative is provided: ch 4, join with a ss into the 1st ch, ch 1, then work round 1 into this loop instead of using a magic loop.

How should I change colours for a clean finish?

Change colours on the slip stitch (ss) join at the end of a round to create neat joins and make weaving in ends easier.

How do I finish thick cord ends if they cannot be sewn?

If the cord cannot be sewn, glue the ends neatly on the inside of the container so they are secure and hidden.