🧶 Beautiful ✨ Detailed 💝 Adorable

Baby Fledermaus Amigurumi Pattern

Baby Fledermaus Amigurumi Pattern
4.4★ Rating
2-4 Hours Time Needed
2.3K Made This
✂️

Intermediate Level

Ideal for those with basic crochet experience, featuring slightly more advanced stitches and techniques to expand your skills.

⏱️

Bite-Sized Project

Finishes in 2-4 hours—perfect for an afternoon of creative relaxation.

🎁

Tiny Treasure

Small, sweet, and gift-worthy creations that fit perfectly in the palm of your hand with detailed charm.

About This Baby Fledermaus Amigurumi Pattern

This pattern teaches you how to crochet a tiny baby bat amigurumi using Schachenmayr Catania cotton yarn. You will work the head and body in one piece, crochet wings in rows, and add small ears and feet for personality. Perfect for gifting or as a cute decorative piece, the bat uses simple shaping techniques and clear step-by-step rounds.

Baby Fledermaus Amigurumi Pattern crochet pattern - detailed view of completed project

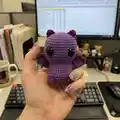
The pattern includes exact round-by-round instructions, placement notes for safety eyes, and simple sewing guidance for assembly. Photos show finished pieces and stitch details so you can match tension and shaping easily.

Why You'll Love This Baby Fledermaus Amigurumi Pattern

I absolutely love this pattern because it turns simple stitches into a tiny character full of personality. I enjoy how the wings are made separately and then stitched on to create a neat, finished look. The shaping of the head into the body gives the bat a charming silhouette that is satisfying to crochet. I also love that it is quick to make, making it perfect for gifting or practicing small sculpting techniques.

Baby Fledermaus Amigurumi Pattern step 1 - construction progress Baby Fledermaus Amigurumi Pattern step 2 - assembly progress Baby Fledermaus Amigurumi Pattern step 3 - details and accessories Baby Fledermaus Amigurumi Pattern step 4 - final assembly and finishing

Switch Things Up

I love how easy it is to customize this tiny bat by changing yarn colors; try pastel shades for a cute nursery friend or black for a classic Halloween look.

I also experiment with yarn weight and hook size to create mini keychain versions or larger plushies — simply adjust safety eye size accordingly.

I often add tiny embroidered mouths or freckles to give each bat a unique expression and personality.

I recommend trying metallic or variegated yarn for wings to add a shimmering effect that catches the light.

I sometimes replace safety eyes with embroidered eyes for baby-safe toys and a softer, handmade look.

I like to crochet little accessories like a tiny scarf or hat to dress the bat for seasons or gifts.

I encourage adding a small loop at the top with a few chains to turn the bat into an ornament or keychain.

I sometimes stitch contrasting edge trim around the wings to highlight the shape and add visual interest.

I also test stuffing levels — a firmer fill keeps the shape crisp while a softer fill gives a cuddlier result.

I enjoy grouping several bats in different colors to create a collection or garland for decorations; it's a fun way to play with color schemes.

Common Mistakes & How to Fix Them

✗ Placing safety eyes too high or low will change the character's expression; mark placement carefully and count stitches to position eyes between rounds 12 and 13 with 9 stitches between them. ✗ Skipping stitch counts on increase/decrease rounds leads to mis-shaped body sections; count your stitches after each round and verify totals against the pattern to catch errors early. ✗ Stuffing the head or body unevenly causes lumps and poor shaping; stuff gradually while shaping and add small amounts of filling to achieve an even, firm form. ✗ Using a much larger or smaller hook will change finished size and tension; use the recommended 2.5 mm hook with the stated yarn weight and check gauge on a test piece before starting.

Baby Fledermaus Amigurumi Pattern

Create an adorable tiny baby bat amigurumi with this clear and charming crochet pattern. You will make a small bat with sewn-on wings, little ears and embroidered eye details using two colors of cotton yarn. The pattern is concise and photos help guide assembly so you can finish a cute pocket-sized friend quickly.

Intermediate 2-4 Hours

Materials Needed for Baby Fledermaus Amigurumi Pattern

— Main Fabric

  • 01
    Schachenmayr Catania No.2 cotton yarn — Color 0113 violet (A)
  • 02
    Schachenmayr Catania No.2 cotton yarn — Color 0282 phlox (B)
  • 03
    Füllung (polyester stuffing) for stuffing head and body

— Tools Required

  • 01
    Crochet hook size 2.5 mm
  • 02
    Yarn needle (Garnnadel) for sewing and weaving ends
  • 03
    Embroidery needle (Sticknadel) for decorative stitching
  • 04
    Scissors (Schere)
  • 05
    Safety eyes 11 mm (2 pieces)
  • 06
    Stitch markers (optional) for rounds
  • 07
    Polyester stuffing (Füllung)

Progress Tracker

0% Complete

— Notes :

Infos :

Körper und Kopf werden in Runden an einem Stück gehäkelt. Die Flügel werden in Reihen gehäkelt und dann an den Körper genäht. Wir machen keine Wendeluftmaschen an den Flügeln. In meinem Blog finden sich Videos zur unsichtbaren Abnahme und wie man die letzte Runde schließt. Link zum Blog, siehe Kopfzeile. Ich empfehle die genannte Garnstärke sowie Baumwollgarn zu verwenden. Die Sicherheitsaugen können mit einem Feuerzeug erhitzt und flach gedrückt werden, um noch sicherer zu sein.

— Head :

R1 :

6 fM in den mR

R2 :

2 fM in jede M (12)

R3 :

(1 fM, Zun) x6 (18)

R4 :

(2 fM, Zun) x6 (24)

R5 :

(3 fM, Zun) x6 (30)

R6 :

(4 fM, Zun) x6 (36)

R7 :

(5 fM, Zun) x6 (42)

R8-14 :

1 fM in jede M

Info :

Sicherheit­saugen zwischen Runde 12 und 13 mit 9 Maschen Abstand anbringen.

R15 :

(5 fM, uns Abn) x6 (36)

R16 :

(4 fM, uns Abn) x6 (30)

R17 :

(3 fM, uns Abn) x6 (24)

Info :

Den Kopf fest füllen.

R18 :

1 fM in jedes vMg (24)

R19 :

(3 fM, Zun) x6 (30)

R20-22 :

1 fM in jede M

R23 :

(4 fM, Zun) x6 (36)

R24-25 :

1 fM in jede M

R26 :

(4 fM, uns Abn) x6 (30)

R27 :

(3 fM, uns Abn) x6 (24)

R28 :

(2 fM, uns Abn) x6 (18)

Info :

Körper füllen.

R29 :

(1 fM, uns Abn) x6 (12)

R30 :

uns Abn x6 (6)

— Wings :

Infos :

mit A: 25 Lm, wenden

R1 :

1 fM in jede M, wenden (24)

R2 :

uns Abn, 20 fM, uns Abn, wenden (22)

R3 :

uns Abn, 18 fM, uns Abn, wenden (20)

R4 :

uns Abn, 16 fM, uns Abn, wenden (18)

R5 :

uns Abn, 14 fM, uns Abn, wenden (16)

Info :

Garn abschneiden, Garnende zum Nähen lassen. Den Faden im Flügel vernähen, so dass das Ende näher zur Mitte des Flügels herauskommt. Damit wir die Flügel später annähen können.

Infos :

mit B: Garn an der ersten Reihe des Flügels anbringen. 24 fM entlang häkeln. Garn abschneiden und ein langes Ende lassen. Mit der Garnnadel Dreiecke auf den Flügel sticken.

— Ears :

Infos :

Ohren (x2) mit B

Round 1 :

2 Lm, in die zweite Lm von der Nadel: hStb, Stb, hStb, fM. Garn abschneiden, langes Ende lassen.

— Feet :

Infos :

Füße (x2) mit B

Round 1 :

2 Lm in zweite Lm von der Nadel 4 fM häkeln. Garn abschneiden und Ende lassen.

Info :

Die Flügel, Ohren und Füße annähen. Die Augen umsticken.

Assembly Instructions

  • Attach the wings to the sides of the body, centering them so the sewn-in tail end emerges near the middle of each wing, and sew securely with the yarn end left from the wing.
  • Sew the ears to the top of the head, spacing them evenly and securely with the long yarn ends left from each ear.
  • Sew the feet to the bottom front of the body so the bat can sit upright, ensuring they are evenly spaced and firmly attached.
  • Embroider around the eyes to add definition using color B as shown in the photos, and weave in all ends securely.
  • Place safety eyes between rounds 12 and 13 with 9 stitches between them before final stuffing and closing rounds.

Important Notes

  • 💡Work head and body in one continuous piece in rounds to achieve the smooth neck shaping shown in the photos.
  • 💡Wings are worked in rows without turning chains; finish and secure yarn ends so they can be positioned and sewn cleanly to the body.
  • 💡Use stitch markers to mark the beginning of each round and count stitches frequently to avoid mistakes during increases and decreases.
  • 💡Use the recommended cotton yarn and 2.5 mm hook for the intended size and firm texture; different yarns will change the finished dimensions.

You did it — you made a tiny baby bat! This little friend is perfect for gifts, shelf decor, or practice in amigurumi shaping. Keep experimenting with colors and eye styles to make each bat unique. 🧶🦇

You ask,

we answer.

FAQs

What size will the finished piece be?

The finished amigurumi measures approximately palm-sized (around 8-12 cm tall) when using Schachenmayr Catania No.2 and a 2.5 mm hook; exact size will vary with tension and yarn.

Can I use different yarn weights for this pattern?

Yes, you can use different yarn weights, but this will affect the final size and stitch counts; choose an appropriate hook and adjust safety eye size accordingly.

Do I need prior crochet experience for this pattern?

This pattern is rated intermediate and requires knowledge of single crochet, increases, decreases and working in rounds; beginners with practice can also follow along carefully.

How long does this project typically take to complete?

Most crocheters complete this project in 2-4 hours, depending on experience level and how much time you spend on sewing and embroidery details.