🧢 Beautiful ✨ Detailed πŸ’ Adorable

Clyde The Chameleon Amigurumi Pattern

Clyde The Chameleon Amigurumi Pattern
4.2β˜… Rating
5-7 Hours Time Needed
3.0K Made This
βœ‚οΈ

Intermediate Level

Ideal for those with basic crochet experience, featuring slightly more advanced stitches and techniques to expand your skills.

⏱️

Weekend Treat

Takes 5-7 hours, making it an enjoyable project to finish over a couple of days.

🧸

Cute Companion

An adorable friend to cherish, handcrafted with love to bring comfort and joy for years to come.

About This Clyde The Chameleon Amigurumi Pattern

This pattern creates Clyde, a small chameleon amigurumi worked tail to nose with shaping to form a curled tail and tapered nose. The legs are made separately and sewn on, and the head features felt-backed safety eyes for a polished finish. You will use basic amigurumi techniques, stitch increases/decreases, and simple shaping to achieve the final look.

Clyde The Chameleon Amigurumi Pattern crochet pattern - detailed view of completed project

Includes full round-by-round instructions, material list, and step photos to guide you. The pattern is intermediate level and ideal for crocheters looking to expand their skills with shaping and small sewn-on pieces.

Why You'll Love This Clyde The Chameleon Amigurumi Pattern

I absolutely love this pattern because it takes a classic amigurumi approach and adds charming reptile shaping that is both fun and satisfying to make. I enjoy the tail-to-nose construction β€” it creates a smooth shape and a surprising amount of personality in a small toy. Making the legs separately and sewing them on gives you control over the final pose, which I always appreciate when finishing. The use of felt behind safety eyes gives Clyde a bright, friendly expression that really brings him to life. Overall, this pattern is one of my favorites because it balances small, quick construction with thoughtful shaping details.

Clyde The Chameleon Amigurumi Pattern step 1 - construction progress Clyde The Chameleon Amigurumi Pattern step 2 - assembly progress Clyde The Chameleon Amigurumi Pattern step 3 - details and accessories Clyde The Chameleon Amigurumi Pattern step 4 - final assembly and finishing

Switch Things Up

I love experimenting with different colorways for Clyde; try gradient or variegated yarn for a colorful chameleon effect.

I sometimes use DK weight yarn with a smaller hook to create a tinier keychain-sized chameleon.

I also make chunky, cuddle-friendly versions using bulky yarn and a larger hook for a plush feel.

I often swap safety eyes for embroidered eyes to make this toy washable and baby-safe.

I will add small embroidered spots or stripes to the back to give Clyde a unique personality and patterning.

I like to vary the tail curl tightness by adjusting stuffing and how much I curve the tail before fully closing the body.

I sometimes insert a short length of wire into the tail to make it poseable and hold a coiled position.

I recommend trying different felt colors behind the eyes to change the expression from friendly to curious.

I often make a tiny hat or scarf as an accessory to give Clyde a seasonal look and make him gift-ready.

I encourage you to combine yarn leftovers to create multi-colored legs or a contrasting belly for extra charm.

I also enjoy making a whole family of chameleons in matching or complementary colors for a whimsical set.

Common Mistakes & How to Fix Them

βœ— Not using stitch markers can cause you to lose track of the start of rounds and misplace increases or decreases; place a marker at the first stitch of each round and move it as you go to maintain accurate counts. βœ— Forgetting to stuff as you go can create lumps or gaps in shaping; add small amounts of stuffing gradually and shape as rounds progress to maintain smooth curves and consistent firmness. βœ— Working with a loose tension will create holes between stitches that allow stuffing to poke through; use a hook and yarn combination that produces a tight fabric and maintain even tension throughout. βœ— Rushing increases or decreases often leads to uneven shaping; count stitches frequently and mark rows where increases or decreases occur so that shaping remains symmetrical and accurate.

Clyde The Chameleon Amigurumi Pattern

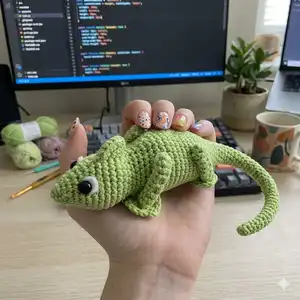
Make your own adorable Clyde the Chameleon with this detailed amigurumi pattern. You will work tail-to-nose to shape the body and create four attached legs and a curled tail. Clear instructions, photos, and helpful tips guide you through every step so you can finish a delightful handmade companion. Perfect as a thoughtful gift or a bright addition to your amigurumi collection.

Intermediate 5-7 Hours

Materials Needed for Clyde The Chameleon Amigurumi Pattern

β€” Main Fabric

  • 01
    Worsted weight yarn (#4) / Aran weight (4) - Main color: approximately 100 yards (recommended Paintbox Aran or Stylecraft Special Aran)

β€” Tools Required

  • 01
    Crochet hook 4mm (G)
  • 02
    Safety eyes 9mm (2)
  • 03
    1/2" white felt circles (or white yarn for backing behind eyes)
  • 04
    Yarn needle for sewing and finishing
  • 05
    Stitch marker
  • 06
    Polyester stuffing
  • 07
    Scissors

Progress Tracker

0% Complete

β€” Pattern Info :

Info :

Text only print formatted section - Print pages 6-8. Clyde is an intermediate skill level pattern that has slight shaping in the body, and attached legs. While I have tried to make it as easy to follow as possible, some previous crochet knowledge is required to complete. While gauge itself is not important to this project. The main sizing concern is to use a hook and yarn combo that creates a tight enough fabric that does not have holes between stitches for stuffing to poke through. If made with suggested yarn and hook size, Clyde will be approx 10" long when completed. Clyde is worked from tail to nose.

β€” Body :

Info :

In your main color yarn. Worked in the round. Stuff as you go.

Round 1 :

Sc x 3 into MR. (3)

Round 2-5 :

Sc x 3. (3) (4 rounds)

Round 6 :

Sc Inc, Sc x 2. (4)

Round 7-10 :

Sc x 4. (4) (4 rounds)

Round 11 :

Sc Inc, Sc x 3. (5)

Round 12-15 :

Sc x 5. (5) (4 rounds)

Round 16 :

Sc Inc, Sc x 4. (6)

Round 17-20 :

Sc x 6. (6) (4 rounds)

Round 21 :

Sc Inc, Sc x 5. (7)

Round 22-24 :

Sc x 7. (7) (3 rounds)

Round 25 :

Sc Inc, Sc x 6. (8)

Round 26-28 :

Sc x 8. (8) (3 rounds)

Round 29 :

Sc Inc, Sc x 7. (9)

Round 30-31 :

Sc x 9. (9) (2 rounds)

Round 32 :

Sc Inc, Sc x 8. (10)

Round 33 :

Sc x 10. (10)

Info :

Sc x 2. Do not count these Sts. First stitch worked in round 34 is where your marker will go, and where the round begins. (figures 1 & 2)

Round 34 :

Sc Inc x 2, Sc x 8. (12)

Round 35 :

Sc, Sc Inc x 2, Sc x 9. (14)

Round 36 :

Sc x 2, Sc Inc x 2, Sc x 10. (16)

Round 37 :

Sc x 16. (16)

Round 38 :

Sc x 4, Sc Inc x 2, Sc x 10. (18)

Round 39 :

Sc x 5, Sc Inc x 2, Sc x 11. (20)

Round 40 :

Sc x 6, Sc Inc x 2, Sc x 12. (22)

Round 41 :

Sc x 7, Sc Inc x 2, Sc x 13. (24)

Round 42 :

Sc Inc, Sc x 7, Sc Inc x 2, Sc x 7, Sc Inc, Sc x 6. (28)

Round 43 :

Sc Inc, Sc x 9, Sc Inc x 2, Sc x 9, Sc Inc, Sc x 6. (32)

Round 44-53 :

Sc x 32. (32) (10 rounds) (figure 4)

Info :

Sc x 3. Do not count these Sts. First stitch worked in round 54 is where your marker will go, and where the round begins.

Round 54 :

Sc Dec, Sc x 9, Sc Dec x 2, Sc x 9, Sc Dec, Sc x 6. (28)

Round 55 :

Sc Dec, Sc x 7, Sc Dec x 2, Sc x 7, Sc Dec, Sc x 6. (24)

Round 56 :

Sc x 8, Sc Dec x 2, Sc x 12. (22)

Round 57 :

Sc x 7, Sc Dec x 2, Sc x 11. (20)

Round 58 :

Sc x 6, Sc Dec x 2, Sc x 10. (18)

Round 59 :

Sc, [Sc Inc, Sc x 5] x 2, Sc Inc, Sc x 4. (21)

Round 60 :

Sc, [Sc Inc x 2, Sc x 5] x 2, Sc Inc x 2, Sc x 4. (27)

Round 61 :

Sc x 10, Sc Inc x 4, Sc x 13. (31)

Round 62 :

Sc x 2, Sc Inc, Sc x 7, Sc Inc x 8, Sc x 7, Sc Inc, Sc x 5. (41)

Round 63 :

Sc x 41. (41) (figure 6)

Round 64 :

Sc x 13, Pinch together the 8 Sc Inc from round 62. Work a Sc Dec into the BLO of Sts 14 and 26 to close off the veil (figure 7), leaving Sts 15-25 unworked. Sc x 13, Sc Dec. (28)

Round 65 :

Sc x 3, Sc Dec, Sc x 7, Sc the next 3 Sts together (figure 8), Sc x 7, Sc Dec, Sc x 4. (24)

Round 66 :

Sc x 3, [Sc Dec, Sc x 6] x 2, Sc Dec, Sc x 3. (21)

Round 67 :

Sc x 3, [Sc Dec, Sc x 5] x 2, Sc Dec, Sc x 2. (18)

Round 68 :

Sc x 2, [Sc Dec, Sc x 4] x 2, Sc Dec, Sc x 2. (15)

Info :

Cut small holes into felt circles and insert the safety eye into the hole. (figure 9) Then place one eye on each side of the top of the head between rounds 66 & 67 with about 4 Sts between them across the top. (figures 10 & 11)

Round 69 :

Sc x 2, [Sc Dec, Sc x 3] x 2, Sc Dec, Sc. (12)

Round 70 :

[Sc Dec, Sc x 2] x 3. (9)

Round 71 :

[Sc Dec, Sc] x 3. (6)

Info :

FO, and leave a long tail.

Info :

Thread tail onto your needle, and pick up the FLO of round 71. Pull to close. (figure 12)

Info :

Insert needle into head and pull up to where the opening begins in round 64. Make sure the nose is stuffed firmly by adding if needed before closing the hole.

Info :

Stitch the BLO of rounds 15-25 together to close the veil. (figure 14)

Info :

Weave in end. (figure 15) Dec x 2, Sc x 10. (18) (figure 5)

β€” Legs :

Info :

Make 4. In your main color yarn. Worked in the round.

Round 1 :

Sc x 6 into MR. (6)

Round 2-10 :

Sc x 6. (6) (9 rounds) (figure 16)

Info :

Pinch closed and Sc x 3 across. Ch x 1, turn. (3) The foot is worked in 2 parts starting from these Sts.

Row 1A :

FLO: Sc x 3, Ch 1, turn. (3) (figure 17)

Rows 2-4 :

Sc x 3. (3) (3 rows)

Info :

Sc x 3 down the side of the foot. (3) (figure 18)

Row 1B :

In the unworked BLO, Sc x 3. (3) (figure 19)

Rows 2-3 :

Sc x 3. (3) (2 rows)

Info :

Sc x 2 down the side of the foot. (2) (figure 20)

Info :

FO, leave long tail.

Info :

Sew to the body. The longer sides will face the head on the front legs, and the tail on the back legs. (figures 22 & 23)

Assembly Instructions

  • Cut small holes into felt circles and insert the safety eyes, then place one eye on each side of the top of the head between rounds 66 and 67 with about 4 stitches between them.
  • Sew each leg to the body securely; for front legs ensure the longer side faces the head, and for back legs ensure the longer side faces the tail.
  • Stitch the BLO of rounds 15-25 together to close the veil and form the body seam before finishing the head placement.
  • Thread tail into needle and pick up the FLO of round 71, pull to close the nose, then insert needle to the opening at round 64 and close, stuffing firmly as needed.

Important Notes

  • πŸ’‘Use stitch markers to keep track of round starts and where increases/decreases occur for accurate shaping.
  • πŸ’‘Stuff firmly as you go but not so much that the fabric stretches; overstuffing can distort the shape and make sewing pieces together difficult.
  • πŸ’‘Work with a hook and yarn combo that produces a tight fabric so stuffing does not poke through; worsted/aran weight and a 4mm hook are recommended.
  • πŸ’‘Place felt behind safety eyes to secure them and prevent the eye posts from damaging the yarn fabric; cut small holes in felt first for the safety eye inserts.

This Clyde the Chameleon pattern is a delightful, tail-to-nose amigurumi design that brings playful reptile charm to your handmade collection. Whether you make one for yourself or as a gift, Clyde is sure to brighten any shelf or playroom with his sweet expression and curled tail. Happy crocheting and enjoy every stitch on this fun little project! 🧢🦎

You ask,

we answer.

FAQs

What size will the finished piece be?

The finished amigurumi will be approximately 10 inches long when using recommended worsted/aran weight yarn and a 4mm hook.

Can I use different yarn weights for this pattern?

Yes, you can use different yarn weights but changing yarn weight will alter the final size. Adjust your hook accordingly and expect different stitch counts if you change gauge significantly.

Do I need prior crochet experience for this pattern?

This pattern is rated intermediate, so familiarity with single crochet, increases, decreases, and working in the round is recommended for best results.

How long does this project typically take to complete?

Most crocheters complete this project in about 5-7 hours, depending on experience level and how much time you take with stuffing and assembly.