🧢 Beautiful ✨ Detailed πŸ’ Adorable

A Hairy Caterpillar Amigurumi Pattern

A Hairy Caterpillar Amigurumi Pattern
4.2β˜… Rating
5-7 Hours Time Needed
2.1K Made This
βœ‚οΈ

Intermediate Level

Ideal for those with basic crochet experience, featuring slightly more advanced stitches and techniques to expand your skills.

⏱️

Weekend Treat

Takes 5-7 hours, making it an enjoyable project to finish over a couple of days.

πŸ₯

Charming Critter

Delightful animal designs with sweet details that capture the essence of your favorite woodland and farmyard friends.

About This A Hairy Caterpillar Amigurumi Pattern

This pattern creates a cute, hairy caterpillar amigurumi worked in continuous rounds from head to tail. It features multiple color changes, small appended parts (antennae and feet), and a fun hairy spine made from short yarn strands. The pattern is written in UK terminology and uses double crochet (dc) stitches for an easy textured fabric.

A Hairy Caterpillar Amigurumi Pattern crochet pattern - detailed view of completed project

You will make eye rings, attach safety eyes, and sew on antennae and feet as you go. Instructions include exact rounds, finishing steps, and tips for attaching hair strands along the back.

Why You'll Love This A Hairy Caterpillar Amigurumi Pattern

I absolutely love this pattern because it brings so much personality to a small, simple shape β€” the hairy spine and bright colours really make it pop. I enjoy how the piece grows segment by segment, which makes stuffing and shaping straightforward and satisfying. The small appendages like antennae and feet add character without being fiddly, and the hair attachment is a fun, crafty finishing step. Sharing this design always brings smiles; it is playful, quick to make, and perfect for using up oddments of yarn.

A Hairy Caterpillar Amigurumi Pattern step 1 - construction progress A Hairy Caterpillar Amigurumi Pattern step 2 - assembly progress A Hairy Caterpillar Amigurumi Pattern step 3 - details and accessories A Hairy Caterpillar Amigurumi Pattern step 4 - final assembly and finishing

Switch Things Up

I love customizing this caterpillar by changing the colour palette; try pastels for a softer look or neon shades for a playful toy.

I often make a mini version by using lighter weight yarn and a smaller hook for cute keychain friends.

If I want a chunkier, cuddlier caterpillar I use bulky yarn and a larger hook to scale the whole pattern up.

I sometimes switch safety eyes for embroidered eyes to make the toy safer for babies and small children.

I like to add little accessories like a tiny crocheted hat or scarf to give each caterpillar a unique personality.

I recommend experimenting with the hair density and colours β€” adding more red strands or mixing in a third colour can create interesting effects.

I sometimes insert a small bell or rattle inside the body segment to make a sensory toy for toddlers.

I also try different feet shapes and placements to create distinct poses or make the caterpillar sit more stably.

I enjoy embroidering expressive mouths or freckles to change the character, and it’s an easy way to personalize gifts.

For displays I link several caterpillars together with a crocheted thread to make a colourful garland or mobile.

Common Mistakes & How to Fix Them

βœ— Not leaving the magic ring slightly open for eye rings; leave a small hole so the safety eye stem can be inserted through the ring before tightening. βœ— Forgetting to stuff as you go results in lumps and mis-shaped segments; stuff gradually between colour changes and shaping rounds to keep an even profile. βœ— Changing colours without weaving in tails can look messy at the joins; carry yarn neatly or weave in ends as you change colours to secure them. βœ— Sewing parts in the wrong position makes the finished toy look unbalanced; pin and check placement of eyes, antennae and feet before stitching them in place. βœ— Pulling the final tail too tight when closing can pucker the piece; leave a long tail and thread it through remaining stitches, then pull gently to close evenly.

A Hairy Caterpillar Amigurumi Pattern

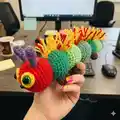
Make a charming, colorful hairy caterpillar amigurumi using simple rounds and easy assembly. This pattern walks you through each round and every small part so you can create a playful, textured toy. Perfect for gifting or keeping as a cozy handmade companion, the caterpillar is full of character with its tufted spine and tiny feet. You will enjoy the step-by-step instructions and clear sections for eyes, antennae, feet and hair.

Intermediate 5-7 Hours

Materials Needed for A Hairy Caterpillar Amigurumi Pattern

β€” Main Fabric

  • 01
    Double Knit (DK) yarn: Red x1 ball (head colour)
  • 02
    Double Knit (DK) yarn: Dark Green x1 ball
  • 03
    Double Knit (DK) yarn: Bright Green x1 ball
  • 04
    Double Knit (DK) yarn: Sage Green x1 ball
  • 05
    Oddments of Purple for antennae
  • 06
    Oddments of Dark Brown for feet
  • 07
    Oddments of Yellow for eye rings and hairy spine
  • 08
    Small amounts of Red for interspersed spine strands

β€” Tools Required

  • 01
    Crochet hook size 4mm
  • 02
    Polyester stuffing
  • 03
    Safety eyes 12mm green x2
  • 04
    Safety nose 9mm black triangle nose
  • 05
    Stitch marker
  • 06
    Tapestry needle for sewing in ends and assembly

Progress Tracker

0% Complete

β€” Eye Rings x2 :

Info :

Using Yellow make a magic ring, ch1

Round 1 :

dc x8 into ring, ss into first st. FO.

Info :

Do not fully close your magic ring, leave a small hole in the centre, just enough to fit the stem of the safety eye through.

Info :

Pop a safety eye into the centre, but do not attach the back yet. You will attach the eyes to the head between rows 3 and 4 once you have made the head.

β€” Head &Body :

Info :

You will be starting at the head and working down the body to the tail.

Info :

Stuff as you go.

Info :

Using Red make a magic ring, ch1

Round 1 :

dc x8 into ring (8)

Round 2 :

inc around (16)

Round 3 :

[inc, dc] repeat around (24)

Round 4 :

[inc, dc x2] repeat around (32)

Round 5-10 :

dc around (32)

Info :

Attach eyes (including eye rings), between rows 3 and 4, about 7 stitches apart.

Round 11 :

[dec, dc x2] repeat around (24)

Round 12 :

[dec, dc] repeat around (16)

Round 13 :

dec around (8). Change to Dark Green

Round 14 :

inc (24)

Round 15 :

[inc, dc] repeat around (24)

Round 16 :

[inc, dc x2] repeat around (32)

Round 17-20 :

dc around (32)

Round 21 :

[dec, dc x2] repeat around (24)

Round 22 :

[dec, dc] repeat around (16)

Round 23 :

dec around (8). Change to Bright Green

Round 24-32 :

repeat rows 14-23 - Changing to Sage Green at the end of round 32.

Round 33-41 :

repeat rows 14-23 - Changing to Dark Green at the end of round 41.

Round 42 :

inc around (16)

Round 43 :

[inc, dc] repeat around (24)

Round 44-46 :

dc around (24)

Round 47 :

[dec, dc] repeat around (16)

Round 48 :

dec around (8). change to Bright Green

Round 49-55 :

repeat rows 42-48, changing to Sage Green at the end of row 55.

Round 56 :

inc around (16)

Round 57-58 :

dc around (16)

Round 59 :

dec (8)

Round 60 :

dec (4)/ FO. leaving a long end to close. Thread end through remaining stitches and pull to close.

Info :

Sew in ends

β€” Antenna x2 :

Info :

Using Purple make a magic ring, ch1

Round 1 :

dc x3 into ring (3)

Round 2 :

inc, dc, inc (5)

Round 3 :

dc around (5)

Round 4 :

dec, dc x3 (4)

Round 5-6 :

dc around (4). FO.

Info :

Stuff tips of antenna lightly.

Info :

Sew antenna to centre top of head, a couple of rows above the eyes, and a couple of stitches apart.

β€” Feet x 6 :

Info :

Using Brown make a magic ring, ch1

Round 1 :

dc x4 into ring (4)

Round 2 :

inc around (8)

Round 3-4 :

dc around (8). FO

Info :

Stuff lightly.

Info :

Sew 2 feet to the first body segment (first green segment after the head).

Info :

Attach feet to the underside, about 3 stitches apart.

Info :

Sew 2 to the second body segment.

Info :

Sew 2 to the fourth body segment.

β€” Hairy Spine :

Info :

Cut several 10cm lengths of Yellow yarn, and a about 8 Red.

Info :

Attach along the centre of the Caterpillars back, interspersing the Red at random intervals till you reach the tail.

β€” To Attach the hair strands - :

Info :

Attach the strands by inserting your crochet hook into the loop of a stitch.

Info :

Catch the middle of the hair strand and pull a loop through. Pull the ends of the strand through the loop. This should hold firmly.

Info :

Cut spine hairs to length (aprox 2cm), so they stick up nicely.

Info :

Tadah! Enjoy!

Assembly Instructions

  • Attach the eye rings and safety eyes between rows 3 and 4 of the head, spacing them about 7 stitches apart; secure the safety back once position is confirmed.
  • Sew the two antennae to the centre top of the head a couple of rows above the eyes, leaving a couple of stitches between them for symmetry.
  • Sew the six feet to the underside: 2 feet to the first green body segment (closest after the head), 2 feet to the second body segment, and 2 feet to the fourth body segment; space feet about 3 stitches apart.
  • Attach hair strands along the centre of the back using a crochet hook: fold each hair strand in half, pull the loop through a stitch, then pull the ends through the loop to secure, interspersing red strands randomly.
  • Weave in and sew all loose ends securely; thread the long closing tail through remaining stitches to close final opening and secure firmly before hiding the tail.

Important Notes

  • πŸ’‘Do not fully close the magic ring for the eye rings; leave a small hole to insert the stem of the safety eye before tightening.
  • πŸ’‘Stuff the body segments as you go to achieve an even shape; stuffing later can create lumps and uneven segments.
  • πŸ’‘Leave a long tail when fastening off the final round so you can thread it through remaining stitches and pull to close the opening neatly.
  • πŸ’‘Pin and check placement of eyes, antennae and feet before sewing them in place to ensure symmetry and correct positioning.

This lovely Hairy Caterpillar pattern is a joyful, colourful project that brightens any day and makes a perfect handmade gift. It uses simple rounds, fun colour changes, and a playful hairy spine to give your creation tons of character. Make one for yourself or stitch up a whole family of caterpillars to decorate a nursery or gift basket. πŸ§ΆπŸ›βœ¨

You ask,

we answer.

FAQs

What size will the finished piece be?

The finished amigurumi measures approximately 25 cm long when using DK yarn and a 4mm hook, as stated in the pattern.

Can I use different yarn weights for this pattern?

Yes, you can change yarn weight, but this will affect the final size; use a larger hook for bulkier yarn and a smaller hook for thinner yarn to maintain proportions.

Do I need prior crochet experience for this pattern?

This pattern is rated intermediate and assumes familiarity with basic stitches such as dc (double crochet), inc and dec, as well as working in the round and assembling small pieces.

How long does this project typically take to complete?

Most crocheters finish this project in about 5-7 hours, depending on experience, speed, and time spent on hair attachment and assembly.

Where should I place the safety eyes?

Place the safety eyes between rows 3 and 4 of the head, approximately 7 stitches apart, using the eye rings provided and testing placement before securing the backs.