๐Ÿงถ Beautiful โœจ Detailed ๐Ÿ’ Adorable

Yoshi Amigurumi Pattern

Yoshi Amigurumi Pattern
4.8โ˜… Rating
5-7 Hours Time Needed
2.7K Made This
โœ‚๏ธ

Intermediate Level

Ideal for those with basic crochet experience, featuring slightly more advanced stitches and techniques to expand your skills.

โฑ๏ธ

Weekend Treat

Takes 5-7 hours, making it an enjoyable project to finish over a couple of days.

๐Ÿงธ

Cute Companion

An adorable friend to cherish, handcrafted with love to bring comfort and joy for years to come.

About This Yoshi Amigurumi Pattern

This pattern creates a standing Yoshi amigurumi complete with shell, boots, spikes, cheeks, and felt or needle-felted eyes. You will work mostly in continuous rounds and join pieces together for a seamless look. Techniques used include single crochet, increases, decreases, half double crochet, and working in front/back loops for shaping. The pattern contains many step-by-step photos to guide assembly and finishing.

Yoshi Amigurumi Pattern crochet pattern - detailed view of completed project

Designed for intermediate crocheters comfortable with shaping and small piece assembly. Includes guidance for felt eyes and needle-felting for realistic, durable facial features.

Why You'll Love This Yoshi Amigurumi Pattern

I absolutely love this pattern because it captures the playful personality of Yoshi while remaining fun to make. I enjoyed designing the shell and boots to give the finished toy character and balance. The pattern photos and step-by-step instructions make assembly straightforward, which I find very satisfying. I also love offering two eye options (felt or needle-felted) so you can personalize the look to your taste.

Yoshi Amigurumi Pattern step 1 - construction progress Yoshi Amigurumi Pattern step 2 - assembly progress Yoshi Amigurumi Pattern step 3 - details and accessories Yoshi Amigurumi Pattern step 4 - final assembly and finishing

Switch Things Up

I love how flexible this pattern is for customization โ€” change colors to create your own unique Yoshi variation.

I often swap the main green for pastels to make a kawaii-style Yoshi that is soft and sweet.

To make a mini keychain version, use fingering weight yarn and a smaller hook; the piece will be much smaller and perfect for gifts.

If you want a chunky, cuddly Yoshi, use bulky yarn and a larger hook for a plush, larger toy.

I like adding embroidered details on the saddle or tiny crocheted accessories like a scarf to personalize each Yoshi I make.

Try using safety eyes for a more durable toy if it will be handled frequently, or use the felt/needle-felted method for a softer, handmade look.

I sometimes add a small piece of wire inside the arms to pose them โ€” just be careful to secure the ends so they don't poke through the yarn.

Swap the boot colors to create different shoe styles; you can also crochet short socks or add a cuff as shown in the pattern.

Experiment with face placement to change personality โ€” higher-eyed placements make a more cartoonish look while lower eyes create a sweeter, more realistic expression.

I recommend testing any major changes on a small sample first so you can fine-tune placement, stuffing, and color balance before committing to the full project.

Common Mistakes & How to Fix Them

โœ— Skipping the stitch marker at the end of rounds leads to losing track of where the round begins; always place a stitch marker at the start of each round and move it after each round. โœ— Not stuffing gradually causes lumps or misshapen pieces; stuff little by little and check the shape frequently to maintain an even form. โœ— Forgetting to leave long tails for sewing makes assembly difficult; leave a long tail when finishing each piece so you have enough yarn to sew parts securely. โœ— Changing tension mid-project creates uneven sizing between pieces; maintain consistent tension and check gauge by comparing pieces as you work. โœ— Overstuffing small parts like the nose or spikes can distort shaping and make sewing awkward; lightly stuff small parts and adjust stuffing while sewing to achieve the intended profile.

Yoshi Amigurumi Pattern

Bring a beloved Nintendo friend to life with this handmade Yoshi amigurumi pattern. You will make a standing Yoshi with detailed shell, boots, facial features, and spikes using worsted weight yarn. The pattern includes full round-by-round instructions, assembly photos, and options for felt or needle-felted eyes to suit your preference. Enjoy a satisfying crochet project that makes a charming gift or display piece.

Intermediate 5-7 Hours

Materials Needed for Yoshi Amigurumi Pattern

โ€” Main Fabric

  • 01
    Red Heart Super Saver (worsted weight #4) - Spring Green (main body color)
  • 02
    Red Heart Super Saver (worsted weight #4) - Pumpkin (for head spikes and accents)
  • 03
    Red Heart Super Saver (worsted weight #4) - Red (for saddle center)
  • 04
    Red Heart Super Saver (worsted weight #4) - White (for belly, cheeks, saddle border, eyes)
  • 05
    Red Heart Super Saver (worsted weight #4) - Carrot (for boots)
  • 06
    Red Heart Super Saver (worsted weight #4) - Gold (for boot soles)
  • 07
    Felt: White (for craft felt eye option)
  • 08
    Felt: Black (for craft felt eye option)

โ€” Tools Required

  • 01
    Crochet hook size G (4.0mm)
  • 02
    Scissors
  • 03
    Yarn needle for sewing
  • 04
    Felting needle (for needle-felted eyes, optional)
  • 05
    Stitch markers
  • 06
    Polyester fiber-fil stuffing
  • 07
    Hot glue (optional for felt eyes)
  • 08
    Pins for assembly

Progress Tracker

0% Complete

โ€” Eye Tops :

Round 1 :

6 sc in magic ring (6)

Round 2 :

inc around (12)

Round 3 :

[3 sc, inc] rep 3 times (15)

Info :

Finish off the first Eye Top with a slip stitch. Do not finish off the second. Now with the second Eye Top still on your hook we are going to join these two pieces together with a sc.

Info :

1- Second eye top still on hook. 2- Insert hook through any stitch on the first eye top. 3- Make a sc to join them together. Place your stitch marker in this stitch to mark the end of the round. We are going to continue to crochet around both pieces to form the head.

โ€” Head :

Round 4 :

sc around both pieces (30)

Round 5 :

sc around (30)

Round 6 - Round 10 :

sc around (30)

Round 11 :

[4 sc, inc] rep 6 times (36)

Round 12 :

[5 sc, inc] rep 6 times (42)

Round 13 :

sc around (42)

Round 14 - Round 16 :

sc around (42)

Round 17 :

[5 sc, dec] rep 6 times (36)

Round 18 :

[4 sc, dec] rep 6 times (30)

Round 19 :

[3 sc, dec] rep 6 times (24)

Round 20 :

[2 sc, dec] rep 6 times (18)

Info :

Finish off with a slip stitch and stuff the head. Leave a long tail for sewing. Leave open.

โ€” Nose :

Round 1 :

6 sc in magic ring (6)

Round 2 :

inc around (12)

Round 3 :

[1 sc, inc] rep 6 times (18)

Round 4 :

[2 sc, inc] rep 6 times (24)

Round 5 :

[3 sc, inc] rep 6 times (30)

Round 6 :

[4 sc, inc] rep 6 times (36)

Round 7 :

[5 sc, inc] rep 6 times (42)

Round 8 :

sc around (42)

Round 9 - Round 11 :

sc around (42)

Round 12 :

[5 sc, dec] rep 6 times (36)

Round 13 :

[4 sc, dec] rep 6 times (30)

Round 14 :

[3 sc, dec] rep 6 times (24)

Info :

Finish with a slip stitch. Leave a long tail for sewing. Stuff the nose and leave open.

โ€” Body :

Round 1 :

6 sc in magic ring (6)

Round 2 :

inc around (12)

Round 3 :

[1 sc, inc] rep 6 times (18)

Round 4 :

[2 sc, inc] rep 6 times (24)

Round 5 :

[3 sc, inc] rep 6 times (30)

Round 6 :

[4 sc, inc] rep 6 times (36)

Round 7 :

[5 sc, inc] rep 6 times (42)

Round 8 :

sc around (42)

Round 9 :

sc around (42)

Round 10 :

sc around (42)

Round 11 :

[5 sc, dec] rep 3 times, 21 sc (39)

Round 12 :

sc around (39)

Round 13 :

[4 sc, dec] rep 3 times, 21 sc (36)

Round 14 :

sc around (36)

Round 15 :

[3 sc, dec] rep 3 times, 21 sc (33)

Round 16 :

sc around (33)

Round 17 :

[2 sc, dec] rep 3 times, 21 sc (30)

Round 18 :

[1 sc, dec] rep 3 times, 21 sc (27)

Round 19 :

3 dec, 21 sc (24)

Round 20 :

[6 sc, dec] rep 3 times (21)

Round 21 :

[5 sc, dec] rep 3 times (18)

Round 22 :

sc around (18)

Info :

Finish with a slip stitch. Leave a long tail for sewing. Stuff the body and leave open.

โ€” Tail :

Round 1 :

6 sc in magic ring (6)

Round 2 :

sc around (6)

Round 3 :

[1 sc, inc] rep 3 times (9)

Round 4 :

[2 sc, inc] rep 3 times (12)

Round 5 :

[3 sc, inc] rep 3 times (15)

Round 6 :

sc around (15)

Round 7 :

4 hdc, hdc-inc, [4 sc, inc] rep 2 times (18)

Round 8 :

6 hdc, 12 sc (18)

Round 9 :

5 hdc, hdc-inc, [5 sc, inc] rep 2 times (21)

Round 10 :

6 hdc, hdc-inc, [6 sc, inc] rep 2 times (24)

Round 11 :

7 hdc, hdc-inc, [7 sc, inc] rep 2 times (27)

Round 12 :

8 hdc, hdc-inc, [8 sc, inc] rep 2 times (30)

Round 13 :

10 hdc, 20 sc (30)

Info :

Finish with a slip stitch. Leave a long tail for sewing. Stuff the tail and leave open.

โ€” Arm :

Round 1 :

6 sc in magic ring (6)

Round 2 :

inc around (12)

Round 3 :

[1 sc, inc] rep 6 times (18)

Round 4 :

sc around (18)

Round 5 :

9 dec (9)

Round 6 :

sc around (9)

Round 7 - Round 12 :

sc around (9)

Info :

Stuff the arm. To close, fold the end flat and sc across the opening.

โ€” Cheeks :

Round 1 :

6 sc in magic ring (6)

Round 2 :

inc around (12)

Round 3 :

[1 sc, inc] rep 6 times (18)

Round 4 :

[2 sc, inc] rep 6 times (24)

Round 5 :

sc around (24)

Info :

Finish with a slip stitch and leave a long tail for sewing.

โ€” Shoe/Leg :

Info :

Use Gold, Carrot, and Spring Green. Make two. Start with Gold. We are going to start with a chain, then we are going to crochet around the chain to form a round. Chain 8.

Round 1 :

Working down the chain: 6 sc, 3 sc in the next stitch, working up the other side of the chain: 6 sc, 3 sc in the next stitch (18)

Round 2 :

6 sc, 3 inc, 6 sc, 3 inc (24)

Round 3 :

in Back Loops Only: sl st around (24)

Info :

-color change to carrot-

Round 4 :

in Back Loops Only: sl st around (24)

Round 5 :

in Back Loops Only: 6 sc, 8 hdc, 10 sc (24)

Round 6 :

6 sc, 8 hdc, 10 sc (24)

Round 7 :

6 sc, 4 dec, 10 sc (20)

Round 8 :

4 sc, 4 dec, 8 sc (16)

Round 9 :

4 sc, 2 dec, 8 sc (14)

Round 10 :

sc around (14)

Info :

At this point stuff the shoe and continue to stuff as you go.

Info :

-color change to Spring Green-

Round 11 :

sc around (14)

Round 12 :

sc around (14)

Round 13 :

sc around (14)

Round 14 :

[6 sc, inc] rep 2 times (16)

Round 15 :

[7 sc, inc] rep 2 times (18)

Round 16 :

[2 sc, inc] rep 6 times (24)

Round 17 :

sc around (24)

Round 18 :

[2 sc, dec] rep 6 times (18)

Round 19 :

[1 sc, dec] rep 6 times (12)

Round 20 :

6 dec (6)

Info :

Finish stuffing and close off.

โ€” Belly :

Info :

Use White. This piece will be worked in ROWS. At the end of each row you will chain 1 before turning your work. Chain 5.

Row 1 :

sc across (4)

Row 2 :

sc, inc, sc, sc (5)

Row 3 :

sc across (5)

Row 4 :

2 sc, inc, 2 sc (6)

Row 5 :

sc across (6)

Row 6 - Row 27 :

sc across (6)

Row 28 :

2 sc, dec, 2 sc (5)

Row 29 :

sc across (5)

Row 30 :

2 sc, dec, sc (4)

Row 31 :

sc across (4)

Row 32 :

sc across (4)

Row 33 :

sc, dec, sc (3)

Row 34 :

sc across (3)

Row 35 :

dec, sc (2)

Row 36 :

sc across (2)

Row 37 :

sc across (2)

Row 38 :

dec (1)

Row 39 :

sc (1)

Info :

Make a border of sc's around the entire piece and finish off. Leave a long tail for sewing.

โ€” Shoe Cuff :

Info :

Use carrot. Make two. This will be crocheted in ROWS. Chain 20.

Row 1 :

19 hdc (19)

Info :

Finish off.

โ€” Head Spikes :

Round 1 :

6 sc in magic ring (6)

Round 2 :

[1 sc, inc] rep 3 times (9)

Round 3 :

sc around (9)

Info :

Finish off with a slip stitch. Leave a long tail for sewing. Do not stuff, fold the piece flat.
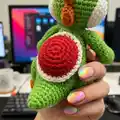
โ€” Mouth :

Info :

Use white. This piece is a semi-circle that is worked in ROWS. At the end of each row you will chain 1 before turning your work. Chain 2.

Row 1 :

4 sc into the 2nd chain from hook (4)

Row 2 :

inc in each stitch (8)

Row 3 :

[1 sc, inc] rep 4 times (12)

Info :

Finish off. leave a long tail for sewing.

โ€” Shell/Saddle :

Round 1 :

6 sc in magic ring (6)

Round 2 :

inc around (12)

Round 3 :

[1 sc, inc] rep 6 times (18)

Round 4 :

[2 sc, inc] rep 6 times (24)

Round 5 :

sc around (24)

Round 6 :

sc around (24)

Info :

-color change to White-

Round 7 :

in Front Loops Only: sl st around (24)

Round 8 :

in Back loops only: [3 sc, inc] rep 6 times (30)

Info :

Finish off with a slip stitch. Stuff the shell and leave open. Leave a long tail for sewing.

Assembly Instructions

  • Sew the nose to the head using the long tail left on the nose piece to secure it firmly to the front of the head.
  • Sew the tail to the backside of the body to create a curved, crescent moon-like shape so the body sits naturally.
  • Sew the cheeks to the sides of the head symmetrically and finish the ends to hide yarn tails before final assembly.
  • Sew the open end of the head to the open end of the body; you can position the head straight or turned slightly to the side for a more interesting pose.
  • Sew the belly to the front of the body aligning the narrow end toward the head so the border of scs sits flush.
  • Sew the mouth just under the nose using the long tail left when finishing the mouth and position centered under the nose.
  • Sew the spikes to the back of the head in a row, then sew the saddle/shell to the back of the body and place the red center piece on top and secure it.

Important Notes

  • ๐Ÿ’กYou may not claim this pattern as your own or alter, copy, sell, or redistribute this pattern in whole or in part.
  • ๐Ÿ’กThis pattern is intended for personal use only; please give credit to the original designer if you publish photos of items made from this pattern.
  • ๐Ÿ’กUse stitch markers to mark the end of your rounds and check your stitch counts frequently to avoid mistakes.
  • ๐Ÿ’กStuff parts gradually for smooth shaping and leave long tails when finishing pieces to make assembly easier.

This adorable Yoshi amigurumi pattern is perfect for creating a playful handmade companion you will love to display or gift. ๐Ÿงถ The pattern includes complete round-by-round instructions, assembly photos, and eye options for felt or needle-felting. โœจ Happy crocheting and enjoy bringing this classic video game friend to life! ๐Ÿงต

You ask,

we answer.

FAQs

What size will the finished piece be?

The finished amigurumi measures approximately 9 inches tall when assembled in a standing position using the recommended yarn and hook size.

Can I use different yarn weights for this pattern?

Yes, you can use different yarn weights but the final size will change; choose an appropriate hook for your yarn and expect variations in proportions.

Do I need prior crochet experience for this pattern?

This pattern is rated intermediate and assumes familiarity with working in continuous rounds, increases, decreases, and basic assembly techniques.

How long does this project typically take to complete?

Most crocheters complete this project in 5-7 hours depending on experience, assembly time, and whether you choose felt or needle-felted eyes.