🧢 Beautiful ✨ Detailed πŸ’ Adorable

Yogi Girl Amigurumi Pattern

Yogi Girl Amigurumi Pattern
4.4β˜… Rating
8-10 Hours Time Needed
1.5K Made This
βœ‚οΈ

Intermediate Level

Ideal for those with basic crochet experience, featuring slightly more advanced stitches and techniques to expand your skills.

⏱️

All-Day Adventure

Requires 8-10 hours, ideal for a full day of immersive crocheting.

🧸

Cute Companion

An adorable friend to cherish, handcrafted with love to bring comfort and joy for years to come.

About This Yogi Girl Amigurumi Pattern

This pattern creates a seated Yogi Girl amigurumi complete with a topknot, hair cap, breast details and posable wire-reinforced arms. Detailed rounds and photo references guide you through shaping the body, legs, arms and head. The design uses simple single crochet shaping and finishing techniques for a polished result.

Yogi Girl Amigurumi Pattern crochet pattern - detailed view of completed project

You will learn how to join details to the body, create invisible closures, and embroider expressive eyes. The pattern includes tips for stuffing, using wire for poseable limbs, and alternative yarn suggestions.

Why You'll Love This Yogi Girl Amigurumi Pattern

I absolutely love this pattern because it combines simple amigurumi shaping with a peaceful, expressive pose that feels instantly rewarding. I enjoy the step-by-step joining techniques that make the finished piece look neat and professional. The use of a small wire inside the arms gives this doll a lovely, posable quality that elevates the finished toy. Making this Yogi Girl is always calming β€” the repetitive stitches and thoughtful assembly mirror the relaxed theme of the design.

Yogi Girl Amigurumi Pattern step 1 - construction progress Yogi Girl Amigurumi Pattern step 2 - assembly progress Yogi Girl Amigurumi Pattern step 3 - details and accessories Yogi Girl Amigurumi Pattern step 4 - final assembly and finishing

Switch Things Up

I like to customize this pattern by changing the color palette; try pastel tones for a soft, serene look or bright colors for a playful version.

I sometimes make a miniature keychain by using thinner yarn and a smaller hook for a tiny Yogi Girl you can carry anywhere.

I often replace the internal wire with pipe cleaners for a safer, bendable option for kids while keeping some flexibility in the arms.

I recommend swapping the cotton yarn for a DK wool blend for a fuzzier, warmer finish β€” just be aware the size will increase.

I love adding tiny crocheted accessories like a little yoga mat or headband to give the doll character and story.

If you want different poses, adjust the leg attachment points slightly or shorten the legs to create a different seated posture.

I sometimes embroider alternate facial expressions β€” a calm smile or open eyes β€” to change the doll’s personality.

To make the doll machine-washable, use washable cotton yarn and secure all ends tightly; avoid wire if you want full machine washing.

I also experiment with textured stitches for the clothing area such as front post or back loop ribbing to create a sweater or top effect.

For gifts, I finish with a small personalized tag or a tiny crocheted heart sewn into the body to make each doll extra special.

Common Mistakes & How to Fix Them

βœ— Using a larger hook than recommended makes stitches loose and can distort the amigurumi shape; use a 2.00mm hook as suggested to keep tight stitches and a neat finish. βœ— Skipping stitch markers will make it hard to track rounds and increases; place a marker at the start of each round to maintain correct stitch counts. βœ— Overstuffing limbs or body will stretch stitches and change the shape; stuff gradually and stop when the piece holds form without distorting stitches. βœ— Changing color at the wrong moment can create visible joins; stop with the last loop of old color on the hook and pull the new color through to secure a clean transition. βœ— Not using invisible decrease where suggested can leave visible gaps; practice the invisible decrease (front loop only) to get smooth shaping when closing parts. βœ— Joining pieces without pinning first leads to uneven placement and crooked assemblies; pin or use stitch markers to check symmetry before sewing.

Yogi Girl Amigurumi Pattern

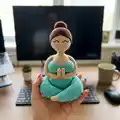
Create a calming Yogi Girl amigurumi you will love to display or give as a mindful handmade gift. This pattern walks you through shaping the body, legs, arms, head, hair and topknot with clear step-by-step instructions. You will learn finishing techniques like invisible closures, attaching parts, and simple embroidery for the face. Perfect for makers who enjoy thoughtful assembly and charming details.

Intermediate 8-10 Hours

Materials Needed for Yogi Girl Amigurumi Pattern

β€” Main Fabric

  • 01
    Gazzal Baby Cotton yarn - Colors: Blue, Beige and Brown
  • 02
    Alternatives: Scheepjes Catona (cotton), Drops Safran, Debbie Bliss Eco Baby, Paintbox Yarns Cotton DK, YarnArt Jeans, Katia Cotton 100% (these have a similar thickness and color palette)
  • 03
    Polyester fiberfill for stuffing (alternative: polyfill or cotton batting)

β€” Tools Required

  • 01
    Crochet hook size 2.00mm
  • 02
    Scissors
  • 03
    Wire (2-3mm thick) for arm reinforcement
  • 04
    Stitch markers
  • 05
    Pins for assembly
  • 06
    Yarn needle for sewing pieces
  • 07
    Tapestry/embroidery needle
  • 08
    Black thread for embroidered eyes
  • 09
    Polyester stuffing (fiberfill)

Progress Tracker

0% Complete

β€” Arms :

Round 1 :

6 SC in MR

Round 2 :

*1 SC, 1 INC* repeat 3 times (9)

Round 3-6 :

/4 rounds/ 9 SC

Round 7 :

*1 SC, 1 DEC* repeat 3 times (6)

Round 8 :

*1 SC, 1 INC* repeat 3 times (9)

Round 9 :

*2 SC, 1 INC* repeat 3 times (12)

Round 10-29 :

/20 rounds/ 12 SC

Info :

Fasten off in invisible way (pic.1)

Info :

To do this: pull the yarn end through the last stitch. Take the needle. Skip one stitch, guide the yarn end through the next stitch. Insert the needle back in the same hole where the yarn comes from. Fasten the stitch. This stitch is called a closing stitch (video 1)

Info :

Crochet second arm in the same way. Don’t stuff

β€” Body :

Info :

Blue yarn. Breast

Round 1 :

6 SC in MR

Round 2 :

6 INC (12)

Round 3 :

*1 SC, 1 INC* repeat 6 times (18)

Round 4 :

*1 SC, 1 INC, 1 SC* repeat 6 times (24)

Round 5 :

24 SC

Info :

Fasten off in invisible way. Crochet second detail in the same way (pic.2)

Info :

Blue yarn. Body

Round 1 :

6 SC in MR

Round 2 :

6 INC (12)

Round 3 :

*1 SC, 1 INC* repeat 6 times (18)

Round 4 :

*1 SC, 1 INC, 1 SC* repeat 6 times (24)

Round 5 :

*3 SC, 1 INC* repeat 6 times (30)

Round 6 :

*2 SC, 1 INC, 2 SC* repeat 6 times (36)

Round 7 :

*5 SC, 1 INC* repeat 6 times (42)

Round 8 :

*3 SC, 1 INC, 3 SC* repeat 6 times (48)

Round 9 :

*7 SC, 1 INC* repeat 6 times (54)

Round 10 :

*4 SC, 1 INC, 4 SC* repeat 6 times (60)

Round 11-17 :

/7 rounds/ 60 SC

Round 18 :

*9 SC, 1 DEC, 9 SC* repeat 3 times (57)

Round 19 :

*17 SC, 1 DEC* repeat 3 times (54)

Round 20 :

*8 SC, 1 DEC, 8 SC* repeat 3 times (51)

Info :

Change color to beige (pic.3)

Round 21 :

BLO *15 SC, 1 DEC* repeat 3 times (48)

Round 22 :

*7 SC, 1 DEC, 7 SC* repeat 3 times (45)

Round 23 :

*13 SC, 1 DEC* repeat 3 times (42)

Info :

Change color to blue

Round 24 :

BLO *6 SC, 1 DEC, 6 SC* repeat 3 times (39)

Round 25 :

*11 SC, 1 DEC* repeat 3 times (36)

Round 26 :

10 SC

Info :

Take the part of the breast, insert the hook into the closing stitch of the breast and into the 11th stitch of the body (pic.5). Crochet the next 8 stitches with SC by grabbing both stitches of the breast and body (pic.6). Please note that the details should be positioned right sides facing each other

Info :

2 SC on the body (pic.7), take second part of the breast and crochet together 8 SC, 8 SC on the body (pic.8-9) (36)

Round 28-29 :

52 SC

Round 30 :

14 SC, *1 DEC, 2 SC* repeat 2 times, 1 DEC, 8 SC, *1 DEC, 2 SC* repeat 2 times, 1 DEC, 10 SC (46)

Info :

Change color to beige

Round 31 :

BLO 11 SC, 2 DEC, *1 DEC, 1 SC* repeat 3 times, 2 SC, *1 DEC, 1 SC* repeat 3 times, 2 DEC, 7 SC (36)

Info :

To stuff

Round 32 :

6 SC, attach arm in closing stitch (pic.15), 8 SC on the arm, skip 4 stitches on the body (pic.16-17), 19 SC on the body, attach second arm in closing stitch, 8 SC on the arm, skip 4 stitches on the body, 3 SC on the body (44)

Info :

To stuff body, don’t stuff arms

Round 33-34 :

44 SC

Info :

Take a needle and beige yarn. Sew the hole with beige yarn between arms and body (pic.20-21)

Round 35 :

6 SC, 4 DEC, 19 SC, 4 DEC, 3 SC (36)

Info :

To begin, you need to measure the width of the shoulders and the length of both arms, adding an extra 1 cm to each arm. Then, cut a wire of the appropriate length and bend it according to the picture, creating loops at the ends (pic.22) Insert the wire into the arms and to stuff body and arms, evenly distributing the stuffing (pic.23-24)

Round 36 :

*2 SC, 1 DEC, 2 SC* repeat 6 times (30)

Round 37 :

*3 SC, 1 DEC* repeat 6 times (24)

Round 38 :

*1 SC, 1 DEC, 1 SC* repeat 6 times (18)

Round 39 :

*1 SC, 1 DEC* repeat 6 times (12)

Round 40 :

BLO 12 SC

Round 41 :

12 SC

Info :

Fasten off in invisible way. Leave long end for sewing. To stuff (pic.25)

Info :

Bend the arms at the elbows and at the hands (pic.26-27) Take a needle and beige yarn. Sew the hands together (pic.28)

β€” Head :

Info :

Beige yarn

Round 1 :

6 SC in MR

Round 2 :

6 INC (12)

Round 3 :

BLO *1 SC, 1 INC* repeat 6 times (18)

Round 4 :

*1 SC, 1 INC, 1 SC* repeat 6 times (24)

Round 5 :

*3 SC, 1 INC* repeat 6 times (30)

Round 6 :

*2 SC, 1 INC, 2 SC* repeat 6 times (36)

Round 7-13 :

/7 rounds/ 36 SC

Round 14 :

*4 SC, 1 DEC* repeat 6 times (30)

Round 15 :

*3 SC, 1 DEC* repeat 6 times (24)

Info :

To stuff

Round 16 :

*2 SC, 1 DEC* repeat 6 times (18)

Round 17 :

*1 SC, 1 DEC* repeat 6 times (12)

Round 18 :

6 DEC (6)

Info :

Brown yarn. Hair

Round 1 :

6 SC in MR

Round 2 :

6 INC (12)

Round 3 :

*1 SC, 1 INC* repeat 6 times (18)

Round 4 :

BLO *1 SC, 1 INC, 1 SC* repeat 6 times (24)

Round 5 :

*3 SC, 1 INC* repeat 6 times (30)

Round 6 :

*2 SC, 1 INC, 2 SC* repeat 6 times (36)

Round 7-11 :

/5 rounds/ 36 SC

Round 12 :

10 SC, 2 HDC, 2 INC DC, 1 HDC, 1 SS, 1 HDC, 2 INC DC, 2 HDC, 16 SC (40)

Info :

Fasten off in invisible way, leave long end for sewing (pic.43-44)

Info :

Sew hair to the head (pic.45-47)

Info :

Brown yarn. Topknot

Round 1 :

6 SC in MR

Round 2 :

6 INC (12)

Round 3 :

*1 SC, 1 INC* repeat 6 times (18)

Round 4 :

*1 SC, 1 INC, 1 SC* repeat 6 times (24)

Round 5-6 :

24 SC

Round 7 :

*1 SC, 1 DEC, 1 SC* repeat 6 times (18)

Info :

Fasten off in invisible way, leave long end for sewing. To stuff (pic.48)

Info :

Sew on the crown for the 4th round of hair (pic.50-51)

Info :

Embroider eyes with black thread between 9th and 10th rounds (pic.52-59, video 3)

Info :

Sew the head behind the front loops of the 3rd round and behind the last round of the body

β€” Legs :

Info :

Blue yarn. Knee

Round 1 :

6 SC in MR

Round 2 :

6 INC (12)

Round 3 :

*1 SC, 1 INC* repeat 6 times (18)

Round 4 :

*1 SC, 1 INC, 1 SC* repeat 6 times (24)

Round 5 :

*3 SC, 1 INC* repeat 6 times (30)

Info :

Fasten off in invisible way. Crochet second detail in the same way (pic.29)

Info :

Beige yarn. Leg

Round 1 :

6 SC in MR

Round 2-4 :

6 SC

Round 5 :

*1 SC, 1 INC* repeat 3 times (9)

Info :

Change color to blue

Round 6 :

BLO *1 SC, 1 INC, 1 SC* repeat 3 times (12)

Round 7-8 :

12 SC

Round 9 :

*3 SC, 1 INC* repeat 3 times (15)

Round 10-11 :

15 SC

Round 12 :

*2 SC, 1 INC, 2 SC* repeat 3 times (18)

Round 13-14 :

18 SC

Round 15 :

*5 SC, 1 INC* repeat 3 times (21)

Round 16-17 :

21 SC

Round 18 :

*3 SC, 1 INC, 3 SC* repeat 3 times (24)

Round 19-20 :

24 SC

Round 21 :

*7 SC, 1 INC* repeat 3 times (27)

Round 22-23 :

27 SC

Round 24 :

*4 SC, 1 INC, 4 SC* repeat 3 times (30)

Round 25-26 :

30 SC (pic.30)

Round 27 :

7 SC

Info :

Take the part of the knee, insert the hook into the closing stitch of the knee and into the 8th stitch of the leg (pic.31). Crochet the next 15 stitches with SC by grabbing both stitches of the knee and leg. Please note that the details should be positioned right sides facing each other.

Info :

8 SC on the leg (pic.32) (30)

Info :

Bend knee to the front (pic.33)

Round 28 :

7 SC, continue crocheting along the remaining 15 stitches of the breast using SC, skipping 15 stitches from the previous round (pic.34), 8 SC on the leg (30)

Round 29-33 :

/5 rounds/ 30 SC

Round 34 :

10 SC

Info :

To stuff

Info :

Fold in half. Crochet 14 SC grabbing both parts (pic.35)

Info :

Cut the yarn. Leave long end for sewing. Crochet second leg in the same way (pic.36)

Info :

Sew the legs to the side of the body along the last round of the leg to the body from the 9th to the 20th rounds (pic.37-39)

Info :

Take the needle and blue yarn. Fold the legs on top of each other and sew them together (pic.40-41)

Assembly Instructions

  • Sew the head behind the front loops of the 3rd round of the head and behind the last round of the body, aligning right sides before stitching.
  • Attach each arm to the body by inserting into the closing stitch and crocheting the specified stitches together (see Round 32), then stuff the body while leaving arms unstuffed.
  • Position and sew the two breast details to the body by aligning right sides together, inserting the hook into the closing stitch of the breast and the 11th stitch of the body, then crochet and secure as instructed.
  • Insert the pre-measured wire into both arms (loops at wire ends) and distribute stuffing evenly to create poseable arms; sew the hole between arms and body with beige yarn.
  • Sew the legs to the side of the body along the last round of the leg from rounds 9 to 20, then fold legs together and sew them on top of each other to form the crossed seated position.

Important Notes

  • πŸ’‘Use a smaller hook (2.00mm) than the yarn label suggests to achieve tight stitches for amigurumi and a clean finish.
  • πŸ’‘Stuff firmly but gradually to maintain shapeβ€”overstuffing will cause stitches to stretch and distort the piece.
  • πŸ’‘Pin all parts before sewing to ensure correct placement and symmetry, especially when joining breasts, arms and legs.
  • πŸ’‘Work continuously without joining at the end of each round for a seamless look; use stitch markers to keep track of your rounds.
  • πŸ’‘When changing color, stop crocheting with the old color before the last loop and use the new color to pull through the last two loops for a clean color change.

This peaceful Yogi Girl is designed to be a joyful, calming companion for your handmade collection. The pattern includes photo-assisted steps and finishing tips so you can create a professional-looking doll with poseable arms and embroidered features. Perfect as a thoughtful gift or mindful decor for anyone who loves yoga and handmade art. πŸ§ΆπŸ§˜β€β™€οΈ

You ask,

we answer.

FAQs

What size will the finished piece be?

The finished amigurumi measures approximately 20-22 cm tall when using the recommended yarn (Gazzal Baby Cotton) and 2.00mm hook; exact size depends on tension and stuffing.

Can I use different yarn weights for this pattern?

Yes, you can use different yarn weights but the final size will change; choose an appropriate hook for the yarn and be aware that stitch counts may feel tighter or looser.

Do I need prior crochet experience for this pattern?

This pattern is rated intermediate β€” basic amigurumi experience, single crochet, increases, decreases, and sewing parts together are recommended for best results.

How long does this project typically take to complete?

Most makers finish this project in about 8-10 hours depending on experience, assembly time, and whether you make adjustments like adding wire for poseable limbs.