🧢 Beautiful ✨ Detailed πŸ’ Adorable

Octopus Comforter Amigurumi Pattern

Octopus Comforter Amigurumi Pattern
4.0β˜… Rating
2-3 Hours Time Needed
1.4K Made This
βœ‚οΈ

Beginner Friendly Level

Perfect for those just starting their crochet journey, with clear instructions and simple techniques

⏱️

Bite-Sized Project

Finishes in 2-4 hoursβ€”perfect for an afternoon of creative relaxation.

🧸

Cute Companion

An adorable friend to cherish, handcrafted with love to bring comfort and joy for years to come.

About This Octopus Comforter Amigurumi Pattern

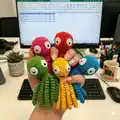
This pattern creates a tiny octopus comforter with a crocheted head and spiral tentacles, perfect as a baby comforter or a small toy. It uses DK cotton yarn and a small 3.00 mm hook for firm, neat stitches. The design is compact and portable, making it a great project for gifts and markets. The instructions include full round-by-round details and simple finishing steps.

Octopus Comforter Amigurumi Pattern crochet pattern - detailed view of completed project

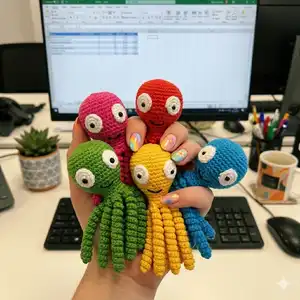
Worked in continuous rounds for smooth shaping, this easy pattern includes eye construction and clear assembly notes. Ideal for using up stash DK cotton yarn and creating a colorful set of octopus comforters.

Why You'll Love This Octopus Comforter Amigurumi Pattern

I absolutely love this pattern because it turns simple stitches into a delightful little companion with so much personality. I enjoy how quick it is to make yet how satisfying the finished octopus looks with its curly tentacles. The design is versatileβ€”change the colors and you instantly have a new character. I also love that it is accessible to newer crocheters while offering room for creative finishing touches.

Octopus Comforter Amigurumi Pattern step 1 - construction progress Octopus Comforter Amigurumi Pattern step 2 - assembly progress Octopus Comforter Amigurumi Pattern step 3 - details and accessories Octopus Comforter Amigurumi Pattern step 4 - final assembly and finishing

Switch Things Up

I love swapping colours to give each octopus a unique personality; try pastels for a nursery-friendly collection or bright neons for playful gifts.

I often change the yarn weight and hook size to create mini keychain versions or larger cuddle-sized comforters; adjust the hook when changing yarn.

I like to replace embroidered mouths with tiny felt smiles glued/sewn on for a different texture and a soft finish.

I sometimes add a small ribbon loop at the top so the comforter can be attached to a stroller or baby bag for on-the-go comfort.

You can experiment with eye styles - use safety eyes for durability, embroidered pupils for safety, or color-contrasting rounds for a cartoon look.

Try making one with a two-colour head and tentacles for a striped effect; start colour changes at the rounds before the tentacle joins for a neat transition.

For older kids, swap toy stuffing for lightweight cotton or wool for a different drape and feel to the comforter.

I sometimes crochet a little pocket on the back to tuck in a scented sachet or small keepsake for a special gift.

If you want more structure, add a small disc of plastic canvas inside the head base before closing to help it sit upright when displayed.

To create a matching set, make a few octopuses in same yarn shades but vary tentacle lengths and eye positions to give each its own character.

Common Mistakes & How to Fix Them

βœ— Skipping stitch markers during rounds can cause you to lose track of the start of each round; place a marker at the first stitch and move it each round to stay accurate. βœ— Forgetting to stuff as you go results in lumps and uneven shaping; stuff gradually and evenly, adding small amounts of fiberfill to maintain a smooth head and body. βœ— Working with inconsistent tension produces uneven spiral tentacles and stitch counts; keep your tension steady and check stitch counts frequently to ensure consistency. βœ— Not securing the long tail when fastening off can cause seams to loosen later; leave a long tail, weave it through several stitches, and sew securely to anchor parts firmly.

Octopus Comforter Amigurumi Pattern

Make a sweet Octopus Comforter with this easy, beginner-friendly crochet pattern. You will create a soft, squidgy head with playful spiral tentacles that make a perfect baby comforter or small toy. The pattern uses DK cotton yarn and a small hook to create neat stitches and durable shaping. Clear step-by-step rounds and finishing notes help you assemble a charming handmade companion.

Beginner Friendly 2-3 Hours

Materials Needed for Octopus Comforter Amigurumi Pattern

β€” Main Fabric

  • 01
    DK cotton yarn (Rico Essential DK Cotton recommended) for main colour(s)
  • 02
    Small amount of white yarn for eyes
  • 03
    Small amount of black yarn for eye pupils and mouth

β€” Tools Required

  • 01
    Crochet hook US D (3.00 mm)
  • 02
    Stitch marker
  • 03
    Tapestry needle
  • 04
    Toy stuffing (polyester fiberfill)
  • 05
    Scissors

Progress Tracker

0% Complete

β€” Stitch Explanation :

Infos :

mc make a loop with the yarn, leaving a tail around 10cm long. Make sure the tail end is on the left hand side. Insert your hook into the loop, from front to back. Wrap the working yarn around the hook and pull the yarn through the loop, chain 1. Your first round of stitches will then be worked into the loop. Once you've worked the number of stitches you need into the loop, simply pull the tail end of the yarn to draw up and close the loop - magic! (An alternative to the mc is to chain 3 and join with a sl st to first chain, then work first round of stitches into loop created.) sl st Insert hook into stitch indicated, wrap yarn over hook, draw the yarn through the chain and the loop in one movement. sc Insert your hook into the stitch or space indicated, yarn over and pull up a loop. (You should have two loops on your hook). Yarn over and draw through both of the loops on your hook. sc2tog Insert hook in next stitch, draw up a loop, (two loops on hook), insert hook in next stitch, draw up a loop (3 loops on hook), YO and draw through all 3 loops.

β€” Head and Body :

Round 1 :

mc, 6sc in circle (6)

Round 2 :

2sc in each st (12)

Round 3 :

*2sc in first st, sc in next*, repeat between ** to end of round (18)

Round 4 :

*2sc in first st, sc in next 2 sts*, repeat between ** to end of round (24)

Round 5 :

*2sc in first st, sc in next 3 sts*, repeat between ** to end of round (30)

Round 6 :

sc in each st (30)

Round 7 :

*2sc in first st, sc in next 4 sts*, repeat between ** to end of round (36)

Round 8 :

sc in each st (36)

Round 9 :

*2sc in first st, sc in next 5 sts*, repeat between ** to end of round (42)

Round 10-17 :

sc in each st (42)

Round 18 :

*sc2tog, sc in next 5 sts*, repeat between ** to end of round (36)

Round 19 :

*sc2tog, sc in next 4 sts*, repeat between ** to end of round (30)

Round 20 :

sc in each st (30)

Round 21 :

*sc2tog, sc in next 3 sts*, repeat between ** to end of round (24)

Round 22 :

sc in each st (24)

Round 23 :

*sc2tog, sc in next 2 sts*, repeat between ** to end of round (18)

Round 24 :

sc in each st (18)

Round 25 :

*2sc in first st, sc in next 2 sts*, repeat between ** to end of round (24)

Round 26 :

sc in each st (24)

Round 27 :

sc in first st, *chain 45, 3sc in 2nd ch from hook and next 43chs, sc into next 3 sts*, repeat between ** to end of round (8 legs in total)

Info :

Fasten off, leaving long tail.

β€” Eyes :

Round 1 :

mc, 6sc in circle (6)

Round 2 :

2sc in each st (12)

Round 3 :

2sc in next 3 sts, sc in next st, sl st (

Info :

Fasten off, leaving long tail.

Info :

With black yarn, sew a black circle in the middle of each eye.

β€” Finishing :

Info :

Eyes - Sew eyes onto front of boy, use picture as guide.

Info :

Mouth - Using black yarn, sew a small mouth underneath eyes, use picture as guide.

Info :

Body - Stuff body using toy filling. Attach bottom of body to main body, ensuring that it is secure so no stuffing can come through.

β€” Bottom of Body :

Round 1 :

mc, 6sc in circle (6)

Round 2 :

2sc in each st (12)

Assembly Instructions

  • Sew the two white eyes onto the front of the head using the picture as a placement guide, leaving space for the mouth underneath.
  • Using black yarn, embroider a small mouth beneath the eyes following the photo guide to give the octopus a friendly expression.
  • Stuff the head and body firmly but evenly with toy filling before closing the final rounds to maintain a smooth shape.
  • Attach the bottom of the body to the main body opening and sew securely, making sure seams are tight so stuffing cannot come through.

Important Notes

  • πŸ’‘Pattern is worked in continuous rounds; do not join at the end of rounds to maintain seamless shaping.
  • πŸ’‘Use stitch markers to mark the beginning of each round so you can track your progress and keep stitch counts accurate.
  • πŸ’‘Stuff gradually and evenly while shaping to avoid lumps and to achieve a smooth, firm head and body.

This Octopus Comforter is a tiny, squishy friend perfect for gifting or cuddling by little hands. The curly tentacles and cute embroidered face give it personality and charm. Make a set in different colours for a playful display and lots of handmade joy. 🧢🧑

You ask,

we answer.

FAQs

What size will the finished piece be?

The finished octopus comforter measures approximately 5-6 inches, depending on your tension and yarn choice.

Can I use a different yarn weight for this pattern?

Yes, you can use different yarn weights but this will change the finished size; adjust your hook accordingly and expect a larger or smaller toy.

Do I need to join rounds or use slip stitches?

No, this pattern is worked in continuous rounds; do not join at the end of rounds to keep the amigurumi seamless.

How long does this project typically take to complete?

Most crocheters complete this project in about 2-3 hours, though time may vary based on experience level and how many octopuses you make.