🧢 Beautiful ✨ Detailed πŸ’ Adorable

Winter is Coming Beanie Pattern

Winter is Coming Beanie Pattern
4.3β˜… Rating
2-3 Hours Time Needed
1.7K Made This
βœ‚οΈ

Beginner Friendly Level

Perfect for those just starting their crochet journey, with clear instructions and simple techniques

⏱️

Bite-Sized Project

Finishes in 2-4 hoursβ€”perfect for an afternoon of creative relaxation.

🧣

Snug Essential

Everyday comfort with practical charm, designed for both functionality and style through changing seasons.

About This Winter is Coming Beanie Pattern

This pattern creates a classic ribbed beanie worked flat and seamed to form a tube, inspired by the fisherman\'s rib stitch. It\'s fully customizable so you can adjust the circumference and height to fit any head. The technique uses HDC worked through the back loop to create deep ribs and stretchy texture.

Winter is Coming Beanie Pattern crochet pattern - detailed view of completed project

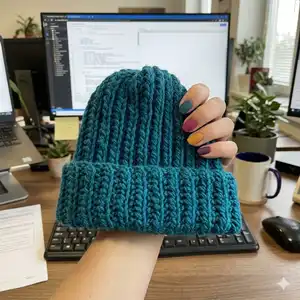
Suitable for beginners, it only uses basic stitches and straightforward seaming to finish. Make it with bulky yarn and an 8 mm hook for squishy ribs or try thinner yarn for a smaller, finer hat.

Why You'll Love This Winter is Coming Beanie Pattern

I absolutely love this pattern because it produces a beautifully textured hat with minimal stitches and fuss. I enjoy how easy it is to adapt the width and height to fit any head size, making it incredibly versatile. The fisherman\'s rib-like effect created by HDC in the back loop gives the beanie a professional, cozy finish that always gets compliments. Working it flat and seaming it makes the construction approachable and relaxing for a quiet afternoon of crocheting. I find it satisfying to watch the ribs emerge row by row β€” it\'s a simple stitch repeat with a high-impact result.

Winter is Coming Beanie Pattern step 1 - construction progress Winter is Coming Beanie Pattern step 2 - assembly progress Winter is Coming Beanie Pattern step 3 - details and accessories Winter is Coming Beanie Pattern step 4 - final assembly and finishing

Switch Things Up

I love customizing this beanie by changing yarn weight and hook size; a bulky yarn with an 8 mm hook creates a thick, slouchy rib while a DK yarn with a smaller hook makes a neater, snug hat.

I often change the number of foundation chains to adjust circumference; measure the head and subtract a few centimeters for stretch to get the perfect fit.

I sometimes add a folded cuff by making the rectangle slightly longer and folding up the bottom before joining to create a double-layer brim for extra warmth.

I like to experiment with color: try striping every 4 rows for subtle bands or use two colors alternating each row for a tweed-like effect.

For a more finished look, I occasionally sew a small leather patch or crochet a tiny flower to stitch to the cuff as a personalized accent.

Want a pom-pom? I recommend making a large faux-fur pom-pom and attaching it securely to the top after gathering the crown for a playful finish.

If you prefer a more fitted beanie, reduce the initial chain by two to four stitches and work fewer rows to shorten the height before seaming.

I sometimes add a lining using a knitted or felted fabric for extra wind protection; cut the lining tube slightly smaller to fit snugly inside the crocheted tube.

To make a matching set, I scale the chain length proportionally for child or toddler sizes and keep the same row pattern for consistent texture across sizes.

I also like to use variegated yarns for quick visual interest β€” the rib texture shows color changes beautifully without extra effort.

Common Mistakes & How to Fix Them

βœ— Not measuring the initial chain length correctly can result in a beanie that is too small or too large; measure your head and chain to the recommended circumference (about 35 cm) before starting and adjust the number of chains accordingly. βœ— Skipping HDC in the back loop will remove the ribbed effect and change gauge; be sure to work half double crochet through the back loop for every row except the final joining row. βœ— Failing to join the two sides carefully can produce an uneven seam or puckering; sew or slip stitch the two vertical edges with consistent tension and line up stitches before fastening off. βœ— Not tightening the final gathered top securely may cause the crown to come loose over time; pull the yarn through the remaining stitches, tighten firmly and fasten off securely to close the top.

Winter is Coming Beanie Pattern

Make a cozy, customizable beanie worked flat using half double crochet through the back loop to reproduce a fisherman\'s rib look. This beginner-friendly pattern walks you through chain foundation, ribbed rows, joining into a tube, and finishing the crown. You can easily adapt the width and height to fit any head size so your beanie will be exactly how you like it.

Beginner Friendly 2-3 Hours

Materials Needed for Winter is Coming Beanie Pattern

β€” Main Fabric

  • 01
    Morelfil BigBall yarn - 100 gr (used in sample)
  • 02
    Wool yarn - approximately 100 gr (alternative phrasing in materials)

β€” Tools Required

  • 01
    Crochet hook size 8 mm (I used this size)

Progress Tracker

0% Complete

β€” Infos :

Info :

Description: Winter is coming Beanie is a crocheted cap, worked in flat, completely customisable to any size, reproducing the fisherman\'s rib stitch knitted with two needles. Gauge: No gauge required; you can work adapting the shape to the head dimension. In my case the gauge was 14 lines x 20 stitches for 10x10 cm. My final dimension was: 49 cm for the circumference and 32 cm for the height. Yarn: I used 100 gr of Morelfil BigBall. Hook: 8 mm, I used this size, but you can use any size according to the yarn used, bigger is your hook, bigger will appear your ribs. Techniques used: slip stitch, half double crochet. Level: Beginner.

β€” Abbreviations :

Info :

Chain: ch. Half Double Crochet: hdc. Slip Stitch: slt.

β€” Materials :

Info :

Materials: with a hook of 8 mm, I used 100 gr of wool.

β€” Instructions :

Info :

Let\'s go!

Info :

Chain to reach about 35 cm, in my case 40 ch.

Info :

Let\'s crochet in rows, back and forth. All rows except for the last one will be made with HDC stitch made through the back loop.

Round 1 :

40 hdc (40)

Round 2 :

chain, 40 hdc though the back loop (40)

Round 3 :

chain, 40 hdc though the back loop (40)

Round 4 :

Repeat *Row 2 and 3* until reach a width of 53 cm, in my case I worked 56 rows. You can adjust your width measuring the head less 4 cm.

Round 5 :

Last row: join the two sides in vertical with 40 slt. You will now have a tube.

Info :

Cut the yarn and pull yarn through the remaining stitches, tighten together and fasten. Your beanie is ready!

Assembly Instructions

  • Join the two vertical edges by working 40 slip stitches through both layers to form a tube, aligning the cast-on edge with the final row.
  • After joining, you will have a tube; check that the seam is straight and the ribs line up before finishing the crown.
  • Cut the yarn leaving a long tail and pull the tail through the remaining stitches at the top of the tube to gather the crown closed.
  • Tighten the gathered stitches securely and fasten off, then weave in the yarn tail to secure the closure.

Important Notes

  • πŸ’‘No strict gauge is required, but check the suggested gauge (14 lines x 20 stitches for 10x10 cm) if you want the same proportions as the sample.
  • πŸ’‘Adjust your chain foundation to measure the head circumference minus about 4 cm to allow for stretch and fit.
  • πŸ’‘Work HDC through the back loop for deep, defined ribs; skipping the back loop will change the look of the fabric.
  • πŸ’‘Use a larger or smaller hook to change rib size: a larger hook will create chunkier ribs, while a smaller hook makes a tighter fabric.

This cozy beanie pattern gives you a warm, ribbed hat that\'s easy to customize and quick to make.🧢 Work it flat with HDC through the back loop, seam the sides, and finish by tightening the crown for a snug fit.🧡 Perfect for gifts, last-minute winter projects, or making a matching family set.❄️

You ask,

we answer.

FAQs

What size will the finished piece be?

The sample finished beanie measures approximately 49 cm in circumference and 32 cm in height using the recommended yarn and 8 mm hook.

Can I use different yarn weights for this pattern?

Yes, you can use different yarn weights, but this will affect the final size and rib texture; adjust your hook size and chain length accordingly.

Do I need prior crochet experience for this pattern?

This pattern is rated beginner friendly, so basic knowledge of chain, half double crochet, and slip stitch is recommended for best results.

How long does this project typically take to complete?

Most crocheters complete this beanie in 2-3 hours, though time may vary based on experience level and whether you customize the size.