🧢 Beautiful ✨ Detailed πŸ’ Adorable

Baby Barefoot Sandals Pattern

Baby Barefoot Sandals Pattern
4.7β˜… Rating
2-4 Hours Time Needed
3.7K Made This
βœ‚οΈ

Beginner Friendly Level

Perfect for those just starting their crochet journey, with clear instructions and simple techniques

⏱️

Bite-Sized Project

Finishes in 2-4 hoursβ€”perfect for an afternoon of creative relaxation.

✨

Stylish Touch

An elegant detail to elevate any look, combining traditional techniques with contemporary design sensibilities.

About This Baby Barefoot Sandals Pattern

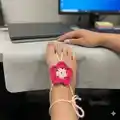
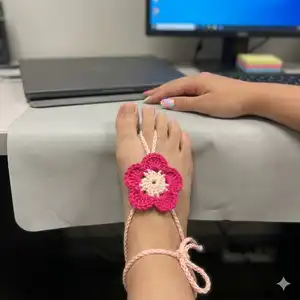
This pattern makes delicate barefoot sandals for babies and toddlers, featuring a small crocheted flower atop a triangular sandal base. You will work a small circular ring base, form three rounds to shape the sandal triangle, add two long straps, and finish with a five-petal flower sewn to the exposed front loops. Suitable for lightweight yarns, crochet thread, or embroidery floss, the result is a dainty summer accessory.

Baby Barefoot Sandals Pattern crochet pattern - detailed view of completed project

Clear photos and detailed notes accompany each step so you can follow along easily. Use the same pattern for both baby and toddler sizes by changing hook size and yarn weight.

Why You'll Love This Baby Barefoot Sandals Pattern

I absolutely love this pattern because it turns simple stitches into a sweet, wearable accent perfect for newborn photos and summer outfits. I created it to be versatile, so you can use thread, embroidery floss, or lightweight yarn depending on the size you want. The little flower detail is quick to make but adds a charming handmade finish that people notice. I enjoy how fast you can make a pair and how many color combinations are possible, letting your creativity show with minimal effort.

Baby Barefoot Sandals Pattern step 1 - construction progress Baby Barefoot Sandals Pattern step 2 - assembly progress Baby Barefoot Sandals Pattern step 3 - details and accessories Baby Barefoot Sandals Pattern step 4 - final assembly and finishing

Switch Things Up

I love to change up the colors to match outfits; consider making monochrome sandals or contrasting flowers for a bold look.

I often switch yarn weight to make mini or larger versions, using a smaller hook for delicate thread or a larger hook for chunky wearable sandals.

I add small beads or a button to the flower center for a bit of sparkle and extra visual interest.

I sometimes shorten or lengthen the strap chains to create ankle ties that are easier to secure for different ages.

I like to embroider tiny initials or shapes on the flower center for personalization before slip stitching it closed.

I try using metallic embroidery floss for the center stitches to give a subtle shimmer that photographs beautifully.

I experiment with adding a small toe loop by chaining and slip stitching under the front to help keep the sandal in place on active little feet.

I recommend testing different strap lengths and tying styles before finishing to ensure the best fit for the baby's foot.

I occasionally make a set in coordinating colors for sibling photos or as a gift set to showcase different yarns and textures.

I also suggest making a garland of several flowers using the same flower motif for decor if you want to repurpose the flowers for another project.

Common Mistakes & How to Fix Them

βœ— Skipping the instruction to work Round 3 in the back loops only; make sure you crochet every stitch of Round 3 into the back loops of the previous round to create the exposed front loops for the flower. βœ— Not counting chain or joining chains correctly at the beginning or end of rounds; always join to the top of the chain stitch you began the round with and follow the note about not counting the chain as a stitch. βœ— Making straps too short or too long without measuring against the baby's foot; chain the recommended 60 for straps then test the length and adjust before binding off to ensure proper fit. βœ— Trying to substitute a very different yarn weight without adjusting hook size; change hook size accordingly when switching yarn weights to maintain the approximate size and drape of the finished sandal.

Baby Barefoot Sandals Pattern

Create sweet baby barefoot sandals with a pretty flower embellishment using lightweight yarn or embroidery floss. This pattern guides you step-by-step through the base, straps, and a five-petal flower so you can make a delicate accessory for newborns or toddlers. The instructions include clear round-by-round directions, helpful notes on reading the pattern, and finishing tips so your sandals look polished. Perfect for gifting or adding a handmade touch to a summer outfit.

Beginner Friendly 2-4 Hours

Materials Needed for Baby Barefoot Sandals Pattern

β€” Main Fabric

  • 01
    Color A - Sandal base: Fingering weight yarn, crochet thread, or embroidery floss (Baby size recommended with 2.75 mm hook)
  • 02
    Color B - Flower: Fingering weight yarn, crochet thread, or embroidery floss (used for the flower)
  • 03
    Toddler option: Use Color A and B in Worsted Weight yarn with 3.25 mm hook for a larger 2 inch flower
  • 04
    Featured samples made with Knit Picks Comfy Fingering and Worsted weight yarns (colors as desired)

β€” Tools Required

  • 01
    Crochet hook size 2.75 mm (C) for Baby size
  • 02
    Crochet hook size 3.25 mm (D) for Toddler size
  • 03
    Fingering weight yarn, crochet thread, or embroidery floss for Color A and Color B
  • 04
    Worsted weight yarn for toddler option
  • 05
    Yarn needle for weaving in ends and sewing flower
  • 06
    Scissors
  • 07
    Pins (optional) to position flower before sewing

Progress Tracker

0% Complete

β€” Materials :

Info :

Baby Size: 1.5 inches across flower. Sandal Base Color A - Fingering weight yarn, crochet thread or embroidery Floss. Flower Color B - Fingering weight yarn, crochet thread or embroidery Floss.

Info :

Toddler Size: 2 inches across flower. Use Color A and B Worsted Weight yarn and D or 3.25 mm hook. Use the same pattern for both sizes. Featured Sandals are made with Knit Picks Comfy Fingering and Worsted weight yarns.

β€” Notes & How to Read Pattern :

Info :

Abbreviations: Ch Chain. Sc Single crochet. Dc Double Crochet. Sl st Slip stitch.

Info :

Notes: 1. Do not count the chain stitch as a stitch at the beginning of round. 2. When joining at end of round always join to the top of the chain stitch you began the round with. 3. I did not do an end of the round stitch count in this pattern because of all the chaining. I thought it might be confusing. All of our other patterns do have stitch count though. :o)

Info :

How to read pattern: A. When you see parenthesis () in the pattern they are either referring to the numbers for the larger sizes or will be around notations such as (See Note A). Note A) B. When you see Brackets [] in the pattern that means that you work everything in them as a set or together. C. When I have a number followed by a st, that stitch needs to be worked over that number of stitches. Example: "10 sc" that is 1 sc in each of the next 10 stitches.

Info :

Gauge: ??????? I wasn't sure what to put here! We normally have gauge I just wasn't sure how to measure it for this pattern. :o)

β€” Sandal Base :

Round 1 :

With color A ch 4, join with slip stitch to 4th chain from hook to form a small ring. (See Picture A)

Round 2 :

Chain 1 (does not count as stitch) place 9 sc in ring. Join with slip stitch to the chain 1 from the beginning of round. (See Picture B) Do not turn.

Info :

In this pattern when stitches are in brackets that means to put that group of stitches in the same stitch.

Round 3 :

This whole round will be worked in the back loops only of the previous round. Ch 3, starting in first stitch *[2 dc, chain 2, 2 dc], 1 dc in each of the next two stitches. Repeat from * 1 more time. [2 dc, chain 11, now working back down chain put 1 slip stitch in 10th chain from hook, ch 1, 2 dc back in same stitch], 1 dc in each of the next two stitches. Join with slip stitch to the top of the chain 3 that you started the round with. Do not turn.

β€” First strap :

First strap :

Slip stitch in next 3 stitches. This should bring you to the middle of the first chain 2 spot. (See pictures C and D) Ch 60, Bind off!

β€” Second Strap :

Second Strap :

Attach yarn to next chain three spot with a single crochet. (See Picture D on first page) Ch 60, Bind off!

Info :

Note: I tied the ends of my straps in a knot to kind of finish them off. You don't have to, I just thought it made them look better. :o)

β€” Flower :

Flower :

With color B attach yarn to any one of the exposed front loops that were not worked in round 3. (See Picture E). Starting in the stitch you attached to, remember to work all stitches between brackets in the same stitch. [Ch 2, 5 dc, ch 2, slip stitch back to same stitch] , first petal made! :o)

Round 1 :

Now skip next stitch, *[slip stitch to next stitch, Ch 2, 5 dc, ch 2, slip stitch back to same stitch] , skip next stitch, repeat from * all the way around and end round by joining with a slip stitch to base of first flower petal made. You should have 5 flower petals when complete. Bind off!

Info :

Note: Folding a corner of the sandal to the back makes it easier to get to the exposed front loops when making the flower petals. (See picture F)

β€” Finishing :

Finishing :

Using color A again attach to center of flower by pulling a loop of yarn from back to front and top stitch by slip stitching all the way around the center of the flower at the base of the petals. (See arrows in picture G) After slip stitching around the center circle fill in the center by slip stitching across the flower's center in random stitches until the center is filled to your liking. :o) This may look ugly before it is finished but no worries! Just keep slip stitching away and fill in the holes until it is pretty. :o) (See Picture H) Bind Off!

Info :

Weave in Ends and you are Done!

Assembly Instructions

  • Attach the first strap by slip stitching in the next 3 stitches after Round 3, chain 60 and bind off; this positions the strap to the side of the sandal and should bring you to the middle of the first chain-2 spot.
  • Attach the second strap by inserting yarn into the next chain-3 spot with a single crochet, chain 60 and bind off; tie strap ends in a small knot if desired for a finished look.
  • Sew the flower to the exposed front loops created by working Round 3 in the back loops only, aligning the petals evenly around the front center and joining the final petal with a slip stitch at the base of the first petal.
  • Using Color A, secure the flower center by slip stitching around and across the center in random stitches until the center is filled and neat, then bind off and weave in ends.
  • Fold the corner of the sandal back if needed while making flower petals to make the exposed front loops easier to reach and ensure even petal placement.

Important Notes

  • πŸ’‘Do not count the chain stitch as a stitch at the beginning of a round to keep stitch counts consistent with this pattern.
  • πŸ’‘When joining at the end of a round always join to the top of the chain stitch you began the round with to maintain a neat join.
  • πŸ’‘Round 3 is worked in the back loops only to create exposed front loops for attaching the flower, so be sure to work BLO for that round.
  • πŸ’‘You may knot the strap ends for a tidy finish, but this is optional and purely decorative.

These Baby Barefoot Sandals are a quick, charming project that make lovely gifts or photo props, perfect for summer outfits and new baby showers. The little five-petal flower adds a sweet handmade touch, and you can change colors to match any wardrobe. Have fun mixing threads and yarns to create tiny, unique sandals everyone will adore. 🧢🌸

You ask,

we answer.

FAQs

What size will the finished piece be?

The finished baby sandal has a flower approximately 1.5 inches across when using fingering weight yarn and a 2.75 mm hook; the toddler option yields about a 2 inch flower with worsted yarn and a 3.25 mm hook.

Can I use different yarn weights for this pattern?

Yes, you can use different yarn weights but you should adjust your hook size accordingly; switching to worsted weight with a larger hook will make a larger sandal and flower.

Do I need prior crochet experience for this pattern?

This pattern is beginner friendly and uses basic stitches like chain, single crochet, double crochet and slip stitch, so basic crochet knowledge is recommended.

How long does this project typically take to complete?

Most crocheters finish a pair of sandals in approximately 2-4 hours, depending on yarn choice and familiarity with the stitches.