🧢 Beautiful ✨ Detailed πŸ’ Adorable

Winnie The Pooh Amigurumi Pattern

Winnie The Pooh Amigurumi Pattern
4.3β˜… Rating
5-7 Hours Time Needed
3.9K Made This
βœ‚οΈ

Intermediate Level

Ideal for those with basic crochet experience, featuring slightly more advanced stitches and techniques to expand your skills.

⏱️

Weekend Treat

Takes 5-7 hours, making it an enjoyable project to finish over a couple of days.

🧸

Cute Companion

An adorable friend to cherish, handcrafted with love to bring comfort and joy for years to come.

About This Winnie The Pooh Amigurumi Pattern

This pattern creates a pocket-sized Winnie the Pooh amigurumi dressed like a little bee, complete with a striped body, tiny limbs and a bee antenna headband. The design uses small-weight yarn and a small hook to achieve tight stitches that hold stuffing well. You will learn shaping for the round head, facial features, and simple color changes for Pooh's outfit.

Winnie The Pooh Amigurumi Pattern crochet pattern - detailed view of completed project

Includes complete round-by-round instructions for every piece: head, nose, ears, body, legs, arms and accessories. Photos and clear notes guide you through assembly and finishing touches for a polished result.

Why You'll Love This Winnie The Pooh Amigurumi Pattern

I absolutely love this pattern because it takes a classic character and gives it a tiny, playful twist with the bee theme. I enjoy how the simple stripes and small accessories add character without complicated construction. The head shaping is satisfying and the tiny nose and embroidered details bring the face to life. I also appreciate that the pattern is compact β€” it works up quickly but still feels special when finished.

Winnie The Pooh Amigurumi Pattern step 1 - construction progress Winnie The Pooh Amigurumi Pattern step 2 - assembly progress Winnie The Pooh Amigurumi Pattern step 3 - details and accessories Winnie The Pooh Amigurumi Pattern step 4 - final assembly and finishing

Switch Things Up

I love how easy it is to customize this Pooh by changing colors or adding accessories like a tiny scarf or hat.

I often try different yarn weights and hooks to make a mini keychain version or a larger cuddly doll.

I sometimes swap the bee headband for a tiny crown to create a royal Pooh for gifts.

I recommend experimenting with embroidered expressions β€” a small change in eye placement or mouth curve really changes personality.

I like to add felt details for toddlers, replacing safety eyes with embroidered eyes for safety and durability.

I also create matching sets by adjusting striping patterns on the body to coordinate with other characters in the series.

I sometimes add a loop at the top to make a hanging ornament for holiday decorations.

I use contrast-colored yarn for edging around the face to make the features pop in photos and displays.

I encourage trying metallic or sparkly thread for subtle, playful accents on accessories like headbands or tiny buttons.

I find that swapping out the stuffing type (firmer vs softer) gives different finished textures β€” firmer for display toys, softer for squeezable gifts.

Common Mistakes & How to Fix Them

βœ— Skipping the safety eye placement step causes misaligned facial features; insert safety eyes between the specified rounds and count stitches carefully before securing. βœ— Overstuffing the head or body creates a distorted shape; stuff gradually and evenly, adding small amounts until the piece is firm but not bulging. βœ— Changing colors without securing ends can lead to loose tails; weave in or hide color changes neatly and leave short tails to sew where possible. βœ— Forgetting to sew edges together properly results in uneven ears or limbs; pin parts in place, check symmetry and use small whipstitches to hold edges securely before final sewing.

Winnie The Pooh Amigurumi Pattern

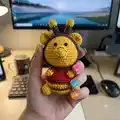
Make your own adorable Winnie the Pooh amigurumi with this detailed intermediate crochet pattern. You will enjoy clear, step-by-step rounds for the head, body, nose, ears, limbs and cute bee headband. This pattern uses small yarn and a fine hook to create a collectible, gift-ready plush that fits in the palm of your hand. Perfect for gifting or decorating nurseries with a handcrafted touch.

Intermediate 5-7 Hours

Materials Needed for Winnie The Pooh Amigurumi Pattern

β€” Main Fabric

  • 01
    Color A: yellow YarnArt Jeans 35 (50g, 160m) - main body/head color
  • 02
    Color B: brown YarnArt Jeans 70 (50g, 160m) - edging/stripe color
  • 03
    Color C: red YarnArt Jeans 90 (50g, 160m) - shirt color
  • 04
    Approximate small amounts of yarn for accents and facial details

β€” Tools Required

  • 01
    Crochet hook size 2.0mm-2.5mm
  • 02
    Tapestry needles
  • 03
    Brown thread for facial embroidery
  • 04
    Pins for assembly
  • 05
    Stitch markers
  • 06
    Scissors
  • 07
    Polyester fiberfill stuffing
  • 08
    Safety eyes 6mm (2 pieces) - optional (use embroidered eyes if preferred)

Progress Tracker

0% Complete

β€” Head :

Round 1 :

sc 6 into a magic loop (6)

Round 2 :

inc 6 (12)

Round 3 :

[sc 1, inc] 6x (18)

Round 4 :

[sc 1, inc, sc 1] 6x (24)

Round 5 :

[sc 3, inc] 6x (30)

Round 6 :

sc 30 (30)

Round 7 :

[sc 2, inc, sc 2] 6x (36)

Round 8 :

sc 36 (36)

Round 9 :

sc 8, [sc 1, inc] 3x, sc 8, [sc 1, inc] 3x, sc 8 (42)

Round 10 :

sc 42 (42)

Round 11 :

sc 8, [sc 1, inc, sc 1] 3x, sc 8, [sc 1, inc, sc 1] 3x, sc 8 (48)

Round 12-17 :

sc 48 (6 rnds), insert safety eyes between rnd 8&9, 2-3 sts apart (48)

Round 18 :

[sc 6, dec] 6x (42)

Round 19 :

[sc 5, dec] 6x (36)

Round 20 :

[sc 4, dec] 6x (30)

Round 21 :

[sc 3, dec] 6x (24)

Info :

Break the yarn, stuff firmly. Sew the ears between rnd 5&8 of the head, 7-8 sts apart. Sew 2 edges together where indicated.

β€” Nose :

Round 1 :

sc 6 into a magic loop (6)

Round 2 :

inc 6 (12)

Round 3 :

[sc 3, inc] 3x (15)

Round 4-5 :

sc 15 (2 rnds) (15)

Info :

Break the yarn, stuff slightly. Sew the nose under the eyes.

β€” Ears (yarn A, X2) :

Round 1 :

sc 6 into a magic loop (6)

Round 2 :

inc 6 (12)

Round 3 :

[sc 1, inc] 6x (18)

Round 4-5 :

sc 18 (2 rnds) (18)

Round 6 :

[sc 1, dec] 6x (12)

Info :

Break the yarn, sew 2 edges together. Sew the ears between rnd 5&8 of the head, 7-8 sts apart.

β€” Body :

Round 1 :

sc 6 into a magic loop (6)

Round 2 :

inc 6, change to yarn B (12)

Round 3 :

[sc 1, inc] 6x, change to yarn A (18)

Round 4 :

[sc 1, inc, sc 1] 6x (24)

Round 5 :

[sc 3, inc] 6x, change to yarn B (30)

Round 6 :

[sc 2, inc, sc 2] 6x, change to yarn A (36)

Round 7 :

[sc 5, inc] 6x (42)

Round 8 :

sc 42, change to yarn B (42)

Round 9 :

sc 42, change to yarn A (42)

Round 10-11 :

sc 42 (2 rnds), break yarn A, change to yarn B (42)

Round 12 :

sc 42, break yarn B, change to yarn C (42)

Round 13 :

[sc 5, dec] 6x (36)

Round 14-15 :

sc 36 (2 rnds) (36)

Round 16 :

[sc 4, dec] 6x (30)

Round 17 :

sc 30 (30)

Round 18 :

[sc 3, dec] 6x (24)

Round 19 :

sc 24 (24)

Info :

Break the yarn, stuff firmly. Sew the body to the head.

β€” Legs (yarn A, X2) :

Round 1 :

sc 6 into a magic loop (6)

Round 2 :

inc 6 (12)

Round 3-5 :

sc 12 (3 rnds) (12)

Info :

Break the yarn, stuff slightly. Sew the legs between rnd 6&9 of the body.

β€” Arms (yarn A, X2) :

Round 1 :

ch 4, start on the 2nd st from the hook, sc 2, (sc 3) on the last st, continue on the opposite side, sc 1, inc (8)

Round 2 :

sc 8, break yarn A, change to yarn C (8)

Round 3 :

sc 8 (8)

Round 4 :

sc 6, dec (7)

Info :

Break the yarn, sew 2 edges together. Sew the arms between the body & the head.

β€” Bee Headband (yarn B) :

Round 1 :

ch 45, slst on the 1st ch to make a ring, sc 45 (45)

Info :

Break the yarn, hide the remaining yarn.

β€” Bee's Antennas (yarn A, X2) :

Round 1 :

sc 6 into a magic loop (6)

Round 2 :

[sc 1, inc] 3x (9)

Round 3 :

sc 9 (9)

Round 4 :

[sc 1, dec] 3x, change to yarn B (6)

Round 5-8 :

sc 6 (4 rnds) (6)

Info :

Break the yarn, stuff slightly, sew the Antennas on the headband, 1-2 sts apart. Wear the Bee headband on the Pooh's head.

Assembly Instructions

  • Attach head to body: align opening at top of body with neck of head, then sew securely with whipstitch around the join to attach the head to the body.
  • Position and sew the arms between the body and head using the pattern placement: place each arm between the body and head openings and sew with small invisible stitches so shoulders are symmetrical.
  • Sew legs to the bottom of the body between rounds 6 and 9, spacing them evenly to allow the toy to sit upright.
  • Sew the ears to the head between rounds 5 and 8, spacing them 7-8 stitches apart for symmetrical placement.
  • Sew the bee headband around the head opening and attach antennas 1-2 stitches apart on the headband; hide and weave in ends securely.
  • Embroider eyebrows, nose and mouth with brown thread as shown: eyebrows 3 rounds above the eyes and the mouth centered under the nose.

Important Notes

  • πŸ’‘Use stitch markers to mark the start of each round, especially during increases and decreases to maintain correct stitch counts.
  • πŸ’‘Insert safety eyes before closing the head (between rounds 12-17 as instructed) and ensure they are securely fastened or embroider eyes if making for a small child.
  • πŸ’‘Stuff pieces firmly but gradually to keep the shape smooth; overstuffing can distort shaping and under-stuffing leaves gaps when sewing parts together.
  • πŸ’‘Weave in ends and hide color change tails as you go to keep the finishing neat and avoid long tails to sew at the end.

This delightful pocket Pooh brings classic charm and a playful bee twist to your handmade collection. Make it in bright yarns for a cheerful gift or keep it as a tiny keepsake to brighten your shelf. Each small detail β€” from the nose to the embroidered smile β€” adds personality and handmade warmth. 🧢🐝

You ask,

we answer.

FAQs

What size will the finished piece be?

The finished amigurumi measures approximately 10-12 cm tall when using the recommended YarnArt Jeans and a 2.0-2.5mm hook.

Can I use different yarn weights for this pattern?

Yes, you can use different yarn weights, but this will affect the final size; adjust your hook accordingly and be mindful that stuffing and eye sizes may need to change.

Do I need prior crochet experience for this pattern?

This pattern is rated intermediate and assumes you can work in the round, perform increases and decreases, and follow bracketed repeat instructions.

How long does this project typically take to complete?

Most crocheters finish this project in about 5-7 hours, depending on experience and how quickly you work through small parts and assembly.