๐Ÿงถ Beautiful โœจ Detailed ๐Ÿ’ Adorable

Whale Amigurumi Pattern

Whale Amigurumi Pattern
4.9โ˜… Rating
12-15 Hours Time Needed
3.0K Made This
โœ‚๏ธ

Intermediate Level

Ideal for those with basic crochet experience, featuring slightly more advanced stitches and techniques to expand your skills.

โฑ๏ธ

Multi-Day Project

A rewarding 12+ hour journeyโ€”perfect for dedicated crafters who love detailed work.

๐Ÿฅ

Charming Critter

Delightful animal designs with sweet details that capture the essence of your favorite woodland and farmyard friends.

About This Whale Amigurumi Pattern

This pattern creates a realistic-looking crocheted whale with detailed fins, jaw and a poseable wire-supported body. It uses fine YarnArt Jeans yarn and works in continuous spiral rounds for a smooth finish. The design includes instructions for invisible color changes and internal wiring for structure.

Whale Amigurumi Pattern crochet pattern - detailed view of completed project

Clear step-by-step rounds and photo references help you assemble and finish the toy. The pattern includes materials, abbreviations, and helpful tips for a professional result.

Why You'll Love This Whale Amigurumi Pattern

I absolutely love this pattern because it transforms simple stitches into a soft, sculpted whale full of character. I enjoy the balance between shaping and finishing โ€” the wires give the whale a posable, lifelike quality that makes a big difference. The invisible color-change technique produces a neat, professional underside for the jaw and fins. I also love how the pattern teaches small finishing tricks that improve the overall look, like using shifting stitches to keep rows aligned.

Whale Amigurumi Pattern step 1 - construction progress Whale Amigurumi Pattern step 2 - assembly progress Whale Amigurumi Pattern step 3 - details and accessories Whale Amigurumi Pattern step 4 - final assembly and finishing

Switch Things Up

I love how easy it is to customize this whale by swapping colors; you can make a pastel nursery whale or a bold navy ocean-themed version depending on your yarn choice.

Want to make a smaller or larger whale? Change the yarn weight and hook sizeโ€”use thinner yarn for a tiny keychain friend or bulky yarn for a large cuddle whale.

I often add tiny embroidered freckles or a mouth line to change the whale's expression and personalityโ€”try a small embroidered smile or stitched eyelashes.

If you want a fully poseable creature, use slightly thicker wire or double the wire in the tail and fins for stronger posing ability.

Try adding removable accessories like a tiny crochet hat, a mini blanket or even a little life ring to make a themed gift set.

I sometimes stuff the head more firmly than the body to keep a rounded snout; experiment with stuffing levels to alter the silhouette.

For a textured surface, switch to a cotton blend with a subtle slub or use a 2-row surface crochet to add 'barnacle' details to the belly.

I enjoy making a matching pair in two contrasting colors for sibling giftsโ€”one blue and one grey, for example, which look great together on a shelf.

Try embroidering simple white dots or using tiny beads on the belly to mimic the whale's throat grooves as a decorative detail.

If you like mixed media, glue a small felt heart or add a fabric tag to personalize it with a name for a thoughtful custom gift.

Common Mistakes & How to Fix Them

โœ— Skipping the shifting stitch when the marker drifts will create a visible spiral offset; watch for the marker moving to the right and add a shifting stitch to keep rows aligned. โœ— Forgetting to insert safety eyes at the specified rounds results in incorrect placement; insert eyes between rounds 29 and 30 leaving 43 stitches apart as instructed. โœ— Not preparing and shaping the wires before inserting them makes the internal structure unstable; make three wires 40 cm long, curve and wrap the ends, and secure with tape before insertion. โœ— Overstuffing the body will distort shaping and make sewing difficult; stuff gradually, use synthetic fluff sparingly and shape as you go.

Whale Amigurumi Pattern

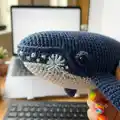
Make a cuddly crochet whale using fine YarnArt Jeans yarn and clear step-by-step instructions. This pattern guides you through the head, body, fins and jaw with photos and helpful tips. You will learn shaping, invisible color changes and internal wiring for a poseable finish. Perfect for gifting or keeping as a soft ocean friend.

Intermediate 12-15 Hours

Materials Needed for Whale Amigurumi Pattern

โ€” Main Fabric

  • 01
    YarnArt Jeans size 2 (Fine/2), 55% cotton, 45% pac (50 g / 150 m) - blue (color 54)
  • 02
    YarnArt Jeans size 2 (Fine/2), 55% cotton, 45% pac (50 g / 150 m) - white (color 01)

โ€” Tools Required

  • 01
    Crochet hook No 1.75 mm (Crochet Soft Touch)
  • 02
    Scissors
  • 03
    Stitch markers
  • 04
    Beads (for decoration if desired)
  • 05
    Sintepuh (synthetic stuffing / polyester filling)
  • 06
    8 mm safety eyes (2 pieces)
  • 07
    Wire for internal structure (make 3 wires of 40 cm)
  • 08
    Adhesive roll bandage or duct tape (to wrap and secure wire ends)
  • 09
    Tapestry/yarn needle for sewing and weaving in ends
  • 10
    Pins for assembly

Progress Tracker

0% Complete

โ€” Head + Body :

Info :

Blue yarn

Round 1 :

1 r: 8 sc into MR [8]

Round 2 :

2 r: 8 inc [16]

Round 3 :

3 r: (1 sc, inc)*8 [24]

Round 4 :

4 r: 12 sc, (1 sc, inc)*6 [30]

Round 5-9 :

5 r - 9 r: 30 sc [30] {5 rounds}

Round 10 :

10 r: 2 sc, inc, (4 sc, inc)*5, 2 sc [36]

Round 11 :

11 r: 36 sc [36]

Round 12 :

12 r: 12 sc, (3 sc, inc)*6 [42]

Round 13 :

13 r: 3 sc, inc, (6 sc, inc)*5, 3 sc [48]

Round 14 :

14 r: 48 sc [48]

Round 15 :

15 r: 12 sc, (5 sc, inc)*6 [54]

Round 16-17 :

16 r - 17 r: 54 sc [54] {2 rounds}

Round 18 :

18 r: 15 sc, inc, (6 sc, inc)*5, 3 sc [60]

Round 19-21 :

19 r - 21 r: 60 sc [60] {3 rounds}

Round 22 :

22 r: (9 sc, inc)*6 [66]

Round 23-24 :

23 r - 24 r: 66 sc [66] {2 rounds}

Round 25 :

25 r: 16 sc, inc, (8 sc, inc)*5, 4 sc [72]

Round 26-27 :

26 r - 27 r: 72 sc [72] {2 rounds}

Round 28 :

28 r: 30 sc, 3 inc, 30 sc, 3 inc, 6 sc [78]

Round 29 :

29 r: 30 sc, (1 sc, inc)*3, 30 sc, (1 sc, inc)*3, 6 sc [84]

Round 30-34 :

30 r - 34 r: 84 sc [84] {5 rounds}

Info :

Insert the safety eyes between the rounds 29 and 30 leaving 43 stitches apart. {img 1-2}

Round 35-44 :

35 r - 44 r: 84 sc [84] {10 rounds}

Info :

Make 3 wires of 40 cm. Curve one end of each piece in the loop like on the pics and wrap it with the adhesive roll bandage.

Info :

Also curve the wrapped part at an angle of 90 degrees. At a distance of 11 cm {img 6}. Stuff it with sintepuh.

Info :

Insert two curved wires between row 38 and row 39, below the eye {img 8 - 9}.

Info :

Insert the third wire into the center. Secure with duct tape {img 9 - 11}.

Round 45-57 :

45 r - 57 r: 84 sc [84] {13 rounds}

Round 58 :

58 r: 12 sc, (11 sc, inc)*6 [90]

Round 59 :

59 r: 90 sc [90]

Round 60 :

60 r: 12 sc, (11 sc, dec)*6 [84]

Round 61 :

61 r: 12 sc, (10 sc, dec)*6 [78]

Round 62-63 :

62 r - 63 r: 78 sc [78] {2 rounds}

Info :

Stuff with synthetic fluff.

Round 64 :

64 r: 12 sc, (9 sc, dec)*6 [72]

Round 65-67 :

65 r - 67 r: 72 sc [72] {3 rounds}

Round 68 :

68 r: 24 sc, (6 sc, dec)*6 [66]

Round 69-72 :

69 r - 72 r: 66 sc [66] {4 rounds}

Round 73 :

73 r: 12 sc, 3 hdc in the 1 stitch {img 13}, 53 sc [68]

Info :

Stuff with synthetic fluff.

Round 74 :

74 r: 26 sc, (5 sc, dec)*6 [62]

Round 75 :

75 r: 13 sc, 3 hdc in the 1 stitch, 48 sc [64]

Round 76 :

76 r: 64 sc [64]

Round 77 :

77 r: 22 sc, (5 sc, dec)*6 [58]

Round 78 :

78 r: 58 sc [58]

Round 79 :

79 r: 14 sc, 3 hdc in the 1 stitch, 43 sc [60]

Round 80-81 :

80 r - 81 r: 60 sc [60] {2 rounds}

Round 82 :

82 r: 24 sc, (4 sc, dec)*6 [54]

Info :

Stuff with synthetic fluff.

Round 83 :

83 r: 9 sc, from the 11th stitch from the hook: 35 sc [44] {img 14, 15}

Round 84 :

84 r: 44 sc [44]

Info :

Go back to row 83. Fold the missed stitches in half and sew. {img 16, 17}

Round 85-87 :

85 r - 87 r: 44 sc [44] {3 rounds}

Round 88 :

88 r: (20 sc, dec)*2 [42]

Round 89 :

89 r: (5 sc, dec)*6 [36]

Round 90-91 :

90 r - 91 r: 36 sc [36] {2 rounds}

Round 92 :

92 r: (4 sc, dec)*6 [30]

Round 93-97 :

93 r - 97 r: 30 sc [30] {5 rounds}

Round 98 :

98 r: (3 sc, dec)*6 [24]

Info :

Finish the end of the line {img 18 - 21}.

Round 99-103 :

99 r - 103 r: 24 sc [24] {5 rounds}

Round 104 :

104 r: (2 sc, dec)*6 [18]

Info :

Stuff with synthetic fluff.

Round 105-106 :

105 r - 106 r: 18 sc [18] {2 rounds}

Round 107 :

107 r: (1 sc, dec)*6 [12]

Round 108-109 :

108 r - 109 r: 12 sc [12] {2 rounds}

Round 111 :

111 r: 6 dec [6]

Info :

Fasten off leaving a tail about 15 cm long and cut the yarn. Using a tapestry needle, weave the yarn tail through the front loop of each stitch and pull tight to close.

โ€” Right Fin :

Info :

Blue yarn

Round 1 :

1 r: make chain of 30 stitches, from the 2nd stitch from the hook: 28 sc, 4 sc in the 1 stitch, on the other side of the chain - 28 sc [60] {img 1}

Round 2 :

2 r: ch, turn, from the 2nd stitch from the hook: 28 sc, 4 inc, 3 sc, 7 hdc, 7 dc, 2 inc-dc, 4 dc, 2 hdc, 3 sc [66] {img 2}

Round 3 :

3 r: ch, turn, from the 2nd stitch from the hook: 3 sc, 2 hdc, 5 dc, 2 inc-dc, 8 dc, 5 hdc, 3 sc, 14 sl st, 20 sc, 4 sl st [68] {img 3}. Don't cut the thread.

Info :

Ch, turn {img 13}, from the 2nd stitch from the hook 5 sl st, 9 sc, 4 sl st {img 14}, 1 sc, 3 hdc in the 1 stitch {img 15}, 1 sc, 3 sl st, 2 sc, 3 hdc in the 1 stitch {img 16}, 2 sc, 11 sl st {img 17}, 2 sc, 3 hdc in the 1 stitch, 2 sc, 1 sl st {img 18}, 3 hdc in the 1 stitch, 1 sl st, 1 sc {img 19}, 3 hdc in the 1 stitch, 2 sc, 1 sl st {img 20}, 3 hdc in the 1 stitch, 1 sc, 2 sl st, 3 sc, 8 sl st {img 21}.

โ€” Left Fin :

Info :

Blue yarn

Round 1 :

1 r: make chain of 30 stitches, from the 2nd stitch from the hook: 28 sc, 4 sc in the 1 stitch, on the other side of the chain - 28 sc [60]

Round 2 :

2 r: ch, turn, from the 2nd stitch from the hook: 28 sc, 4 inc, 3 sc, 7 hdc, 7 dc, 2 inc-dc, 4 dc, 2 hdc, 3 sc [66]

Round 3 :

3 r: ch, turn, from the 2nd stitch from the hook: 3 sc, 2 hdc, 5 dc, 2 inc-dc, 8 dc, 5 hdc, 3 sc, 14 sl st, 20 sc, 4 sl st [68]. Don't cut the thread.

Info :

Follow same shaping steps as right fin. Make one blue and one white detail and attach wrong side to wrong side. Blue yarn: keep white detail on top, blue detail on bottom. Bind off 2 pieces together and catch blue piece in the stitch and white piece in BLO. Finish edge as shown in photos.

โ€” Lower Jaw :

Info :

Blue yarn

Round 1 :

1 r: make chain of 28 stitches {img 1}, from the 2nd stitch from the hook: 26 sc, 3 sc in the 1 stitch, on the other side of the chain - 26 sc [55] {img 2}

Round 2 :

2 r: ch, turn, from the 2nd stitch from the hook: 26 sc, 3 inc, 26 sc [58] {img 3}

Round 3 :

3 r: ch, turn, from the 2nd stitch from the hook: 26 sc, (1 sc, inc)*3, 26 sc [61] {img 4}

Round 4 :

4 r: ch, turn, from the 2nd stitch from the hook: 27 sc, inc, (2 sc, inc)*2, 27 sc [64] {img 5}

Round 5 :

5 r: ch, turn, from the 2nd stitch from the hook: 26 sc, (3 sc, inc)*3, 26 sc [67] {img 6}

Round 6 :

6 r: ch, turn, from the 2nd stitch from the hook: 27 sc, dec [28] {img 7}

Round 7 :

7 r: ch, turn, from the 2nd stitch from the hook: dec, 26 sc [27] {img 8}

Round 8 :

8 r: ch, turn, from the 2nd stitch from the hook: 25 sc, dec [26] {img 9}

Round 9 :

9 r: ch, turn, from the 2nd stitch from the hook: dec, 24 sc [25] {img 10}

Round 10 :

10 r: ch, turn, from the 2nd stitch from the hook: 23 sc, dec [24] {img 11}

Round 11 :

11 r: ch, turn, from the 2nd stitch from the hook: dec, 22 sc [23] {img 12}

Info :

Continue shaping the lower jaw following the photo sequence and instructions for sl st and hdc clusters as shown in images 13-21 to complete the jaw scallops and finish edges.

Assembly Instructions

  • Insert the safety eyes between rounds 29 and 30 leaving 43 stitches apart before continuing shaping of the head.
  • Make three wires of 40 cm, curve one end into a loop, wrap and tape the ends; insert two curved wires between row 38 and row 39 below the eye and insert the third wire into the center, securing it with duct tape.
  • Stuff the body gradually with synthetic fluff (sintepuh) at the indicated stuffing points and after rounds called out to avoid overstuffing.
  • Attach the white inner jaw and blue outer jaw pieces together wrong side to wrong side, then sew the jaw in place under the head following the photo references.
  • Sew fins to the sides of the body matching photo placement, use the wires to pose the body and fins as desired, and secure seams with hidden whipstitch.
  • Fold and sew missed stitches at the notch (go back to row 83, fold the missed stitches in half) to create the opening seam, then continue rounds and close as instructed.

Important Notes

  • ๐Ÿ’กWork in continuous spiral rounds without slip stitches or turning chains for a smooth surface and to maintain correct shaping.
  • ๐Ÿ’กUse a thin cotton thread as a marker thrown between the last stitch of one row and the first of the next to track the beginning of the round and add shifting stitches when necessary.
  • ๐Ÿ’กMake invisible color changes by working to within two stitches before the change, wrap new color on hook and pull through remaining loops, and tie loose tails inside.
  • ๐Ÿ’กStuff gradually and check shaping as you go; overstuffing will distort the silhouette and make finishing difficult.

This charming whale amigurumi is a wonderful project that combines shaping, invisible color changes and a poseable internal wire frame for lifelike posture. It uses YarnArt Jeans fine yarn and finishes with neat scalloped fins and a tidy lower jaw. Make one for baby nurseries, ocean-themed gifts or as a special handmade keepsake. ๐Ÿ‹๐Ÿงถ

You ask,

we answer.

FAQs

What size will the finished piece be?

The finished whale measures approximately the size shown in the photos when using YarnArt Jeans size 2 and a 1.75 mm hook; exact size varies with tension and stuffing.

Can I use different yarn weights for this pattern?

Yes, you can use different yarn weights but the final size will change; use an appropriate hook for your chosen yarn and adjust wire length and stuffing accordingly.

Do I need prior crochet experience for this pattern?

This pattern is rated intermediate, so you should be comfortable with single crochet, increases, decreases, hdc, dc and reading round counts; experience with invisible color change is helpful.

How long does this project typically take to complete?

Most crocheters complete this project in 12-15 hours across multiple sessions, depending on experience, finishing detail and whether you make additional accessories.