🧶 Beautiful ✨ Detailed 💝 Adorable

Vinyl Record Coasters Pattern

Vinyl Record Coasters Pattern
4.4★ Rating
1-2 Hours Time Needed
2.2K Made This
✂️

Beginner Friendly Level

Perfect for those just starting their crochet journey, with clear instructions and simple techniques

⏱️

Quick Make

Complete in under 2 hours—lightning fast fun for instant gratification and quick gifts.

Warm Welcome

A comforting piece for home or gifts that brings handmade warmth to everyday moments and special occasions.

About This Vinyl Record Coasters Pattern

This pattern creates charming vinyl record-inspired coasters with a colourful centre and a black outer vinyl ring. You get full instructions for both UK and US terminology, so you can work with the terms you prefer. The pattern uses simple increases and a final edge row to flatten the coaster into shape.

Vinyl Record Coasters Pattern crochet pattern - detailed view of completed project

Each coaster measures approximately 13cm/5.5inches finished and is quick to make using small amounts of yarn. Detailed notes and finishing tips help you secure ends and get a neat result.

Why You'll Love This Vinyl Record Coasters Pattern

I absolutely love this pattern because it captures a playful retro aesthetic with very little work. I enjoy how quickly a small circle grows into a neat coaster and how easy it is to change the centre colour for different looks. I love that the pattern includes both UK and US terms, making it friendly for many crocheters. I'm proud of the simple finishing tips that keep the coaster flat and tidy, even if the rounds look wavy mid-way.

Vinyl Record Coasters Pattern step 1 - construction progress Vinyl Record Coasters Pattern step 2 - assembly progress Vinyl Record Coasters Pattern step 3 - details and accessories Vinyl Record Coasters Pattern step 4 - final assembly and finishing

Switch Things Up

I love changing the centre colours to create themed sets; try pastel centres for a soft look or neon for a bold statement.

I sometimes change yarn weight and hook size to make miniature keyring versions or chunky dinner-size coasters—experiment to find the look you love.

I often add a felt or cork backing for non-slip protection and extra durability on surfaces—glue or stitch it in place carefully.

I like to embroider small labels or initials on the contrast insert to personalise gifts or make sets for family members.

I will occasionally use a metallic or shiny yarn for the centre ring to give the illusion of a record label and a little sparkle.

I recommend trying different centre diameters: increase or decrease the number of contrast rounds to make a larger or smaller label effect.

I sometimes block the coaster after finishing to help it lie perfectly flat, pinning it to shape and allowing it to dry fully.

I enjoy making matching sets in tonal colours for a coordinated table setting or mixing colours for a playful mismatched set.

I also experiment with adding a single round of surface slip stitches to mimic grooves on the vinyl for added texture.

I encourage you to try combining yarn types—cotton for absorbency or acrylic for easy washing—depending on the intended use.

Common Mistakes & How to Fix Them

✗ Skipping the stitch marker when working continuous rounds can cause you to lose track of the start of each round; place a stitch marker on the last stitch of each round so you always know where to begin the next round. ✗ Not leaving long enough yarn ends makes finishing harder and less secure; leave the recommended 10cm ends for sewing and weaving in so you can secure them properly before trimming. ✗ Pulling your tension too tight on the last round can make the coaster curl or pucker; maintain even, moderate tension and try the recommended ch counts to keep the coaster flat. ✗ Failing to secure and weave in ends into the back of nearest stitches can leave messy edges; secure ends with a couple of small stitches and weave through the back of nearest stitches before cutting flush for a tidy finish. ✗ Assuming the coaster will be perfectly flat before the final row can be disappointing; remember the pattern note that the coaster may be slightly wavy until the last row flattens it back out, so finish the pattern before blocking.

Vinyl Record Coasters Pattern

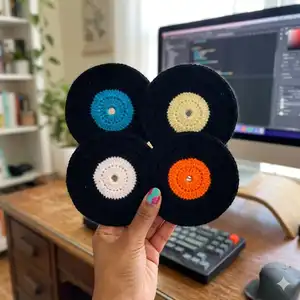
Make fun vinyl record coasters that add a retro music vibe to your home. This quick crochet pattern shows you how to create a contrasting centre and a sleek black "vinyl" surround with clear UK and US terms. Perfect for gifts, sets, or a themed party, you can finish one coaster in minutes and customize colours to match your decor. Follow the step-by-step rows and tips to get smooth, flat coasters every time.

Beginner Friendly 1-2 Hours

Materials Needed for Vinyl Record Coasters Pattern

— Main Fabric

  • 01
    Hayfield Bonus Black 0965 - 15g
  • 02
    Hayfield Bonus Contrast - 2g (per coaster, depending on size and colour)

— Tools Required

  • 01
    3mm Crochet Hook
  • 02
    Wool Needle (for sewing/weaving in ends)
  • 03
    Stitch Markers (to mark last stitch of each round)
  • 04
    Scissors
  • 05
    Tapestry Needle
  • 06
    Blocking surface (optional to flatten)

Progress Tracker

0% Complete

— Intro (UK Terms) :

Infos :

Materials: Hayfield Bonus Black 0965 - 15g. Hayfield Bonus Contrast - 2g. 3mm Crochet Hook. Wool Needle (for sewing).

Infos :

Abbreviations: ch - chain. htr - half treble crochet. tr - treble crochet. inc - 2 stitches into next stitch. htrinc - 2 half treble crochets into next stitch. trinc - 2 treble crochets into next stitch. dec - decrease over next two stitches in front loops only. htrdec - half treble crochet decreased over next two stitches in front loops only. 3dec - decrease over next three stitches in front loops only. sl st - slip stitch. f/o - fasten off by slip stitch in next stitch. FP(htr) - work (half treble crochet) round front post of stitch inserting hook from in front of the stitch from right to left.

Info :

Note: Unless stated work in continuous rounds marking last stitch of each row with a stitch marker before proceeding with the next.

Info :

Measurements: Contrast Insert: 6cm/2.5inches. Final Coaster: 13cm/5.5inches.

— Contrast Insert (UK Terms) :

Info :

Using Contrast

Row 1 :

leaving a 10cm end, ch8, sl st to join (8)

Row 2 :

ch2, tr x21 into centre circle, sl st to join at top of ch2 (22, ch2 counts as 1st st)

Row 3 :

ch2, trinc into base of same st, trinc) x21, sl st to join at top of ch2 (44, ch2 counts as 1st st)

Info :

F/O leaving a 10cm end.

Info :

Secure ends with a couple of small sts before weaving through back of nearest tr sts and cutting flush to finish.

— Vinyl (UK Terms) :

Info :

Using Black

Row 4 :

leaving a 10cm end, FP(htr) into top of any of the tr sts in previous row, FP(htr) into next 43 sts, sl st to join at top of 1st FP(htr) (44)

Row 5 :

ch2, trinc into next st, (tr into next st, trinc) x21, sl st to join at top of ch2 (66, ch2 counts as 1st st)

Row 6 :

ch2, tr into next st, trinc, (tr into next 2sts, trinc) x21, sl st to join at top of ch2 (88, ch2 counts as 1st st)

Info :

THE COASTER WILL BE SLIGHTLY WAVY AT THIS STAGE BUT THE LAST ROW WILL FLATTEN IT BACK OUT.

Row 7 :

ch1, htr into next 87sts, sl st to join at top of ch1 (88, ch1 counts as 1st st)

Info :

F/O leaving a 10cm end.

Info :

Secure ends with a couple of small sts before weaving through back of nearest htr sts and cutting flush to finish.

— Intro (US Terms) :

Infos :

Materials: Hayfield Bonus Black 0965 - 15g. Hayfield Bonus Contrast - 2g. 3mm Crochet Hook. Wool Needle (for sewing).

Infos :

Abbreviations: ch - chain. hdc - half double crochet. dc - double crochet. inc - 2 stitches into next stitch. hdcinc - 2 half double crochets into next stitch. dcinc - 2 double crochets into next stitch. dec - decrease over next two stitches in front loops only. hdcdec - half double crochet decreased over next two stitches in front loops only. 3dec - decrease over next three stitches in front loops only. sl st - slip stitch. f/o - fasten off by slip stitch in next stitch. FP(hdc) - work (half double crochet) round front post of stitch inserting hook from in front of the stitch from right to left.

Info :

Note: Unless stated work in continuous rounds marking last stitch of each row with a stitch marker before proceeding with the next.

Info :

Measurements: Contrast Insert: 6cm/2.5inches. Final Coaster: 13cm/5.5inches.

— Contrast Insert (US Terms) :

Info :

Using Contrast

Row 1 :

leaving a 10cm end, ch8, sl st to join (8)

Row 2 :

ch2, dc x21 into centre circle, sl st to join at top of ch2 (22, ch2 counts as 1st st)

Row 3 :

ch2, dcinc into base of same st, dcinc) x21, sl st to join at top of ch2 (44, ch2 counts as 1st st)

Info :

F/O leaving a 10cm end.

Info :

Secure ends with a couple of small sts before weaving through back of nearest dc sts and cutting flush to finish.

— Vinyl (US Terms) :

Info :

Using Black

Row 4 :

leaving a 10cm end, FP(hdc) into top of any of the dc sts in previous row, FP(hdc) into next 43 sts, sl st to join at top of 1st FP(hdc) (44)

Row 5 :

ch2, dcinc into next st, (dc into next st, dcinc) x21, sl st to join at top of ch2 (66, ch2 counts as 1st st)

Row 6 :

ch2, dc into next st, dcinc, (dc into next 2sts, dcinc) x21, sl st to join at top of ch2 (88, ch2 counts as 1st st)

Info :

THE COASTER WILL BE SLIGHTLY WAVY AT THIS STAGE BUT THE LAST ROW WILL FLATTEN IT BACK OUT.

Row 7 :

ch1, hdc into next 87sts, sl st to join at top of ch1 (88, ch1 counts as 1st st)

Info :

F/O leaving a 10cm end.

Info :

Secure ends with a couple of small sts before weaving through back of nearest hdc sts and cutting flush to finish.

Assembly Instructions

  • Secure ends: after finishing each section, leave a 10cm end, fasten off, then secure ends with a couple of small stitches before weaving through the back of the nearest stitches and cutting flush to finish.
  • Join contrast insert and vinyl rounds by lining the contrast circle in the middle and working the first vinyl row (FP stitches) into the tops of the contrast stitches for a smooth connection.
  • Use a stitch marker to mark the last stitch of each round while working in continuous rounds to keep track of the start and end of each row for accurate stitch counts.
  • Finish the outer edge with the final round (Row 7) to flatten the coaster: work the edge row evenly across the top of the last increase round to remove waviness.
  • If desired, block the finished coaster lightly on a flat surface to help it lay perfectly flat; pin to shape and allow to dry before adding any non-slip backing.

Important Notes

  • 💡Work in continuous rounds unless stated otherwise and mark the last stitch of each round with a stitch marker before proceeding.
  • 💡Always leave a 10cm end when fastening off so you can secure and weave the ends through the back of neighbouring stitches.
  • 💡The coaster may appear slightly wavy after the increase rounds; the final row is designed to flatten the coaster back out.
  • 💡Secure ends with a couple of small stitches and weave through the back of nearest stitches before trimming to get a neat finish.

Create a set of retro Vinyl Record Coasters that bring music-themed style to your coffee table. They are quick to make, easy to customize, and perfect for gifting or party favors. Try bright contrast centres for a pop of colour and make a matching set for friends. 🧶 ☕ 🎶

You ask,

we answer.

FAQs

What size will the finished piece be?

The finished coaster measures approximately 13cm/5.5inches across, with the contrast insert measuring about 6cm/2.5inches.

Can I use different yarn weights for this pattern?

Yes, you can substitute yarn, but the final size will change; use a larger hook for bulkier yarn or a smaller hook for finer yarn and adjust stitch counts if needed.

Do I need prior crochet experience for this pattern?

This pattern is beginner friendly but assumes you know basic stitches like chain, slip stitch, and trebles/half double crochets; front post stitches are used but explained in the abbreviations.

How long does this project typically take to complete?

Most crocheters can complete a single coaster in under 2 hours; making a set of four will take proportionally longer depending on speed and familiarity with the stitches.