🧢 Beautiful ✨ Detailed πŸ’ Adorable

Desert Crochet Cactus Amigurumi Pattern

Desert Crochet Cactus Amigurumi Pattern
4.1β˜… Rating
2-3 Hours Time Needed
2.1K Made This
βœ‚οΈ

Beginner Friendly Level

Perfect for those just starting their crochet journey, with clear instructions and simple techniques

⏱️

Bite-Sized Project

Finishes in 2-4 hoursβ€”perfect for an afternoon of creative relaxation.

🏑

Cozy Accent

A warm touch for your space that transforms ordinary corners into inviting nooks filled with handmade charm.

About This Desert Crochet Cactus Amigurumi Pattern

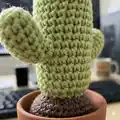
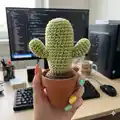
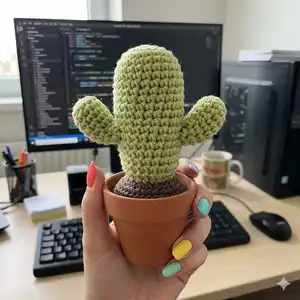
This pattern teaches you how to crochet a small potted cactus with a soil base, a stuffed body, optional arms and tiny flowers. It uses DK weight yarn and a 3.5mm hook for a neat, compact finished size. The design is perfect for gifting or decorating small spaces and terracotta pots.

Desert Crochet Cactus Amigurumi Pattern crochet pattern - detailed view of completed project

Clear round-by-round instructions and helpful notes are included for each element of the cactus. Optional pipe cleaner support and simple floral accents let you customize your cactus.

Why You'll Love This Desert Crochet Cactus Amigurumi Pattern

I absolutely love this pattern because it turns simple stitches into a delightful little scene that fits perfectly on a shelf or windowsill. I enjoy how quickly a finished cactus comes together, making it a great last-minute handmade gift. The pattern is versatile so I can experiment with different shapes and tiny flowers to create a whole collection. I especially love the charming look when the arms are bent slightly with a pipe cleaner inside β€” it gives each cactus character.

Desert Crochet Cactus Amigurumi Pattern step 1 - construction progress Desert Crochet Cactus Amigurumi Pattern step 2 - assembly progress Desert Crochet Cactus Amigurumi Pattern step 3 - details and accessories Desert Crochet Cactus Amigurumi Pattern step 4 - final assembly and finishing

Switch Things Up

I love how easy it is to customize this pattern with different colors; try soft pastels for a sweet look or deep greens for a realistic style.

You can change the size by using thicker yarn and a larger hook for a chunky, bold cactus or thinner yarn for miniature keychain-sized versions.

I often add wire or pipe cleaners inside the arms so I can pose them; this makes each cactus more expressive and fun.

Try adding tiny crocheted flowers in different colors to the top or side for seasonal variations.

You can experiment with stitch texture too: work more back loop rows for pronounced ribs or use front loops to create subtle vertical lines.

For a modern look, place your cactus in painted or decorated pots and add glued pebbles around the soil surface.

I sometimes embroider small dots or lines to mimic cactus spines for a stylized finish without adding prickly texture.

Make a set of varied cacti by changing height, arm position and flower accents to create an attractive display.

If you want a weighted base, add a little pebble or plastic pellets under the stuffing in the soil to help stability.

Don't be afraid to combine yarn types; mixing a cotton blend with DK can change drape and surface sheen for a unique effect.

Common Mistakes & How to Fix Them

βœ— Skipping the magic ring and starting with a loose chain can create a hole in the center; use a tight magic ring or replace with 2 chains and work into the 2nd chain to close the center. βœ— Not counting stitches after increases or decreases leads to incorrect stitch counts and misshapen pieces; count after each round, especially during shaping transitions. βœ— Overstuffing the body or soil makes the pot bulge and distorts the shape; stuff gradually and check fit inside the pot as you go. βœ— Forgetting to leave a long tail to sew pieces together makes assembly difficult; leave long tails for sewing and weaving in ends during finishing.

Desert Crochet Cactus Amigurumi Pattern

Make a charming miniature desert cactus to brighten your home or desk with this friendly crochet pattern. You will craft a snug soil base, a cuddly cactus body, optional arms and little flowers β€” perfect as a gift or a cheerful decor piece. The pattern uses DK weight yarn and simple stitches so you can finish a lovely cactus quickly.

Beginner Friendly 2-3 Hours

Materials Needed for Desert Crochet Cactus Amigurumi Pattern

β€” Main Fabric

  • 01
    Yarn A: Brown DK weight yarn - 20g (soil)
  • 02
    Yarn B: Green DK weight yarn - 20g (cactus body and arms)
  • 03
    Yarn C: Small quantity of pink or white DK weight yarn - small amount (flowers/accents)

β€” Tools Required

  • 01
    US 4 (3.5mm) Crochet Hook
  • 02
    Stitch marker
  • 03
    Sewing needle
  • 04
    Acrylic toy stuffing
  • 05
    Small Terracotta Plant Pot 6cm x 6.8cm x 4cm
  • 06
    Pipe cleaner (optional)
  • 07
    Scissors

Progress Tracker

0% Complete

β€” Soil :

Info :

Using yarn A:

Round 1 :

MR 6

Round 2 :

*Inc (12)

Round 3 :

*1 SC, Inc (18)

Round 4 :

1 SC, *Inc, 2 SC until last stitch, 1 SC (24)

Round 5 :

*3 SC, Inc (30)

Round 6 :

2 SC, *Inc, 4 SC until last 2 stitches, 2 SC (36)

Info :

Note: If your pot is larger continue increasing in this way until the circumference of the soil fits just inside the pot as pictured below.

Info :

At round 7:

Round 7-15 :

SC around (36)

Info :

Note: If your pot is larger continue until soil fits just inside the pot as pictured below. Begin stuffing soil, continue stuffing as you go.

Round 16 :

2 SC, *Dec, 4 SC until last 2 stitches, 2 SC (30)

Round 17 :

*3 SC, Dec (24)

Round 18 :

1 SC *Dec, 2 SC until last stitch, 1 SC (18)

Round 19 :

*1 SC, Dec (12)

Round 20 :

*Dec (6)

Info :

FO.

β€” Body :

Info :

Using Yarn B:

Round 1 :

MR 6 (6)

Round 2 :

*Inc (12)

Round 3 :

*1 SC, Inc (18)

Round 4 :

1 SC, *Inc, 2 SC until last stitch, 1 SC (24)

Round 5-19 :

SC around (24)

Round 20 :

1 SC *Dec, 2 SC until last stitch, 1 SC (18)

Info :

FO 6ave tail for sewing.

Info :

Stuff firmly.

β€” Arms (Make 2) :

Info :

Using Yarn B:

Round 1 :

MR 6 (6)

Round 2 :

*Inc (12)

Round 3-8 :

SC around (12)

Round 9 :

(for this last row stop working in rounds) turn and do not CH, SC 8.

Info :

FO 6ave tail for sewing

Info :

Lightly stuff.

Info :

If you want the arms to have more of a bend, fold a short piece of pipe cleaner so it is the length of the arm. Place inside with the stuffing.

β€” Assembly :

Info :

Sew the body of the cactus to the soil at approximately round three of the soil pattern.

Info :

To sew the arms to the cactus. Place the arms with pins to the body approximately 6 rounds up from the bottom of the body of the cactus and on opposite sides.

Info :

Place the arms facing upwards, so row 9 is facing downwards.

Info :

Sew the arm of the cactus to the body of the cactus. If you have used pipe cleaner, once sewn in place bend the pipe cleaner to create an upwards curve.

Info :

Sew to the soil.

β€” Cactus (Flat seam method) :

Info :

Using yarn B:

Instruction :

CH 24

Row 1 :

In 2nd Loop from the hoop, SC, repeat for remaining 22 stitches, CH1 turn

Row 2 :

In 2nd loop from the hook, SC in the back looks only for all 23 stitches, CH 1 turn

Info :

Repeat row 2 until piece measures 11cm.

Info :

Weave through one side of the cactus, drawstring close as pictured.

Info :

Sew up the side of the cactus by crocheting through the stem of the first row and the back loop of the last row.

Info :

Stuff firmly.

Info :

Weave the other side of the cactus as above and drawstring to close.

Info :

Sew to the soil.

β€” Flowers (Optional) :

Info :

Using Yarn C:

Round 1 :

MR 6

Info :

Change to Yarn D:

Round 2 :

SS to the first stitch, in the same stitch: 2 CH, 2 TR, 1 DC. For the remaining 5 stitches: SS to the next stitch, 2 CH 2 TR, 1 DC. SS to the first stitch.

Info :

FO.

Assembly Instructions

  • Sew the body of the cactus to the soil at approximately round three of the soil pattern so the cactus sits securely in the pot.
  • Position the arms on opposite sides of the body about 6 rounds up from the bottom, pin them in place, then sew securely so row 9 faces downwards.
  • If you used a pipe cleaner inside the arms, bend it after sewing to shape an upwards curve and give the arms a natural pose.
  • Weave the drawstring closed securely when using the flat seam cactus method, then sew the seam through the first row stem and the back loop of the last row for a neat finish.
  • Attach any optional flowers to the top of the cactus by sewing through the flower center and into the stuffed cactus, arranging for an even appearance.

Important Notes

  • πŸ’‘This pattern uses American crochet terminology as noted in the abbreviations section.
  • πŸ’‘If you are not familiar with the Magic Ring technique you can replace this with 2 chains and work into the 2nd chain from the hook as your magic ring.
  • πŸ’‘This pattern uses an invisible decrease throughout by decreasing in the front loops only to create smooth shaping.
  • πŸ’‘Stuff firmly for shape but avoid overstuffing the soil so the pot does not bulge when the cactus is placed inside.

This charming desert cactus pattern helps you create a tiny handmade accent perfect for desks, shelves or gifts. It's quick, satisfying, and fully customizable with optional arms, pipe cleaner wiring and little flowers. Make a whole collection of different shapes and colors to brighten any space. 🧢🌡🧡

You ask,

we answer.

FAQs

What size will the finished piece be?

The finished cactus fits a small terracotta pot (approx 6cm x 6.8cm x 4cm) and stands roughly the height shown in the photos when using DK yarn and a 3.5mm hook.

Can I use different yarn weights for this pattern?

Yes, using a different yarn weight will change the final size; choose an appropriate hook and adjust stuffing and pot size accordingly.

Do I need prior crochet experience for this pattern?

This pattern is beginner friendly and uses basic stitches, but familiarity with the magic ring and working in rounds will help for smoother results.

How long does this project typically take to complete?

Most crafters finish a single cactus in about 2-3 hours, depending on experience and whether you add arms or flowers.