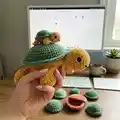
About This Turtle Memory Game Amigurumi Pattern
This pattern teaches you how to crochet a soft plush turtle and a set of matching baby turtles that double as a memory game. You will work mostly in continuous rounds, join legs and head into the shell, and finish with simple surface embroidery and glued-on eyes. The design uses HIMALAYA DOLPHIN BABY velvet yarn for a plush, kid-friendly texture and includes photo references for key steps.
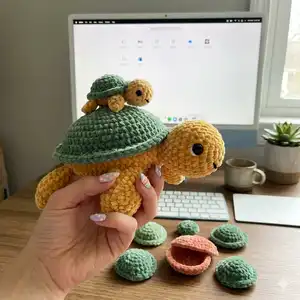
Detailed round-by-round instructions are provided for each piece (legs, head, shell/body, baby turtle). Clear assembly notes help you join parts and finish the toy neatly for play or display.
Why You'll Love This Turtle Memory Game Amigurumi Pattern
I absolutely love this pattern because it combines a cuddly plush texture with playful functionality — it becomes both a toy and a memory game. I enjoy how quickly the baby turtles work up, making it satisfying to see a full matching set appear in a single afternoon. The construction is clever: the legs and head are crocheted separately and joined seamlessly, which makes sewing easier and the finished piece neater. I also love that the pattern uses a popular velvet yarn that gives a luxurious feel while remaining durable for little hands. Sharing this pattern lets me pass on a fun project that both beginners with some experience and more advanced makers can enjoy.
Switch Things Up
I love to customize the baby turtle tummies by choosing bright contrasting colors to make each pair pop in the memory game.
I sometimes use thinner yarn and a smaller hook to create miniature turtles that work as keychains or magnets.
I also enjoy embroidering tiny patterns on the tummies — flowers, stars, or initials — to personalize each piece for gifts.
You can replace glued beads with embroidered eyes for a safer toy for young children; I prefer embroidery when gifting to toddlers.
If you want a chunkier, cuddlier set, use bulky velvet yarn and a larger hook and adjust stuffing to maintain shape and softness.
I often add wire to the legs of display pieces to make them poseable, but skip the wire for toys intended for kids.
Try different shell colors — pastel shades for a nursery-friendly set or jewel tones for a striking decorative piece.
I sometimes make coordinating accessories like a tiny crochet leaf or pocket for the mama turtle to hold the babies for storage.
For a travel-friendly set, make smaller babies and attach a loop to the shell so the set can hang on a stroller or bag.
Finally, experiment with yarn textures — cotton for a cleaner look, or plush for ultra-soft toys — and see which finish you prefer.
Common Mistakes & How to Fix Them
✗ Skipping stitch markers when joining legs and head to the shell can cause uneven spacing; place markers to mark attachment points and count stitches before crocheting them together.
✗ Not stuffing pieces evenly makes the turtle lumpy and misshapen; stuff gradually and model the shape as you go, adding small amounts until you reach the desired firmness.
✗ Crocheting through the wrong loops (front/back loops) will change the shell texture and appearance; follow the instructions carefully when it says 'front loops only' or 'back loops only' and check your work against the photos.
✗ Fastening off too early or hiding ends poorly can cause the toy to come apart during play; leave long tails for sewing, weave ends securely inside, and fasten off with tight knots or backstitching.
✗ Changing color without securing the yarn can create loose joins or gaps; change color cleanly by finishing the last stitch of the old color and pulling the new color through to complete the next stitch, then weave ends inside.