About This Infinity Cube Amigurumi Pattern
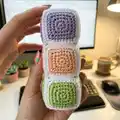
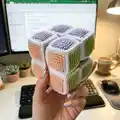
This pattern teaches you how to crochet the Infinity Cube fidget toy by making small colored squares, edging them in white and assembling them into eight cubes that fold together. It uses simple single crochet and half double crochet shaping for compact, tactile squares. The finished toy is approximately 10 cm using the indicated yarn and hook.

The instructions are written in US crochet terms with photos showing key assembly steps and corner stitching. You can easily customize colors to make a playful, unique cube for babies and adults.
Why You'll Love This Infinity Cube Amigurumi Pattern
I absolutely love this pattern because it turns simple crochet squares into a clever, tactile toy that is both calming and playful. I enjoy how few stitches create such a structured and satisfying object, and assembling the cubes feels like a mini construction project. The design invites color play and customization, so I can make sets with different palettes for gifts. It also encourages mindful crafting — the repetitive squares are relaxing to crochet and quick to finish. Sharing this pattern lets me pass on a small handmade joy that both children and adults can enjoy.
Switch Things Up
I love customizing the colors when I make this Infinity Cube, and you can too: try pastel shades for a nursery-friendly toy or bright primary colors for maximum contrast.
To change the size, switch yarn weight and hook size — bulky yarn with a larger hook makes a chunky version, while fingering weight yields tiny cubes for keychains.
I sometimes embroider small faces or add felt shapes to the center faces to create themed sets like animals or planets; simple stitched details add character.
Try using a cotton yarn for a firmer cube that steams nicely, or a soft acrylic for a squishier feel — each material changes the toy's tactile qualities.
If you want posable sections, insert thin craft wire between the joined seam layers when assembling, but be sure to secure and pad the wire ends for safety.
For a different finish, use a colored edging instead of white to make the seams pop or match the edging to the center colors for a subtle look.
I like making travel-sized cubes by swapping to light sport yarn and a smaller hook; they fit easily in a bag and make great calm-down tools for kids.
You can also pair two cubes of contrasting palettes and sew them together for a double-cube design that flips in new ways.
Consider filling with small amounts of plastic pellets inside a fabric pouch to add weight and sensory feedback, but keep pellets away from toys for very young children.
Finally, assemble the cubes loosely at first to test folding, then adjust stuffing and seam tension for the smoothest twisting action — small tweaks make a big difference.
Common Mistakes & How to Fix Them
✗ Skipping the chain at the beginning of rows when counting can throw off stitch totals; always count the chain as a stitch where indicated and recount after each round.
✗ Not placing increases exactly in the corners will make the square lopsided; make all inc3 increases in the corner stitches as instructed to keep the square even.
✗ Overstuffing the cube with holofiber will deform the shape and prevent proper folding; stuff lightly and shape the cube by hand after assembly.
✗ Forgetting to hide and fasten off ends before joining can leave visible tails; fasten off and weave ends inside the square or cube before final assembly.